00198711-01_UM_X-Serie-S_EN.pdf - 第285页
Instruction manual SIPLACE X-Series S 5 Tasks at the placement machine From software version 713.0 Edition 11/2019 5.14 Docking the component trolley in or out 285 5 Fig. 5.14 - 4 X-Series S component trolley - swivel ha…
5 Tasks at the placement machine Instruction manual SIPLACE X-Series S
5.14 Docking the component trolley in or out From software version 713.0 Edition 11/2019
284
5
5
Carefully push the component trolley into the placement machine as far as the stop.
5
Press the button on the respective placement machine location until the trolley is completely
docked in.
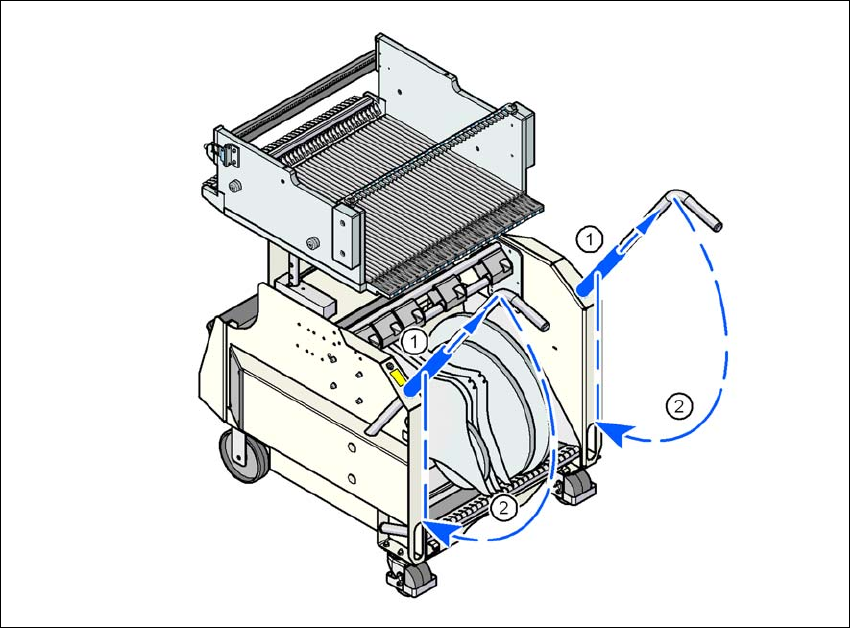
Push the sleeve (item 1 in fig. 5.14 - 4, page 285) on both handles up and swivel the handle
down (item 2 in fig. 5.14 - 4
, page 285).
PLEASE NOTE
Cut tapes flush
If you do not cut tapes off flush at the front end of the X feeder modules, the emptied
tapes will not enter the empty tape duct.
Cut the tapes off flush, before you dock the component trolley into place.
CAUTION
Position of placement head!
Check that the placement head is outside the range of the component trolley.
PLEASE NOTE
Docking only possible if protective cover is closed
Close the protective covers.
Instruction manual SIPLACE X-Series S 5 Tasks at the placement machine
From software version 713.0 Edition 11/2019 5.14 Docking the component trolley in or out
285
5
Fig. 5.14 - 4 X-Series S component trolley - swivel handles down
(1) Push sleeve up
(2) Fold handle down
5 Tasks at the placement machine Instruction manual SIPLACE X-Series S
5.14 Docking the component trolley in or out From software version 713.0 Edition 11/2019
286