00194845-0302_MM_D1_D2_EN.pdf - 第18页
3 Daily maintenance jobs SIPLA CE D1 / D2 02/2010 EN E dition 18 3 Daily maintenance jobs 3
SIPLACE D1 / D2 2 Everything you will need for maintenance
02/2010 EN Edition
17
2
Year
Greasing the Y-axis gantries Grease nipple, grease gun, if
required, ISOFLEX TOPAS NCA
52
Function test of used tape cutter
Check the hood switches and the emergency-stop buttons
Check the protective covers New damping cylinder if neces-
sary
Clean the gas spring, if required Lint-free cloths
Clean the protective covers Lint-free cloths
Pick&Place module
Clean /check additional volume filter Compressed air
Clean the scale Ethyl alcohol, lint-free cloth
Interval Location Equipment/spare parts Done (date)
Sleeves / valve plungers
Sleeves
Check the film
Grease the anti-rotation element Fin Grease spray grease,
Microtips cottonwool buds
Check the switching ring
Clean the longitudinal vacuum hole Metal drill bit, 1.4 mm
Clean the transverse vacuum hole Metal drill bit, 1.1 mm
Check the suction plate New suction plate, if required
Clean the suction plate Lint-free cloth
Clean the edge of the sleeve Ethyl alcohol, lint-free cloth
Clean the incremental disk Ethyl alcohol, lint-free cloth
Clean the sleeve shaft Ethyl alcohol, lint-free cloth
Clean the circumference of the ball catch Ethyl alcohol,
lint-free cottonwool buds
Valve plunger
Wipe the valve plunger with a dry cloth Lint-free cloth
Check the sealing lips, the spring O-ring and the sleeve
3 Daily maintenance jobs SIPLACE D1 / D2
02/2010 EN Edition
18
3 Daily maintenance jobs
3

SIPLACE D1 / D2 3 Daily maintenance jobs
02/2010 EN Edition
19
3
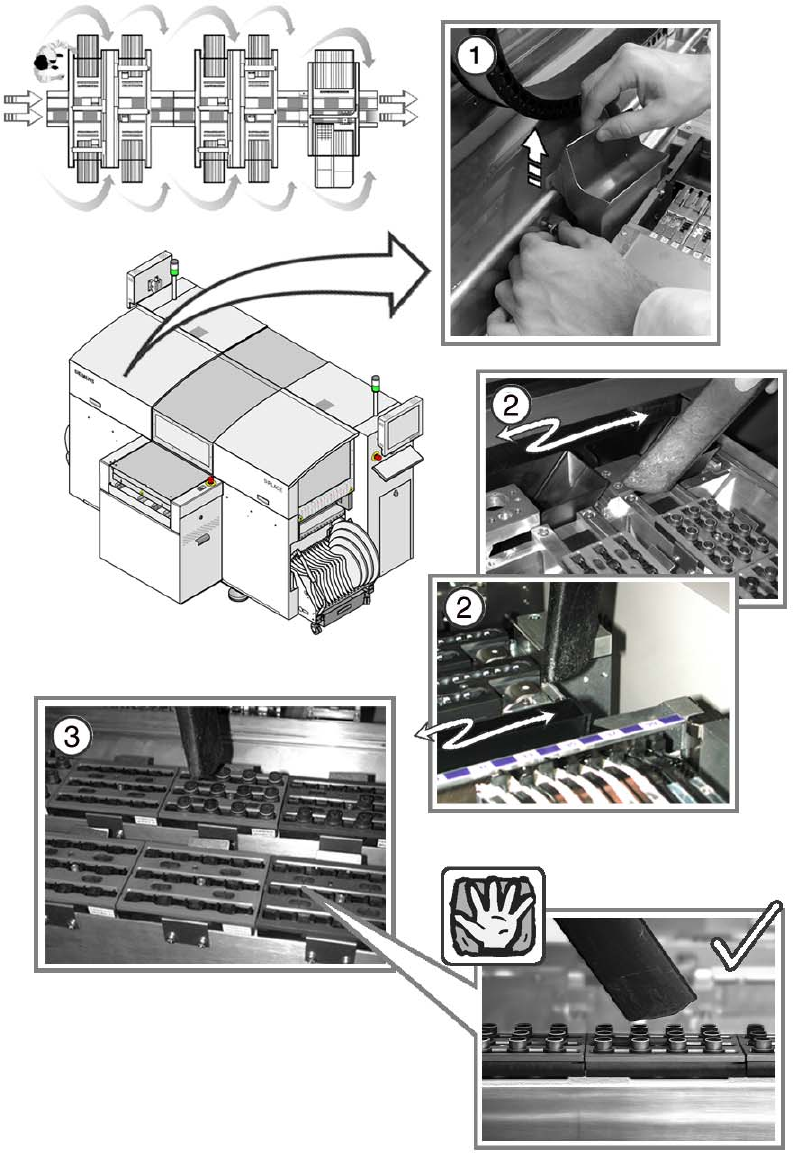
You will need a waste bin, a collecting container and a vacuum cleaner for the daily cleaning jobs.3
3
Carry out the cleaning jobs in the order shown in the graphic to minimize down times. 3
3
: Press the Stop button at the first station if the gantry is over the placement position.
This will stop it outside your working area.
3
: Open the protective cover.
3
Empty the reject bin 3
a Remove the reject bin and empty it into the collecting container.
3
We recommend that you empty the reject bin every day, since this will show whether a certain
component is being rejected frequently. Use the track error menu, OIS or MaDaMaS (pick-up re-
liability) to determine the cause of the error. 3
3
s Clean around the reject bin with the vacuum cleaner and replace the bin.
3
The inside of the placement machine should be free of loose components since these can cause
faults if they get caught between moving parts. 3
3
3
Vacuum the nozzle changer 3
Keep the vacuum cleaner at least 1 cm away from the nozzles so as not to damage them. 3
3
3
d Clean the nozzle changers of the Collect&Place head with a vacuum cleaner.
3
The nozzle changers should be free of loose components since these could prevent nozzles being
picked up and set down correctly. 3
3