00194845-0302_MM_D1_D2_EN.pdf - 第74页
8 Annual maintenance work SIPLA CE D1 / D2 02/2010 EN E dition 74 8.1 Mainten ance of the Pick& Place module (SIPLACE D1 only) 8

SIPLACE D1 / D2 8 Annual maintenance work
02/2010 EN Edition
73
Check the protective covers 8
a Open the protective covers to a height of 100 mm (+/-5mm) measured between the machine
frame and the edge of the protective cover. Replace the damping cylinder if the damping cyl-
inder covers cannot be held open reliably at this height.
s Use a lint-free cloth to remove any excess oil from the gas spring.
8
: Close the protective covers.
8
Clean the protective covers 8
8
The choice of cleaning agent for the protective covers must be made with particular care so as not
to damage the ESD coating on the protective covers. 8
8
: Check the protective covers for dirt.
: Clean them with a dry lint-free cloth if necessary.
If it is very dirty, use a lint-free cloth and a small amount of a neutral or weak alkaline cleaning
agent.
8
This must NOT be 8
– acidic or strong alkaline,
– contain ketones, esters, aromatics, halogenated hydrocarbons, etheric oils or similar.
8
Apply as little pressure as possible when cleaning the protective covers to avoid damaging the
ESD coating. 8
8
: After cleaning, wipe over with fresh water.
8
8
8
8 Annual maintenance work SIPLACE D1 / D2
02/2010 EN Edition
74
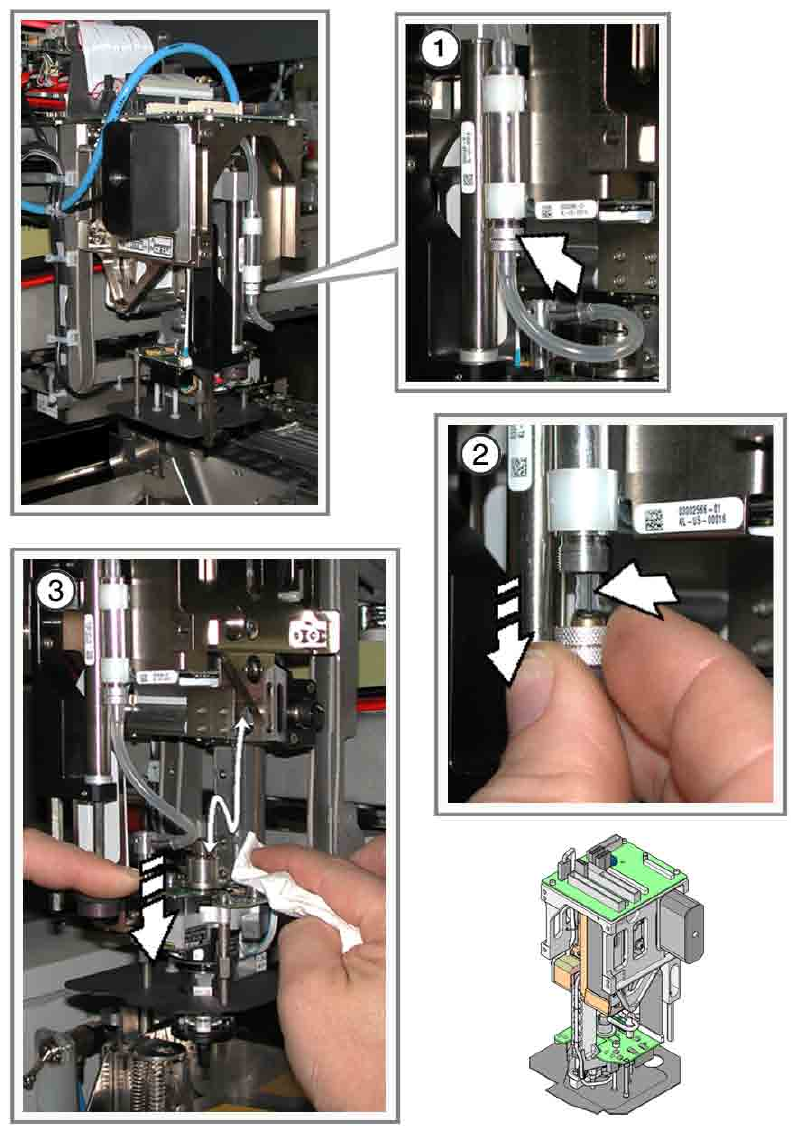
8.1 Maintenance of the Pick&Place module (SIPLACE
D1 only)
8

SIPLACE D1 / D2 8 Annual maintenance work
02/2010 EN Edition
75
8
For maintenance of the P&P module you will need: 8
– Lint-free cloths
– Ethyl alcohol
– Compressed air
– ESD wristband.
8
: End the placement sequence and set down the nozzles of the P&P module.
: Dock the component trolley out of the placement machine or move the P&P module to a point
at which the Z axis can be extended down safely.
: Switch the placement machine off at the main switch.
8
The easiest position at which to carry out the conversion is location 2. 8
8
8
8
Wear an ESD armband for the whole time you are working on the placement head and servos. 8
8
Clean /check additional volume filter 8
8
Keep your hand underneath the cap as you remove it as the filter can drop out. 8
8
a Loosen the union nut and detach the compressed air hose.
The additional volume filter will drop out.
: Clean the filter by carefully blowing it out with compressed air.
: Check the filter for damage.
Replace it if it is damaged.
: Insert the filter once more and tighten the union nut.
: Make sure that the compressed air hose can move freely when the Z axis moves, that it is not
jammed at any point and does not obstruct the Z axis.
Clean the scale 8
: Carefully press the Z axis down in the vicinity of the return cylinder.
d Carefully clean the scale using a lint-free cloth moistened with ethyl alcohol.
8
Only use a little ethyl alcohol and do not press too hard, otherwise the glued-on scale may become
detached. 8