00194845-0302_MM_D1_D2_EN.pdf - 第70页
8 Annual maintenance work SIPLA CE D1 / D2 02/2010 EN E dition 70 8

SIPLACE D1 / D2 8 Annual maintenance work
02/2010 EN Edition
69
8
All the visible grease nipples on the Y axis must be greased. 8
Please apply the specified amount of grease. Too much or too little grease can damage the bear-
ing. 8
8
8
Greasing of the SIPLACE machines is to be carried out machine specific: for SIPLACE D1 / D2
and D4 machines use ISOFLEX TOPAS NCA 52, for the SIPLACE D3 use Klüberplex
BEM 3
4-132. 8
8
a Fil
l the grease gun (Y axis) with ISOFLEX TOPAS NCA 52 and place it straight on the conical
grease nipple.
: Apply one squeeze of the grease gun (approx. 0.4 cm
3
per squeeze).
8
If the grease emerges from the grease nipple, then either the bearing is already full or the grease
nipple is not sealing correctly. In the latter case, use a new grease nipple. 8
8
: Move the gantry approx. 30 cm to distribute the grease.
: Repeat the pressing and moving process two more times. This ensures that the right amount
of grease is applied.
: Use a cloth to remove any excess grease from on and around the grease nipple.
: Grease the other grease nipples on the Y axis in the same way (two grease nipples per gantry).
8
8
The X axis is not greased on the D1 / D2. 8
8
8
8 Annual maintenance work SIPLACE D1 / D2
02/2010 EN Edition
70
8
SIPLACE D1 / D2 8 Annual maintenance work
02/2010 EN Edition
71
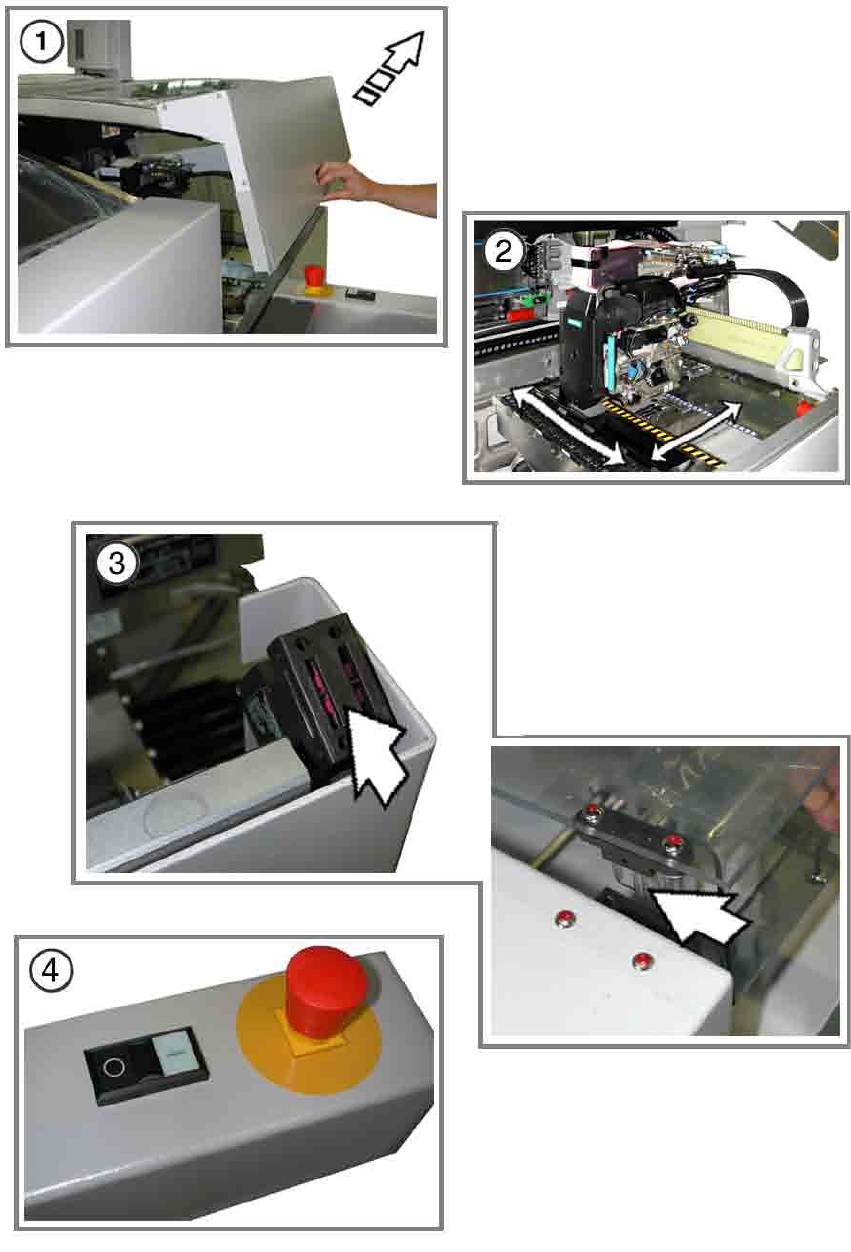
Check the hood switch and the emergency-stop button 8
: Make sure that the placement system is switched on and the operating system has started up.
: Make sure that "Control on" is set on the placement machine.
You can tell this from the main fault indicator.
Press the Start button.
8
a Open a protective cover. The other protective cover(s) must be closed.
The control must drop out immediately. You will hear this clearly by the venting compressed air.
s Move the gantry in the X and Y directions.
It must move effortlessly and without resistance.
: If the control does not switch off or the gantry does not move effortlessly, then the hood switch
may be defective. Replace it with a new switch and check the functions again.
: Test all the protective covers individually and move the associated gantry.
8
d Check the hood switch for damage, particularly the plastic web in the middle.
If there is any damage, replace the hood switch with a new one.
: Check that the actuator moves cleanly and effortlessly into the switching unit.
If this is not the case, align the actuator and switching unit with respect to one another.
8
f Check the emergency-stop button for damage.
: Check that the control switches off immediately when you actuate the button.
Replace the button with a new one if this is not the case.
8
8
8