00193370-0202.pdf - 第57页
SIPLACE Axis T est er Handbuch für das Achsprüfgerät / Axis T est er Manual Ausgabe 08/2003 Edition 7 Commissioning the axis tester 57 7 Commissioning the axis tes ter 7.1 Connecting the axis tester W A RNING 7 Always pr…

Handbuch für das Achsprüfgerät / Axis Tester Manual SIPLACE Axis Tester
6 Structure of the user interface Ausgabe 08/2003 Edition
56
6.4 “System control” menu
Fig. 6 - 4 “System control” menu
The “System control” menu has four submenus:
Settings This menu is used to save your individual settings or load settings that you
have already stored.
User control Allows you to select the user interface language. There are two versions –
German and English.
Also used to select the user level. There are two options: “Beginner” and
“Expert”. “Beginner” is set by default.
Display This menu is used to set the appearance of the user interface and screen
saver.
Ports Used to define the parameters for the CAN bus and serial port.
EEPROM
DisplayUser controlSettings
Save ...
Load ...
Default
Beginner
Language
German
English
User level Set contrast
Darker
Brighter
Screen saver
Stars
Change type
Display off
Settings
Enable
Reset
Disable
Delay
Max. 2 h
CAN port
CAN IDS
Serial port
Change ASC port
Sending CT ID
Sending events ID
Receiving ID
SAT-A36X
SAT-PC
A36X-PC
Ports
SIPLACE Axis Tester Handbuch für das Achsprüfgerät / Axis Tester Manual
Ausgabe 08/2003 Edition 7 Commissioning the axis tester
57
7 Commissioning the axis tester
7.1 Connecting the axis tester
WARNING 7
Always press the emergency stop button before connecting the axis tester to or disconnecting it
from the axis controller. 7
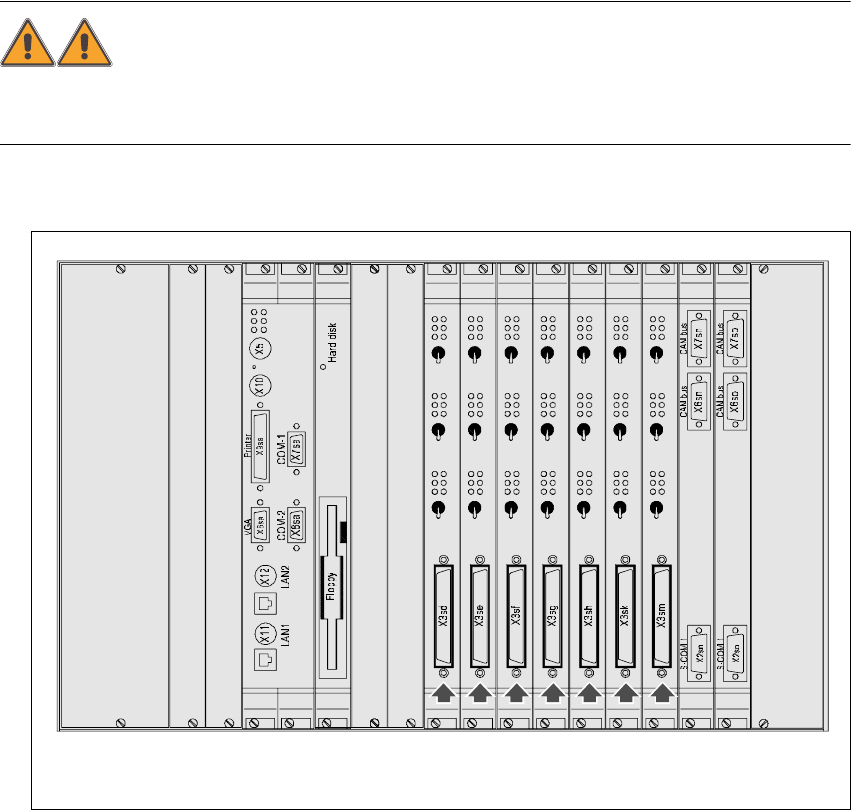
Æ Open the doors to the control unit.
Fig. 7 - 1 Section of the control unit in the HS-50 placement machine
7.1.1 Connecting the axis tester to HS /S2x F4/F5 machines
Æ Connect the 37-pin plug on the ribbon cable to the axis controller.
Æ Connect the 37-pin socket on the ribbon cable to the axis tester.
The axis tester boots up. If all the self tests are successful, the start-up screen appears.
Æ Carry out your diagnostics and settings as described in the setting instructions.
Servo
Servo
Servo
Servo
Servo
Servo
Servo
Servo
Servo
Servo
Servo
Servo
Servo
Servo
Servo
Servo
Servo
Servo
Servo
Servo
Servo
Keyboard
Mouse
Off
Off
Off Off
Off
Off
Off
Off
Off Off
Off
Off Off
Off
Off
Off
Off
Off Off
Off
Off
Axis controllers in the HS-50 control unit with 37-pin sockets

Handbuch für das Achsprüfgerät / Axis Tester Manual SIPLACE Axis Tester
7 Commissioning the axis tester Ausgabe 08/2003 Edition
58
7.1.2 Connecting the axis tester to S-15 /F3 /G placement machines and wafflepack
changers
Æ Connect the adapter to the 37-pin plug on the ribbon cable.
Æ Connect the 25-pin plug on the adapter to the socket on the axis controller.
Æ Connect the 37-pin socket on the ribbon cable to the axis tester.
The axis tester boots up. If all the self tests are successful, the start-up screen appears.
Æ Carry out your diagnostics and settings as described in the setting instructions.
7.2 Disconnecting the axis tester from the placement machine
Once you have completed your measurements on an axis controller, remember to save your
changes before you disconnect the ribbon cable. The procedure is as follows:
Æ Select the “Shutdown” option from the main menu.
Æ Select the “Shutdown computer: Yes” menu option.
When you click on “Yes”, all your settings are saved and the axis tester is shut down.
WARNING 7
Press the emergency stop button. 7
Æ You can now unplug the axis tester from the ribbon cable of the axis controller.