00191369-02.pdf - 第159页
User Manual HS-50 5 Single Functions Software Version S R.501.xx 12/99 Issue US 5.2 Single functions, Gantry 159 t I I t Reject circ uit - For ced air on/ off 5 When t his funct ion is acti vated, the for ced air at the …

5 Single Functions User Manual HS-50
5.2 Single functions, Gantry Software Version SR.501.xx 12/99 Issue US
158
t IIt
5.2.1.1 Functions
In the "Revolver head functions" screen, the functions described below are available to help you
test the revolver head. 5
– Vacuum test in the pick-up position
– Vacuum test in the reject position
– Vacuum test in the holding circuit
– Revolver head functions
The functions are triggered by clicking the appropriate button. 5
Pick-up circuit - Forced air on/off 5
When this function is activated, the forced air to the nozzle in the pick-up position is either
switched on or off.
Å In the "Pick-up circuit" area, click the Forced air on/off button.
This switches the forced air on or off.
Pick-up circuit - Vacuum on/off 5
When this function is activated, the vacuum at the nozzle in the pick-up position is either
switched on or off.
Å In the "Pick-up circuit" area, click the Vacuum on/off button.
This switches the vacuum on or off.
Pick-up circuit - Measure forced air 5
When this function is activated, forced air at the pick-up position is measured.
Å Switch on the forced air (using the "Forced air on/off" function in the "Pick-up circuit" area).
Å Click the Measure forced air button in the "Pick-up circuit" area.
The forced air is measured and the result displayed in [mbar] above the button.
NOTE
The value displayed after the measurement is taken does not correspond to the actual values at
the nozzle.
When calibrating the machine, you must use a manometer to establish the values (see Adjustment
instructions or the Service Manual). 5
Pick-up circuit - Measure vacuum 5
When this function is activated, vacuum at the pick-up position is measured.
Å Switch on the vacuum (using the "Vacuum on/off" function in the "Pick-up circuit" area).
Å Click the Measure Vacuum button in the "Pick-up circuit" area.
The vacuum is measured and the result displayed in [mbar] above the button.

User Manual HS-50 5 Single Functions
Software Version SR.501.xx 12/99 Issue US 5.2 Single functions, Gantry
159
t IIt
Reject circuit - Forced air on/off 5
When this function is activated, the forced air at the nozzle in the reject position is switched on or
off.
Å Click the Forced air on/off button in the "Reject circuit" area.
The forced air is switched on or off.
Reject circuit - Vacuum on/off 5
When this function is activated, the vacuum to the nozzle in the reject position is switched on or
off.
Å Click the Vacuum on/off button in the "Reject circuit" area.
The vacuum is switched on or off.
Head reference run 5
This function is used to start a head reference run of all the head axes, or in other words, all head
axes travel to their origin. The gantry axes travel over the reject container and discard compo-
nents in a defined manner.
Å Click the Head reference run button.
The head axes execute a head reference run.
Holding circuit - Measure vacuum 5
When this function is activated, the vacuum at the nozzle in the holding circuit is measured.
Å Click the Measure vacuum button in the "Holding circuit" area.
The vacuum is measured and the result displayed in [mbar] above the button.
Star in position 1 5
This function is used to bring the revolver head into a defined starting position.
Å Click the Star in position 1 button.
The revolver head is moved round so that segment 1 is in the pick up and placement position
(lowest position). In addition the revolver head and the Z-axis perform a reference run.
RV head indexing 5
This function is used to move the revolver head. Each time you click the button the revolver head
is moved round by one segment.
Å Click the RV head indexing button.
The revolver head is moved by one segment.
The current positions of the segments is displayed in the graphic.
5 Single Functions User Manual HS-50
5.2 Single functions, Gantry Software Version SR.501.xx 12/99 Issue US
160
t IIt
Actuate DP-axis 5
When this function is activated, the nozzle in the DP1- axis is rotated by 90
°
.
Å Click the Actuate DP-axis button.
The nozzle in the DP1 axis is rotated by 90° once.
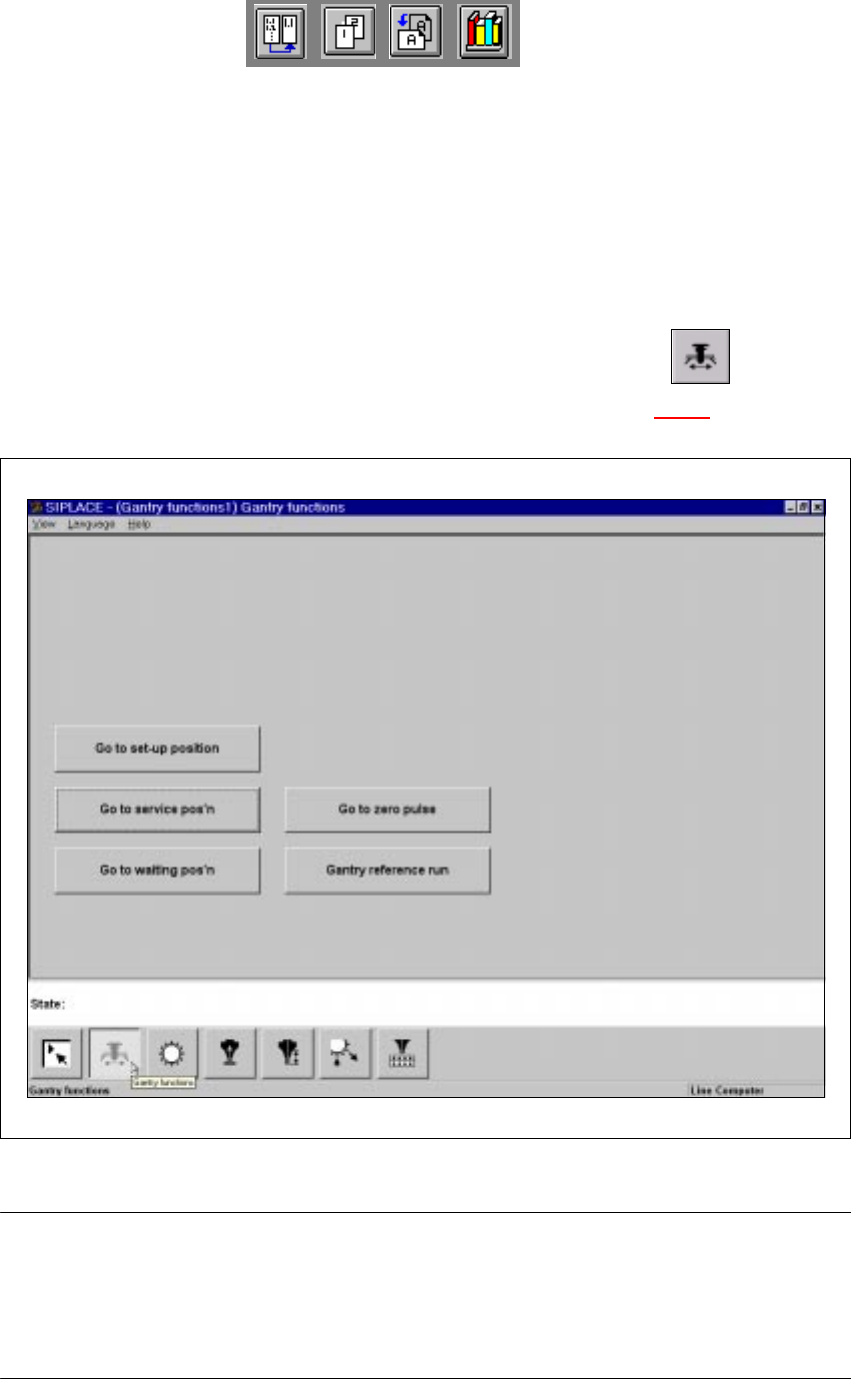
5.2.2 "Gantry functions" screen
Å In the current screen for the single functions for Gantry x, click the symbol .
The user interface is switched to the "Gantry functions" screen (see Fig. 5.2 - 2
).
5
Fig. 5.2 - 2 "Gantry functions" screen
NOTE
All travel functions of the main axes (X and Y) must be started using the start button.
A message appears in the status field on the screen which asks you to "Please press the start
button".
If the machine covers are not closed, the message "Close cover" will appear in the status field. 5