NPM-D3维修手册.pdf - 第208页
NPM-D3 Service Manual 5.6 2D Inspection Head Page 5-80 EJM6D3-MB-05SM-00( 編集中 ).DOC 5.6.6 Connecting the Camera Cable / LAN Relay Connector / LAN Cable カメラケーブル / LAN 中継コネクタ / LAN ケーブル取り付け 照相机电缆 / LAN 中继连接器 / LAN 电缆的安装 Co…
NPM-D3
Service Manual
5.6 2D Inspection Head
EJM6D3-MB-05SM-00(
編集中
).DOC Page 5-79
2. The 2D inspection head unit is located by the positioning pins (2-5). Pull the unit toward you and tighten
the mounting bolts (3-M6x20). Make sure that the mounting surfaces are flush against each other. (Fig. 3)
2D 検査ヘッドユニットは規正ピン(25)で位置決めされます。2D 検査ヘッドユニットを手前に引き、取り付けボルト (3M620) を締め付け、取り付け面が密着していること
を確認します。(Fig. 3)
2D 检查头装置是由定位销 (25) 来定位的。将 2D 检查头装置向跟前拉,用安装螺栓 (3M620) 进行紧固,并确认安装面紧密结合了。(Fig. 4)
Tighten the mounting bolts at the specified torque using a torque wrench.
2D 検査ヘッドユニットの取り付けボルトはトルクレンチを使用して規定のトルクで締め付けます。
对 2D 检查头装置的安装螺栓要用扭矩扳手按规定的扭矩来拧紧。
Bolt tightening torque: 6
0.5 N
ヘッドユニット取り付けボルト締め付けトルク
头装置安装螺栓拧紧扭矩
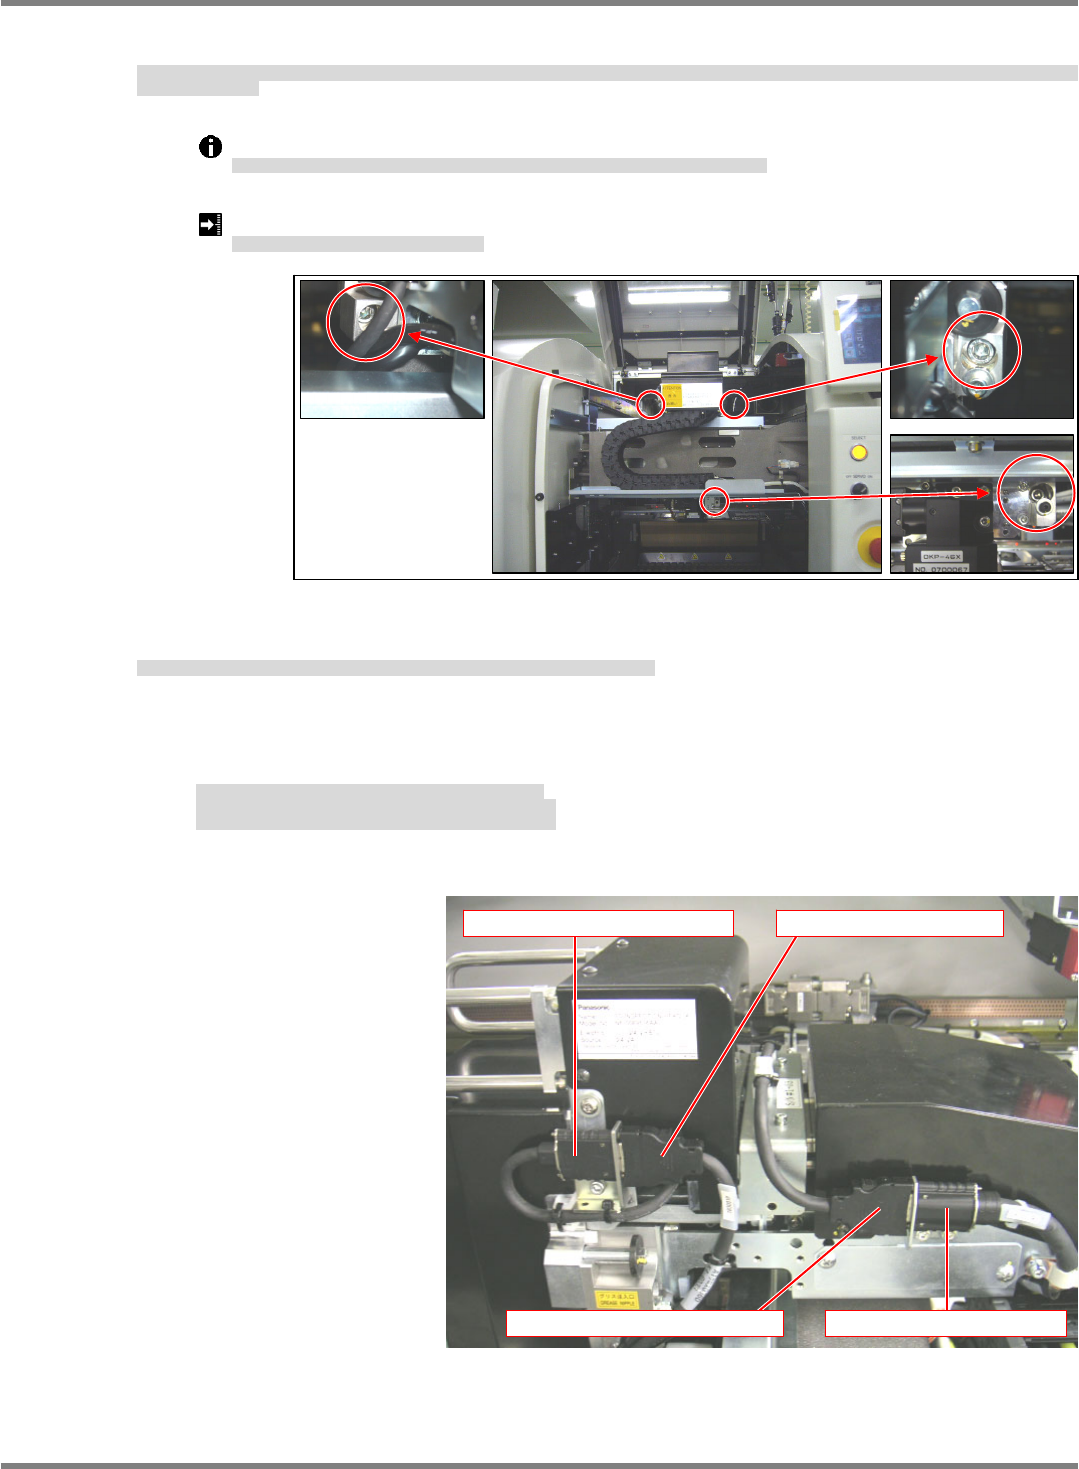
3. Connect the cables (camera link and head camera) to the 2D inspection head.
2D 検査ヘッドユニットとの接続ケーブル (カメラリンク・ヘッドカメラケーブル) を接続する。
对连接到 2D 检查头装置的连接电缆 (照相机连接线・头照相机电缆) 进行连接。
- Disconnect the head camera cable from the cableveyor connector.
- Connect the head camera cable to the head camera connector.
- Connect the camera link output cable to the cableveyor connector.
・ケーブルベアコネクタからヘッドカメラケーブルを取り外す。
・ヘッドカメラ接続コネクタにヘッドカメラケーブルを接続する。
・ケーブルベアコネクタにカメラリンク出力ケーブルを接続する。
・从电缆链套连接器上拆下头照相机电缆。
・将头照相机电缆连接到头照相机连接器上。
・将照相机连接输出电缆连接到电缆链套连接器上。
Fig. 3
Head camera connector Head camera cable
Camera link output cable Cableveyor connector
NPM-D3
Service Manual
5.6 2D Inspection Head
Page 5-80 EJM6D3-MB-05SM-00(
編集中
).DOC
5.6.6 Connecting the Camera Cable / LAN Relay Connector / LAN
Cable
カメラケーブル / LAN 中継コネクタ / LAN ケーブル取り付け
照相机电缆 / LAN 中继连接器 / LAN 电缆的安装
Connect the camera cable, LAN relay connector and LAN cable to the NPM.
カメラケーブル・LAN 中継コネクタ・LAN ケーブルを NPM 本体に取り付けます。
将照相机电缆、LAN 中继连接器、LAN 电缆装到 NPM 主体上。
The works described in this section are not required if these parts have already been
connected.
既に取り付けられている場合は、本作業は必要ありません。
如果已经装好了的话,就不需要本作业了。
34.
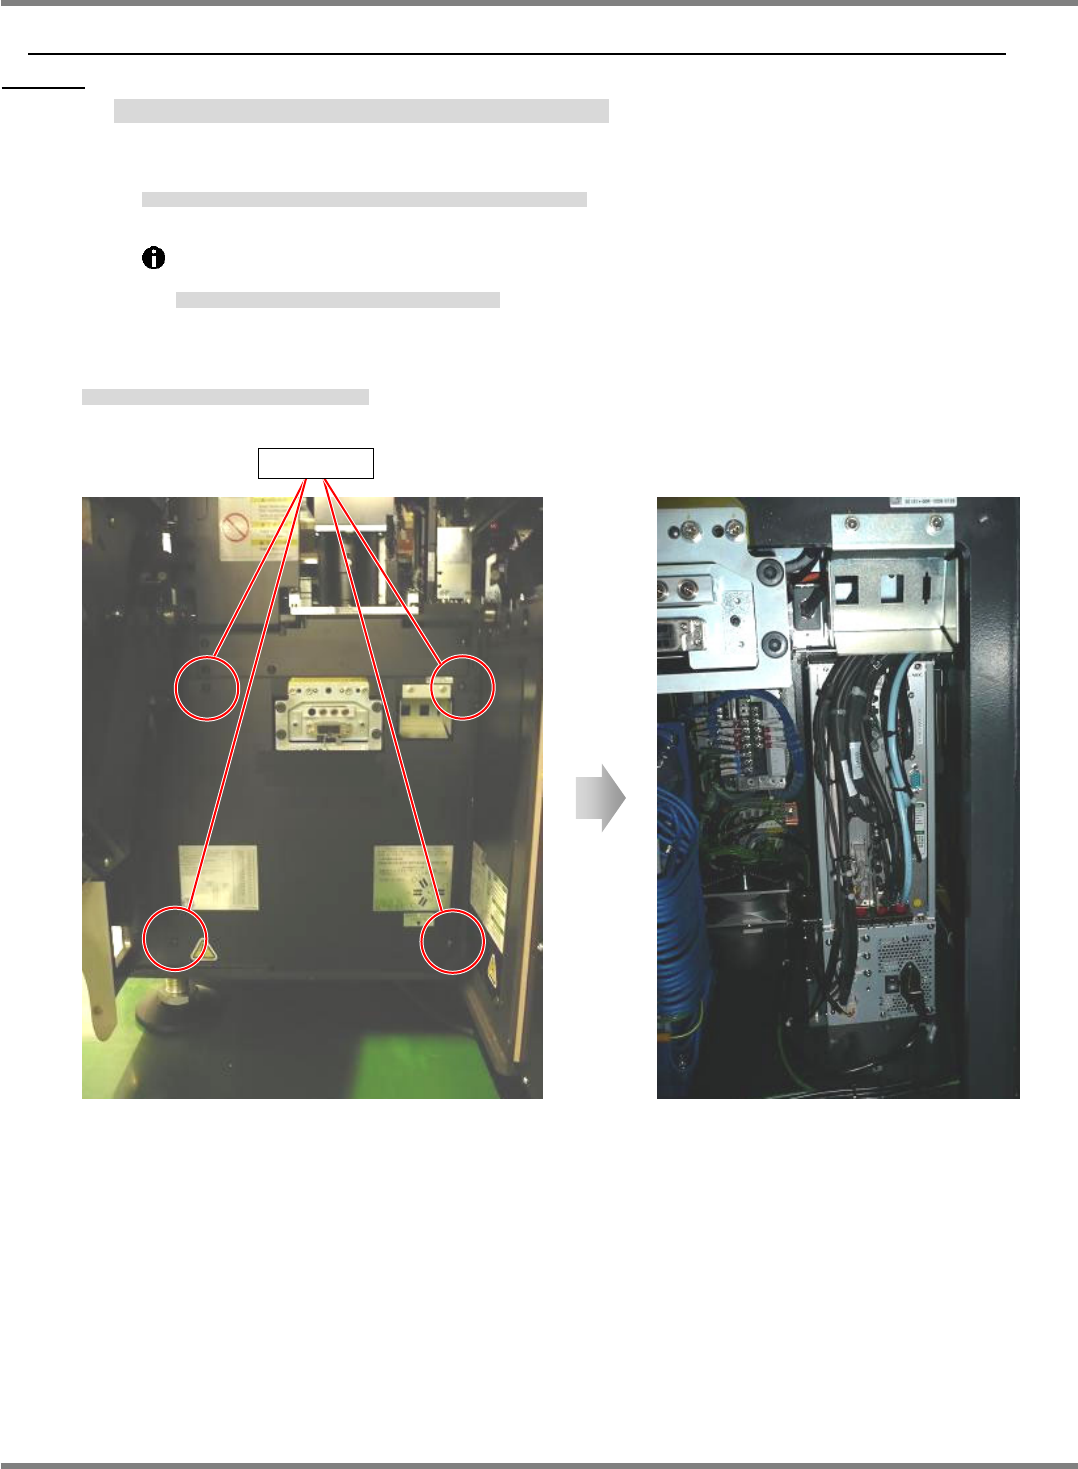
1. Loosen and remove the screws of the cover of the NPM. (4 positions)
NPM 本体のカバーのネジを緩めて抜きます。(4 か所)
松开 NPM 主体盖的螺丝并拔下。(4 处)
Screw
NPM-D3
Service Manual
5.6 2D Inspection Head
EJM6D3-MB-05SM-00(
編集中
).DOC Page 5-81
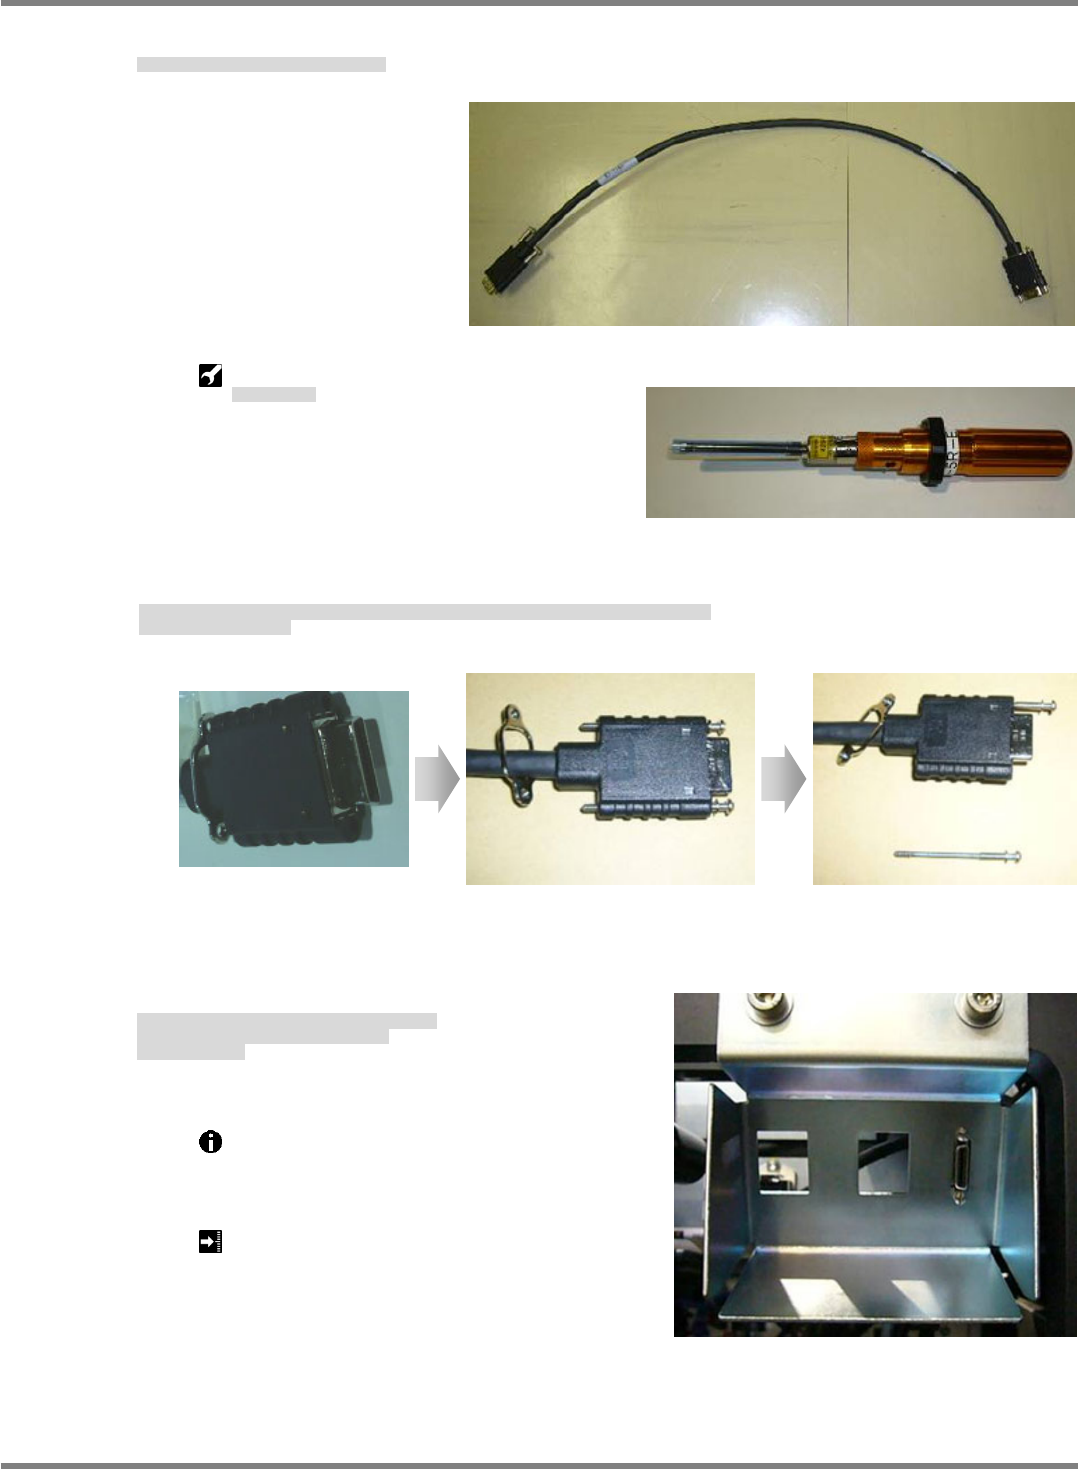
2. Connect the camera cable to the NPM.
カメラケーブルを NPM 本体に取り付けます。
将照相机电缆装到 NPM 主体上。
Torque screwdriver:
トルクドライバ
扭矩螺丝刀
3. Fit the bolts (x 2) included with the camera cable once as shown in Fig. 1, and remove either of them as
shown in Fig. 2. (This is for improving workability in the subsequent process.)
カメラケーブルの付属ボルト(2 個)を Fig.1 のように一旦取り付けた後、Fig.2 のように一方のみ取り外す。
(後工程の作業性向上のため)
将照相机电缆的附属螺栓(2 个)如 Fig.1 所示先暂时装上后,再如 Fig.2 所示仅仅拆下一侧的螺丝。
(这是为了提高后续工序的作业效率)
4. After lightly securing the bolt at the upper side, fit the bolt at the lower side.
Tighten both bolts using a torque screwdriver.
Provide markings in blue.
上側を仮固定後に後、下側に付属ボルトを取り付ける。
トルクドライバで両側のボルトを締め付ける。
青マーキングする。
对上侧进行暂时固定后,对下侧装上附属的螺栓。
用扭矩螺丝刀将两侧的螺栓拧紧。
做上蓝色标记。
Use a torque screwdriver to tighten the bolts to
the specified torque.
ボルトはトルクドライバを使用して規定のトルクで締め付けます。
请用扭矩螺丝刀按照规定的扭矩拧紧螺栓。
Tightening torque: 19 cN
m
締め付けトルク
拧紧扭矩
Fig. 1 Fig. 2