SIPLACE D4-D4i 工程师手册_EN.pdf - 第166页
Service Work C&P12 Placement Head 4.5.12 Replacing the Z Axis Toothed Belt [0 0334936-xx] 166 Service Manual SIPLACE D4/D4i Installation ► Loosen the two M2.5x12 hexagon socket-head screws (3) on the motor clamp fitt…

Service Work
4.5.12 Replacing the Z Axis Toothed Belt [00334936-xx] C&P12 Placement Head
Service Manual SIPLACE D4/D4i 165
See also
6.3.6 Setting the Z axis Belt Tension [ ➙ 211]
4.5.12
4.5.12 Replacing the Z Axis Toothed Belt [00334936-xx]
Replacing the Z Axis Toothed Belt [00334936-xx]
Removal
► Tighten the two M3x14 hexagon socket-head screws
(6) to fix the motor clamp (5).
► Fix the motor clamp upper part (4) with the two
M2.5x12 hexagon socket-head screws (3).
► Now tighten the hexagon socket-head screws on the
Z axis drive unit and the motor clamp.
► Check the Z axis top stop with the setting gauge.
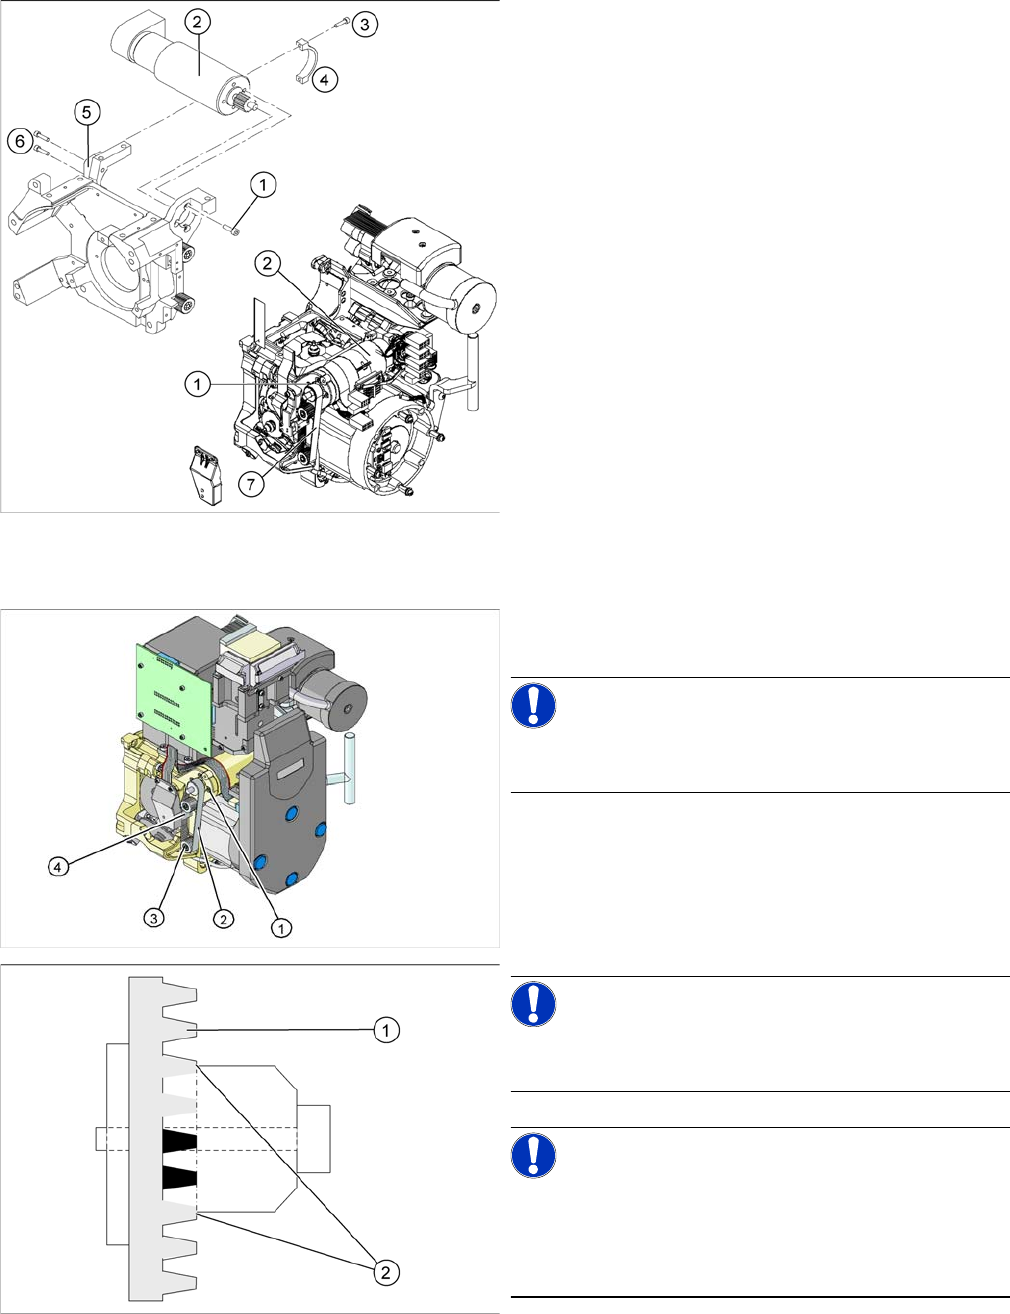
1. Z axis drive
2. Z axis toothed belt
3. 2 x deflection wheel / DLM3
4. Tension jack (Z axis clamping device)
► Switch off the machine and secure it to prevent unau-
thorized reactivation.
► Loosen the two screws fastening the tension jack (3).
Service Work
C&P12 Placement Head 4.5.12 Replacing the Z Axis Toothed Belt [00334936-xx]
166 Service Manual SIPLACE D4/D4i
Installation
► Loosen the two M2.5x12 hexagon socket-head
screws (3) on the motor clamp fitting (4).
► Loosen the two M3x14 hexagon socket-head screws
(6) on the motor clamp fitting (5).
► Slightly loosen the four M3x5 hexagon socket-head
screws (1).
► Remove the toothed belt (7).
► Place the new toothed belt over the pinion of the Z
axis drive and the deflection wheels.
NOTICE!
Make sure that the teeth of the toothed belts engage in
the teeth of the pinion and deflection pulleys.
► Fit the tension jack (4) with the two fastening screws,
to the toothed belt.
NOTICE!
Make sure that both ends (2) of the tension jack lie on the
teeth of the toothed belt (1) .
NOTICE!
New tension jack
A new tension jack (fitted from 10/2007) has a profile
which engages with the toothed belt and therefore en-
sures a more reliable clamping.
Service Work
4.5.13 Replacing the "Z Axis Down" Sensor [00321524-xx] C&P12 Placement Head
Service Manual SIPLACE D4/D4i 167
See also
6.3.6 Setting the Z axis Belt Tension [ ➙ 211]
4.5.13
4.5.13 Replacing the "Z Axis Down" Sensor [00321524-xx]
Replacing the "Z Axis Down" Sensor [00321524-xx]
Removal
► Loosely screw in the four M3x5 hexagon socket-head
screws (1) on the Z axis drive unit (2).
► Tension the Z axis toothed belt (7) by pushing the Z
axis drive unit upwards.
► Check the toothed belt tension with the belt tension
measuring device.
► Tighten the two M3x14 hexagon socket-head screws
(6) to fix the motor clamp (5).
► Fix the motor clamp 2 (4) with the two M2.5x12 hex-
agon socket-head screws (3).
► Now tighten the hexagon socket-head screws on the
Z axis drive unit and the motor clamp.
► Check the Z axis top stop with the setting gauge.
Frequency in Hz Before continuous opera-
tion run
After continuous operation
run
Toothed belt T2 / DLM3 on the Z axis 280 +/- 10 280 +/- 10
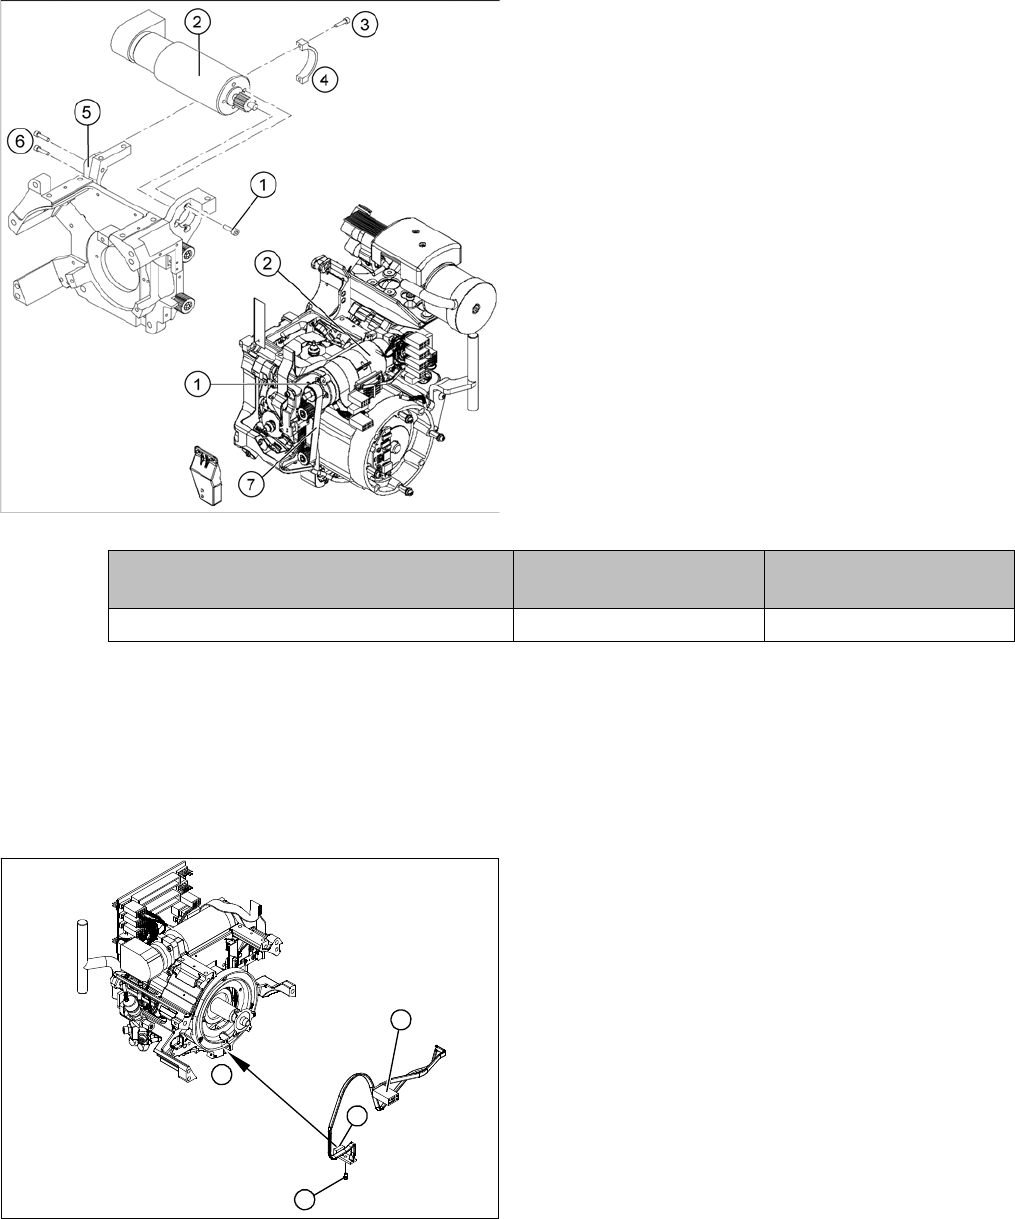
1. "Z axis down" sensor
2. Fixtures for sensor
3. Plug for intermediate distributor
► Dismantle the front part of the C&P head.
► Dismantle the star.
► Remove the plug from the slot on the intermediate
distributor.
► Push the Z axis down.
► Loosen the screws holding the sensor (2).
► Remove the cable clamps on the driver arm and star
motor.
► Carefully pull the sensor and cable out of the front
part of the C&P head and remove the plug (3) from
the socket on the intermediate distributor.
1
1
3
2