00198505-01_SM_SIPLACE_SmartFeeder_EN.pdf - 第171页
8 Repairs to SmartFeeder 2x8 mm X 8.10 Knurled Tamp Wheel Service Manual SIPLACE SmartFeeder 4 - 104 mm X 11/2017 171 8.9.2.2 Fitting the tamp wheel and bearing shaft ► Insert the tamp wheel into the rocker. (1) ► Inser…

8 Repairs to SmartFeeder 2x8 mm X
8.9 Rocker
170 Service Manual SIPLACE SmartFeeder 4 - 104 mm X 11/2017
8.9.1.2 Fitting the rocker assembly
► Refit the left rocker.
► Insert the right-hand rocker again.
► Reinsert the pressure springs.
► Fit the right side cover (see 8.3.4 "Fitting the Right Side Cover" [}137]).
8.9.2 Spare parts on the rocker
Required spare part
Fig.56: Rocker, tamp wheel and bearing shaft
Feeder module Item no. Designation
SmartFeeder 2x8mmX 03041735-xx Rocker with holder/foil disposal X8
03041017-xx Tamp wheel /rocker X8
03042321-xx Bearing shaft for rocker /X8
Required tools
●
Flat-bladed screwdriver
●
Tweezers
8.9.2.1 Removing the tamp wheel and bearing shaft
► Place the feeder on a stable, level and clean sur-
face.
► Remove the rocker as described in 8.9.1.1 "Re-
moving the Rocker Complete" [}169].
► Screw off the bearing shaft(1) and remove the
tamp wheel.(2)
8 Repairs to SmartFeeder 2x8 mm X
8.10 Knurled Tamp Wheel
Service Manual SIPLACE SmartFeeder 4 - 104 mm X 11/2017 171
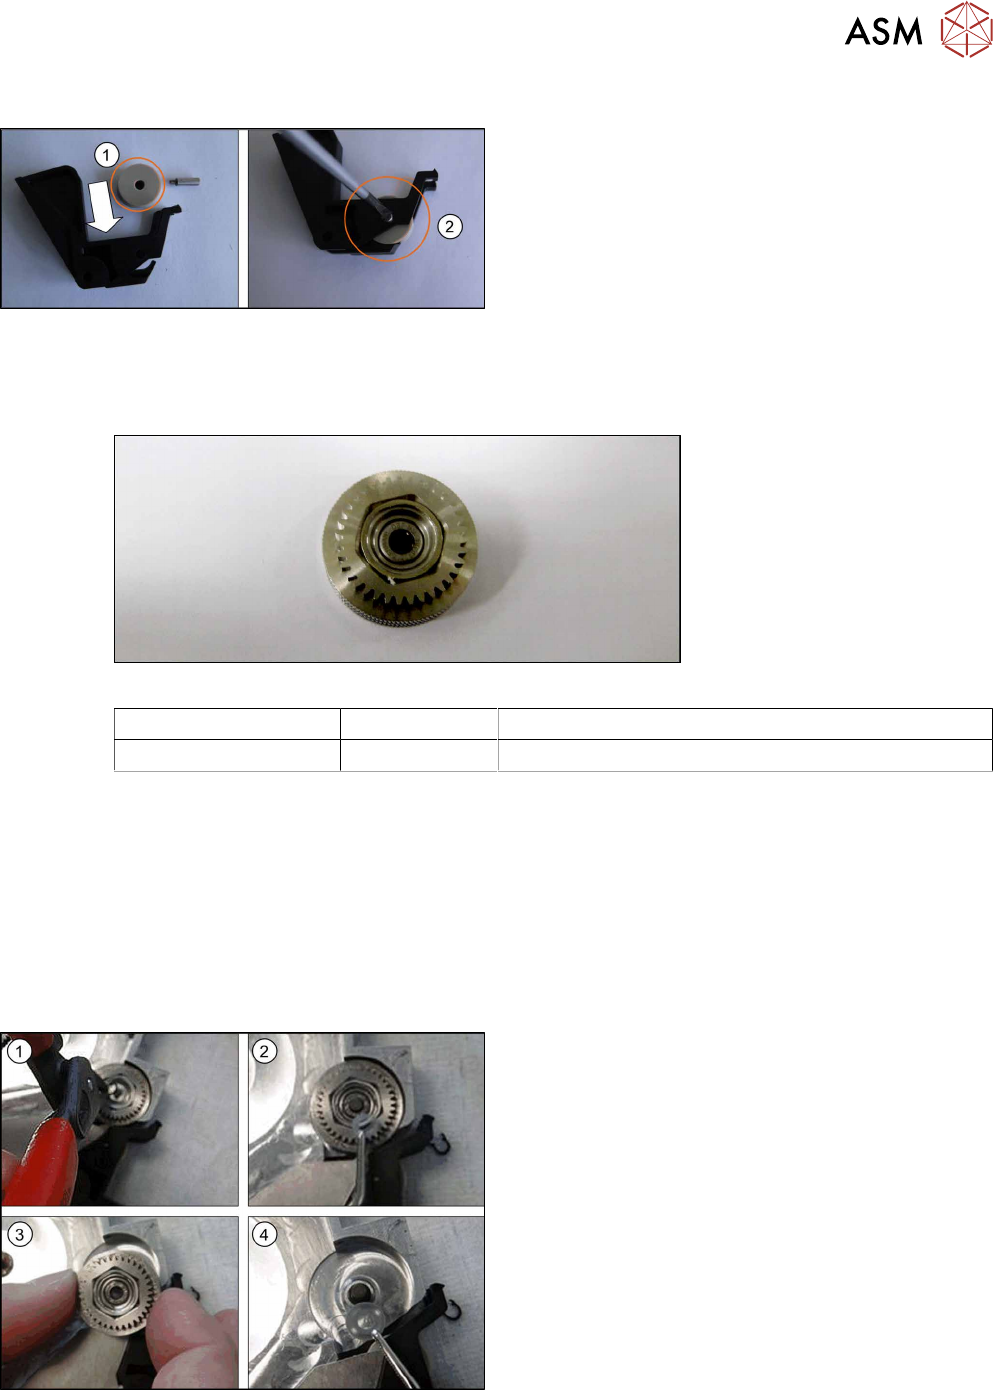
8.9.2.2 Fitting the tamp wheel and bearing shaft
► Insert the tamp wheel into the rocker.(1)
► Insert the bearing shaft through the hole in the
rocker, through the tamp wheel and then screw it
in place.(2)
► Fasten the rocker as described in section 8.9.1.2
"Fitting the rocker assembly" [}170].
8.10 Knurled Tamp Wheel
Required spare part
Fig.57: Knurled tamp wheel
Feeder module Item no. Designation
SmartFeeder 2x8mmX 03061111Sxx Knurled tamp wheel
Required tools
●
TORX screwdriver 0.6Nm, size T8
●
Phillips screwdriver
●
Flat-bladed screwdriver
●
Tweezers
●
Circlip pliers for outer rings 3-10 mm
8.10.1 Removing the knurled tamp wheel left
► Place the feeder on a stable, level and clean sur-
face.
► Remove the left and right side covers. (See 8.3.1
"Removing the Left Side Cover" [}135], 8.3.3
"Removing the Right Side Cover" [}136])
► Remove the rocker. (See 8.8.1.1 "Removing the
Foil Rocker Cpl." [}165])
► Remove the stripping device. (See 8.11.1 "Re-
moving the wiper" [}173])
► Remove the toothed wheel 4 tape. (See Remov-
ing the Gear Wheel 4 Foil left)
► Remove the circlip.(1)
► Remove the knurled tamp wheel.(2)
► Remove the large washer.(3)
8 Repairs to SmartFeeder 2x8 mm X
8.10 Knurled Tamp Wheel
172 Service Manual SIPLACE SmartFeeder 4 - 104 mm X 11/2017
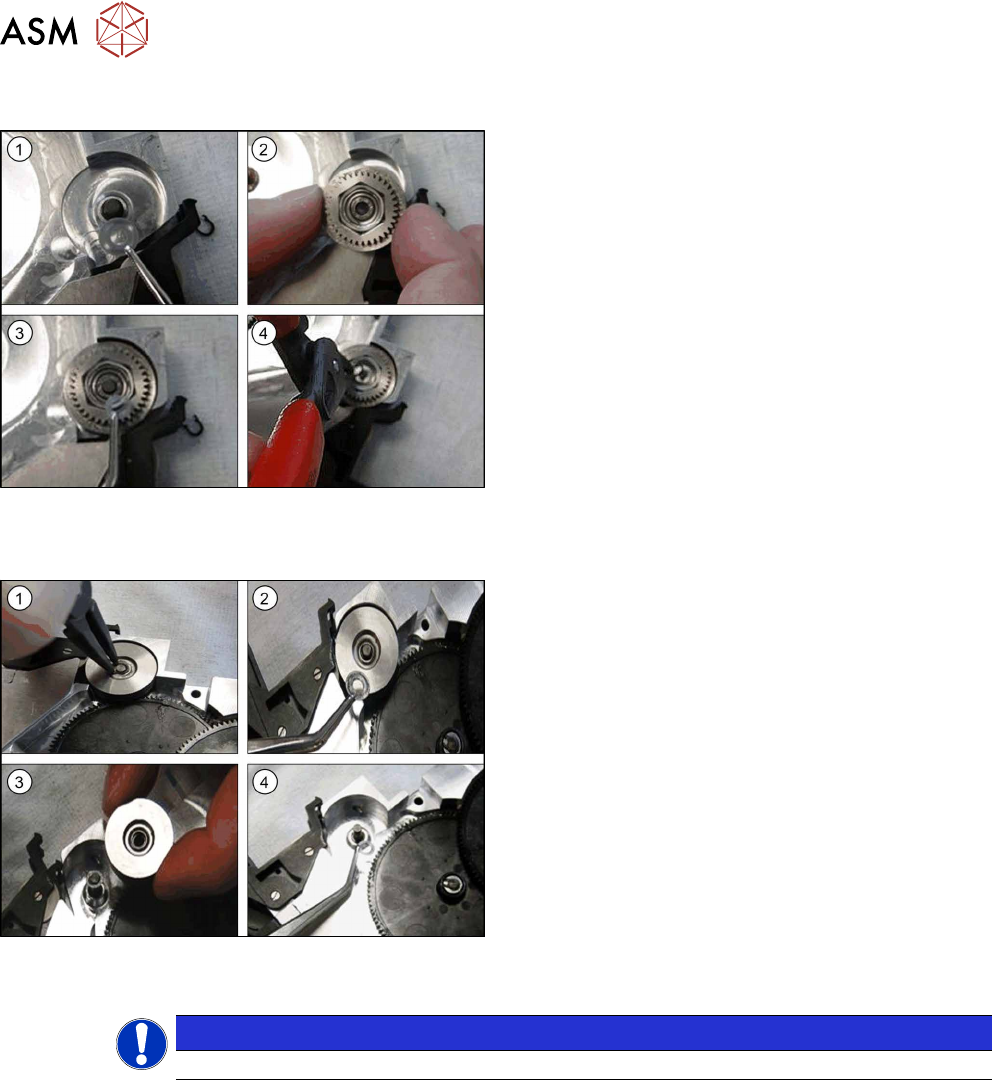
8.10.2 Fitting the knurled tamp wheel left
► Grease the shaft and the circlip with Polyhub Gly
801.
► Replace the large washer. (1)
► Fit the new knurled tamp wheel.(2)
► Replace the circlip.(3,4)
► Refit the toothed wheel 4 tape. (See Fitting the
Gear Wheel 4 Foil left)
► Reinsert the stripping device (see 8.11.2 "Fitting
the wiper" [}173]).
► Reinsert the rocker (see 8.8.1.2 "Fitting the Foil
Rocker Cpl." [}165]).
► Fit the covers (see 8.3.2 "Fitting the Left Side
Cover" [}136], 8.3.4 "Fitting the Right Side
Cover" [}137]).
8.10.3 Removing the knurled tamp wheel right
► Place the feeder on a stable, level and clean sur-
face.
► Remove the left and right side cover (see 8.3.1
"Removing the Left Side Cover" [}135], 8.3.3
"Removing the Right Side Cover" [}136]).
► Remove the rocker (see 8.8.1.1 "Removing the
Foil Rocker Cpl." [}165]).
► Remove the stripping device (see 8.11.1 "Remov-
ing the wiper" [}173]).
► Remove the toothed wheel 4 tape (see Removing
the Gear Wheel 4 Foil right).
► Remove the circlip.(1)
► Remove the washer.(2)
► Remove knurled tamp wheel. (3)
► Remove the washer.(4)
NOTICE
Ensure that the smaller spacer is below and the larger spacer on top of the tamp wheel.