Service Manual SIPLACE SmartFeeder.pdf - 第26页
6 Repairs to SmartFeeder 4 mm X / Xi 6.1 Front sliding guide/sliding foil 26 Service Manual SIPLACE SmartFeeder 4 - 8 mm X / Xi SIPLACE SmartFeeder 2 x 8 mm X / Xi 11/2020 6.1 Front sliding guide/sliding foil Required sp…

6 Repairs to SmartFeeder 4 mm X / Xi
Service Manual SIPLACE SmartFeeder 4 - 8 mm X / Xi SIPLACE SmartFeeder 2 x 8 mm X / Xi 11/2020 25
6 Repairs to SmartFeeder 4 mm X / Xi
Feeder module Item no. Description
SmartFeeder 4mmX 00141368-xx SIPLACE SmartFeeder 4mm X
SmartFeeder 4mm Xi 00141478-xx SIPLACE SmartFeeder 4mm Xi
00141498-xx SIPLACE SmartFeeder 4mm Xi splice sensor
Notes about SmartFeeder Xi
The SmartFeederXi feeder modules support high infeed speeds for maximum utilization of the
machine placement capacity with the SIPLACE SpeedStar CP20P2 placement head.
The corrugated slide on the back of the SmartFeeder is a clear identifying feature of the Smart-
Feeder Xi.
SIPLACE Pro shows the SmartFeederXi as a SmartFeederX. If a CP20P2 head is used in the
setup, SIPLACE Pro automatically assumes that a SmartFeederXi is being used. The maximum
speed of a SmartFeederXi depends on the placement head which uses this feeder module.
The station software also shows a SmartFeederXi as a SmartFeederX. If a faster SmartFeederXi
is needed for performance purposes (machine with CP20P2 head), although a slower Smart-
FeederX is configured, the feeder LED will flash briefly, to signal the status "Not fast enough". The
station software will mark this feeder orange with the status "Too slow".
The SmartFeeder 4mmXi feeder module can be operated at any machine which can already ac-
commodate the SmartFeeder 4mmX. The SmartFeeder 4mmXi can also be operated with older
station software versions 7xx.x.
For more information about introducing the SmartFeederXi, refer to the technical information "In-
troducing the SmartFeeder modules Xi" (German [TI2018-09D14], English [TI201809E14]).
6 Repairs to SmartFeeder 4 mm X / Xi
6.1 Front sliding guide/sliding foil
26 Service Manual SIPLACE SmartFeeder 4 - 8 mm X / Xi SIPLACE SmartFeeder 2 x 8 mm X / Xi 11/2020
6.1 Front sliding guide/sliding foil
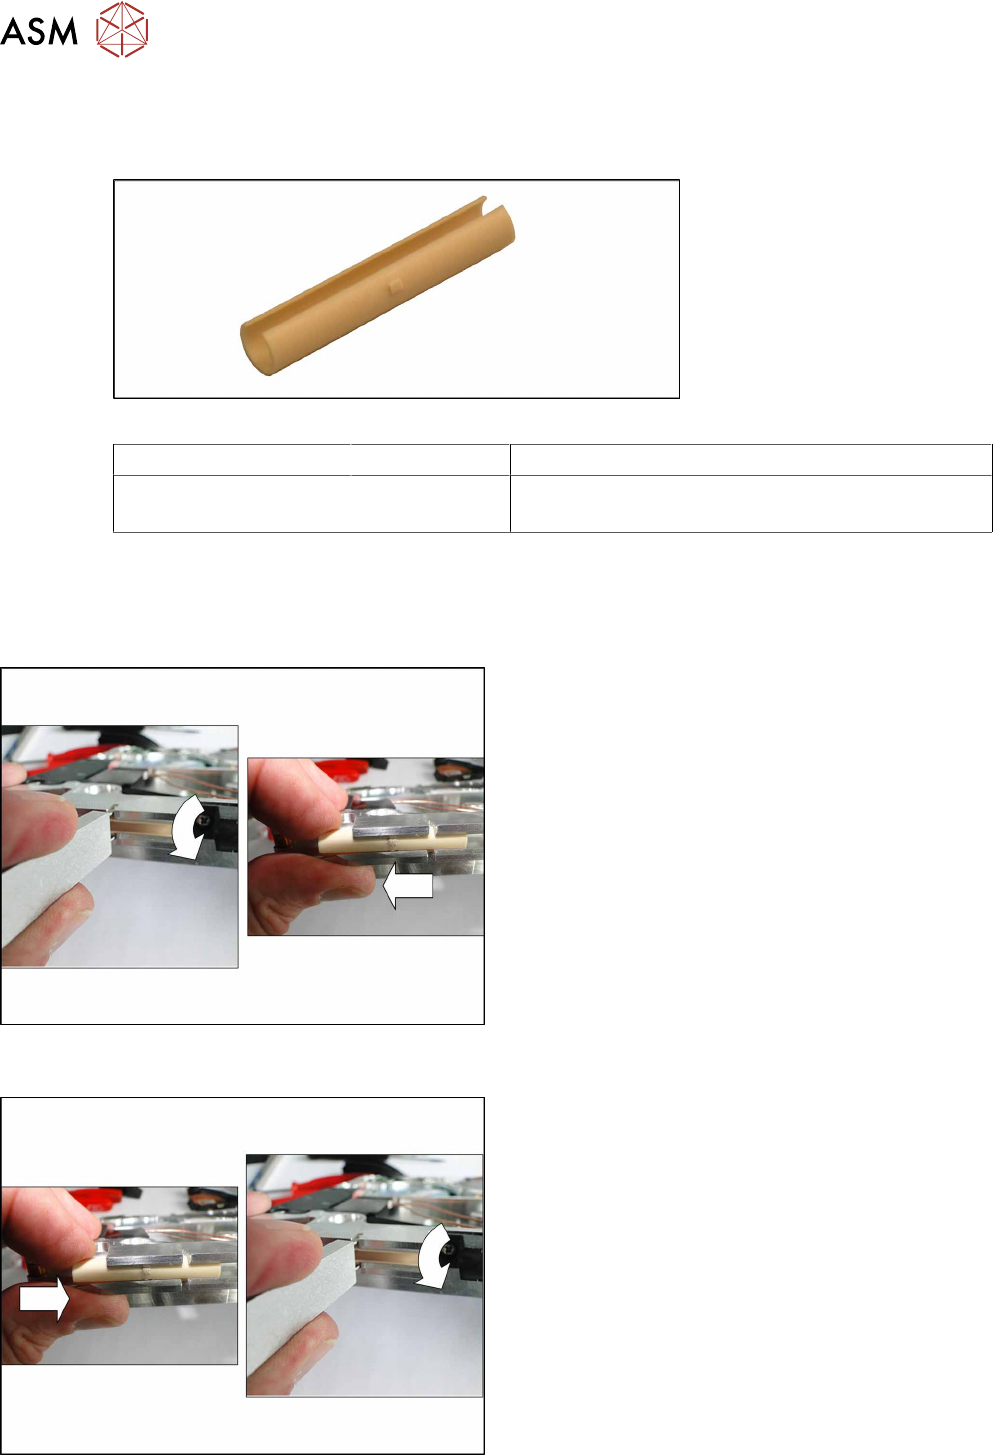
Required spare part
Fig.2: Sliding foil
Feeder module Item no. Designation
SmartFeeder 4mmX
SmartFeeder 4 mm Xi
03019604Sxx Sliding foil, X-feeder JUM-S-06LY
Tools required
●
Sliding foil remover
6.1.1 Removing the Sliding Foil
► Place the feeder module carefully down on its
side, onto a stable, level and clean surface.
► Place the sliding foil remover into the sliding
guide, as shown in the diagram.
► Lever the sliding foil out of the engaged position.
► Pull the sliding foil out of the sliding guide, to-
wards the front.
6.1.2 Fitting the Sliding Foil
► Press the sliding foil slightly together.
► Push the sliding foil into the sliding guide, from
the front, as far as the end stop.
► Turn the sliding foil, until the slit can be fully seen
and the sliding foil engages audibly.
6 Repairs to SmartFeeder 4 mm X / Xi
6.2 Rear Sliding Guide
Service Manual SIPLACE SmartFeeder 4 - 8 mm X / Xi SIPLACE SmartFeeder 2 x 8 mm X / Xi 11/2020 27
6.2 Rear Sliding Guide
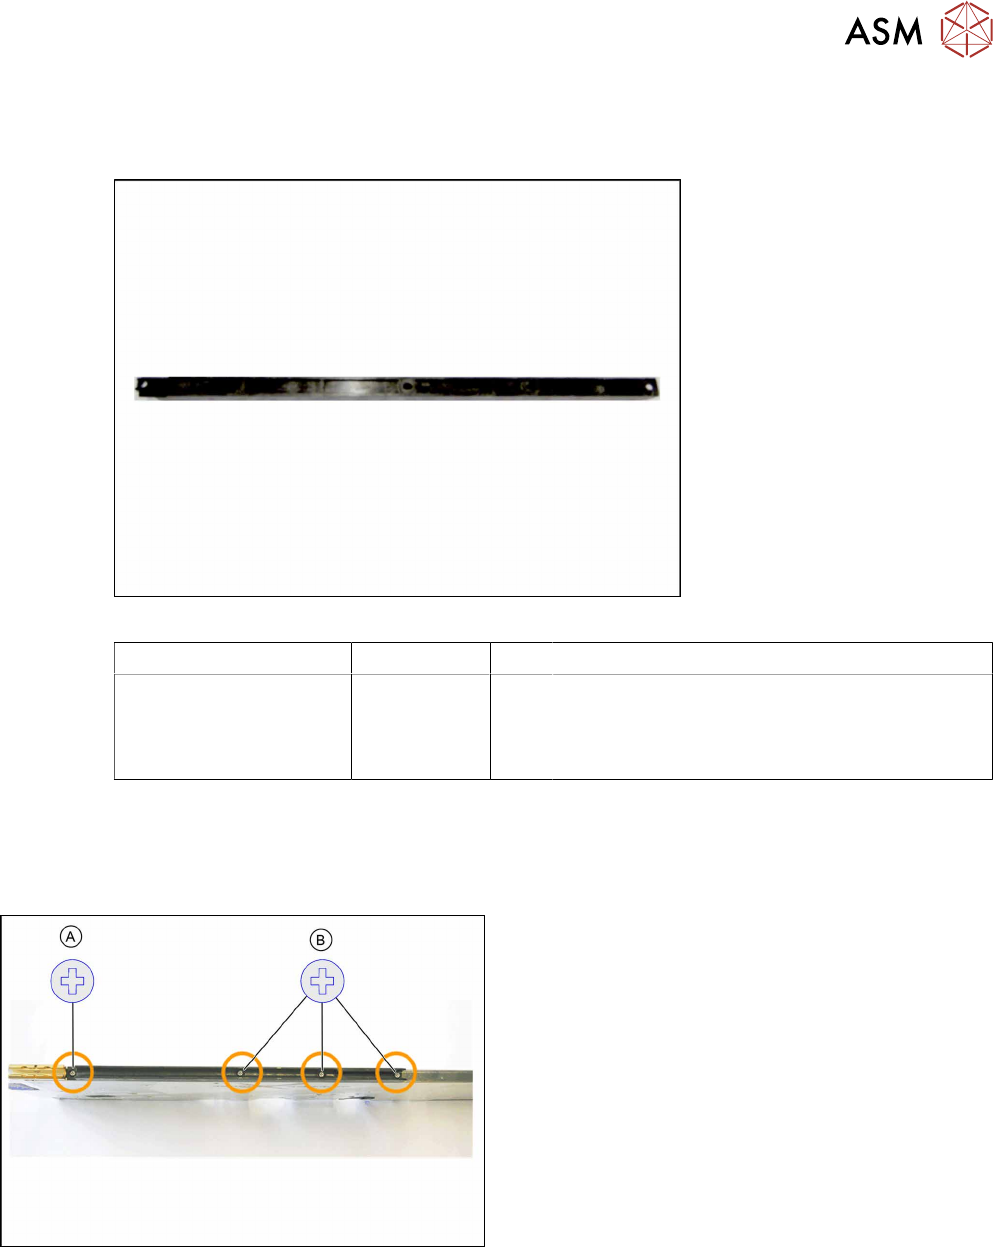
Required spare part
Fig.3: Rear sliding guide
Feeder module Item no. Type Designation
SmartFeeder 4mmX
SmartFeeder 4 mm Xi
03003994-xx
03010209-xx
03158711-xx
A
B
Sliding guide / back L200
ISO 7045 - M2.5 x 6-A2-50-H (1x)
Fillister head self-tapping screw DIN7981
2.9x9.5 (3x)
Tools required
●
Phillips screwdriver 0.6Nm
6.2.1 Removing the Sliding Guide
► Turn the feeder module so that its underside is at
the top.
► Remove the left Phillips screw (type A).
► Remove the other three Phillips screws (type B).
► Lift the gliding slide upwards and off.