YSM40R_Mainte_E.pdf - 第121页
3-51 3 Periodic maintenance items 4.1.3 Side-view camera (multi-vision camera installed type) T he multi-vision camera used for the MU head and FL head machines also has a side-view camera. T he cleaning procedure for th…
3-50
3
Periodic maintenance items
4.1.2 Multi-vision camera
The cleaning procedure for the multi-vision camera lighting unit is given below.
e
1
Prepare for work.
1. Press the emergency stop button to put
the machine in emergency stop.
2. Use the CLAMP ON/OFF switch to lower
the feeder exchange carriage and
detach it.
2
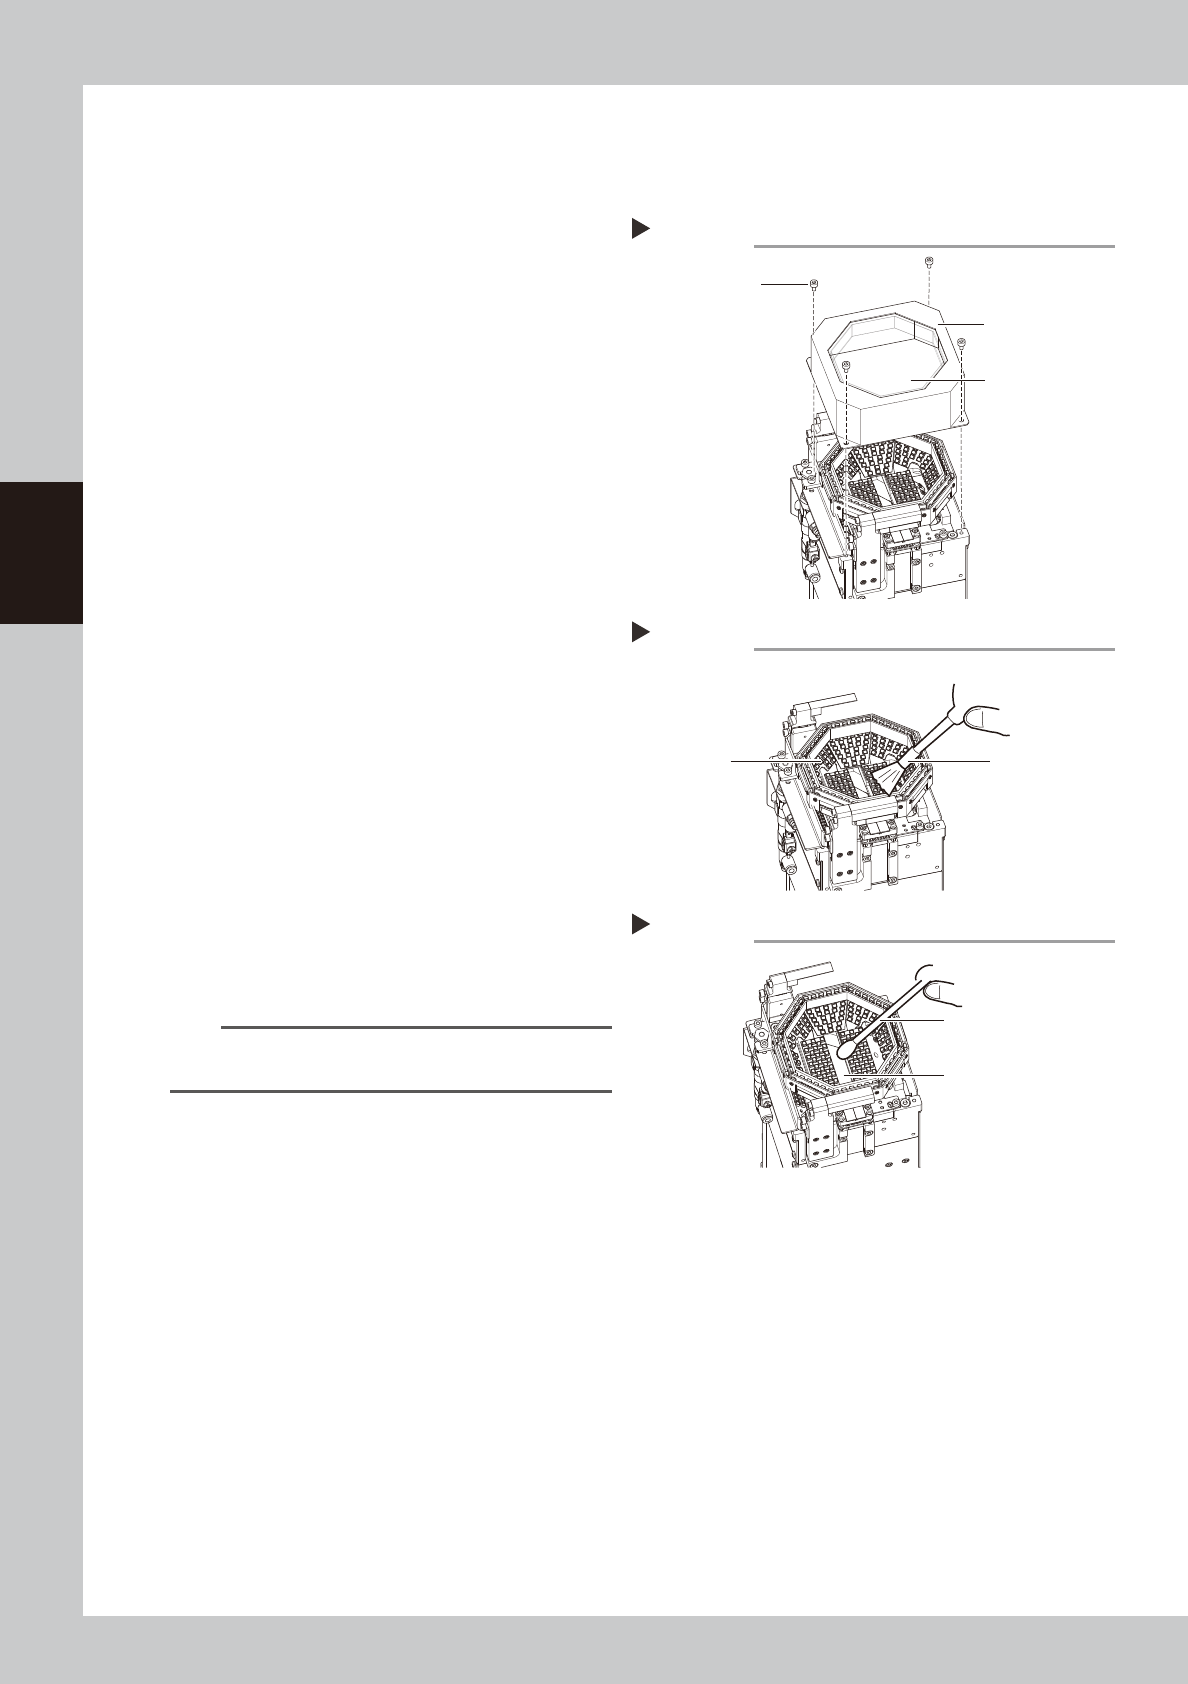
Detach the lighting cover.
Use a hex wrench (2.5) to remove the
cover's 4 mounting bolts, then detach the
lighting's protective cover.
53353-N9-00
3
Wipe the transparent glass with a
cloth.
Wipe the front and back sides of the lighting
cover's transparent glass with a lint-free
cloth dampened with a few drops of lens
cleaner.
53354-N9-00
4
Clean the lighting.
Use an optical brush to remove the dust
from the lighting.
5
Clean the half-mirror.
Use a cotton swab dampened with a small
amount of lens cleaner to clean the half-
mirror.
53355-N9-00
6
Return cover to original position.
Place the lighting cover back in its original
position, then secure it with the 4 bolts.
TIP
The optical brush and lens cleaner are optional
purchase items.
Detaching lighting cover
Step 2
Lighting cover
Transparent glass
Mounting bolt
Cleaning the lighting
Step 4
Lighting
Optical brush
Cleaning the half-mirror
Step 5
Half-mirror
Cotton swab dampened
with lens cleaner
3-51
3
Periodic maintenance items
4.1.3 Side-view camera (multi-vision camera installed type)
The multi-vision camera used for the MU head and FL head machines also has a side-view camera.
The cleaning procedure for the side-view camera's lighting unit (multi-vision camera installed type) is given
below.
e
1
Prepare for work.
1. Press the emergency stop button to put
the machine in emergency stop.
2. Use the CLAMP ON/OFF switch to lower
the feeder exchange carriage and
detach it.
3. Shut off the main air supply to the
machine.
2
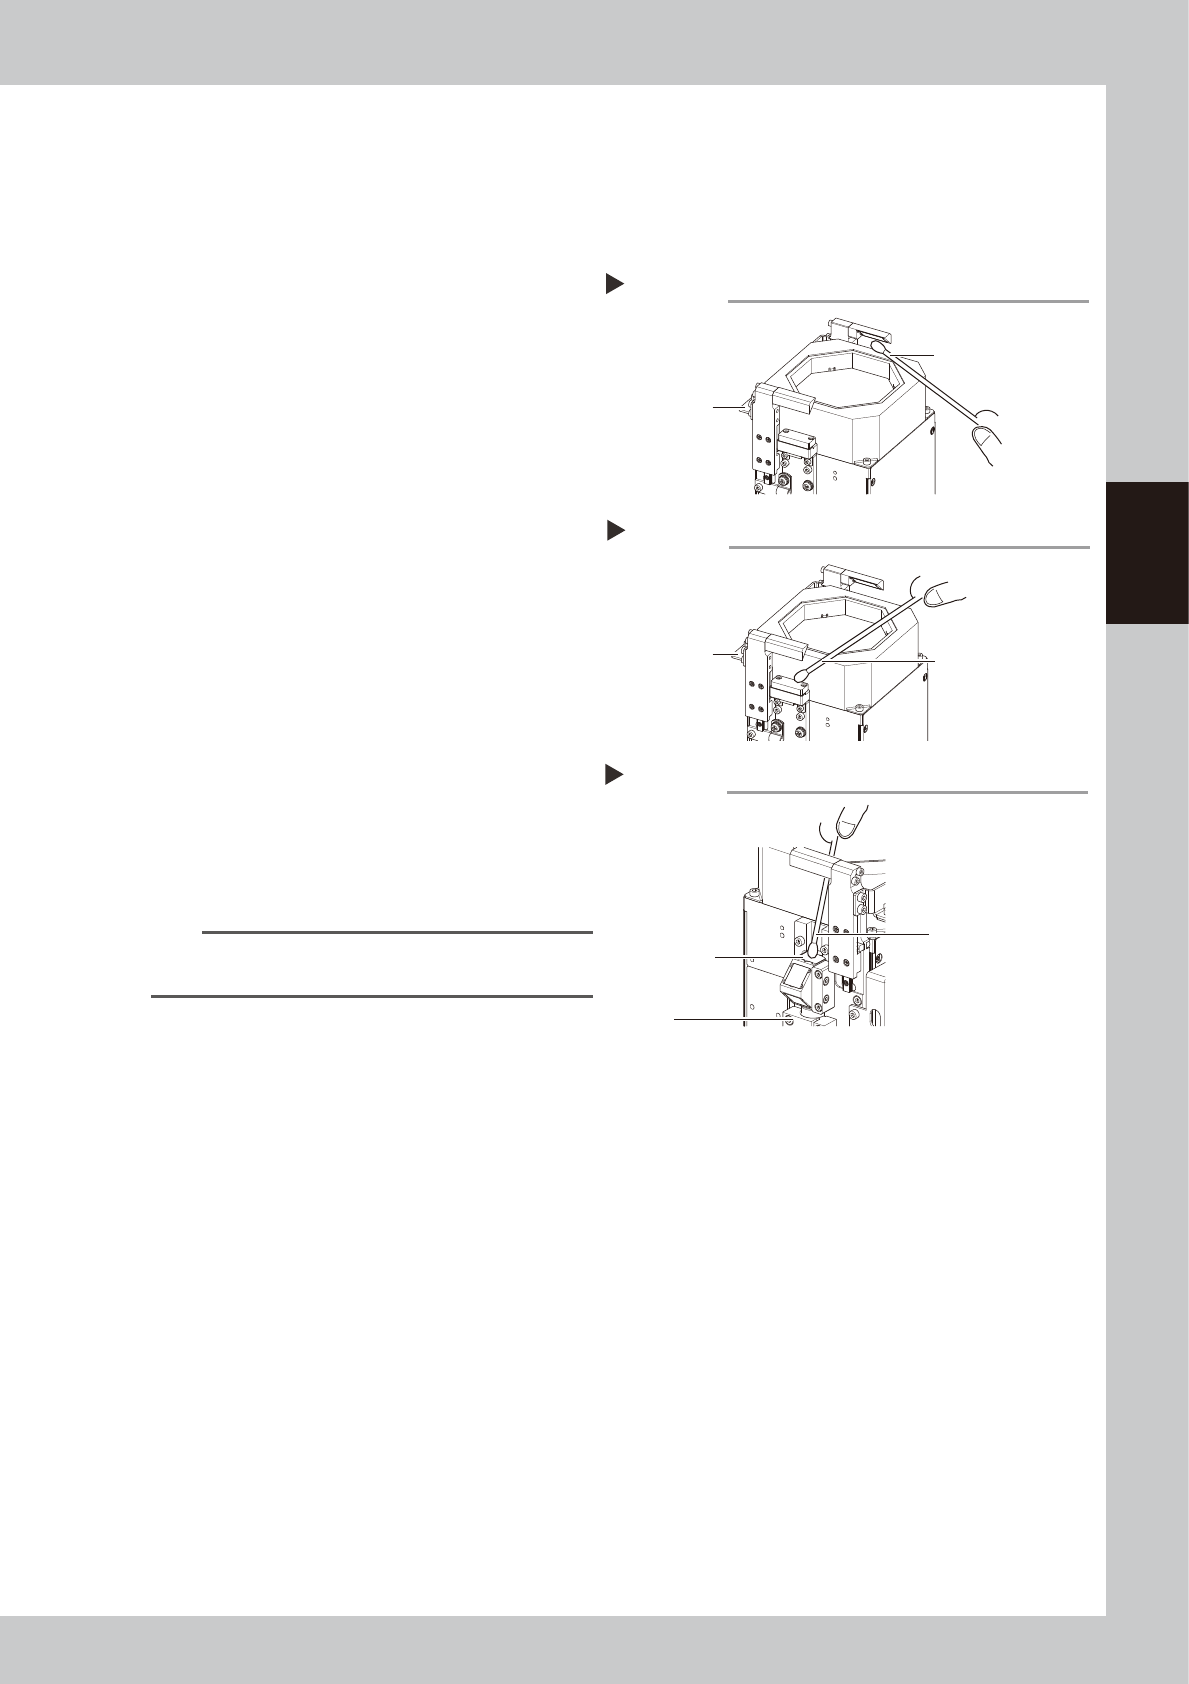
Clean the mirrors at both sides.
1. Apply a small amount of lens cleaner to
a cotton swab or lint-free cloth.
2. Lift the up/down section of the lighting
unit and clean the mirrors.
53356-N9-00
3
Clean the lighting side.
As shown in the figure at right, wipe the
lighting with a cotton swab dampened with
a small amount of lens cleaner.
53357-N9-00
4
Clean the camera side.
As shown in the figure at right, wipe the
cover with a cotton swab dampened with a
small amount of lens cleaner.
53358-N9-00
TIP
The optical brush and lens cleaner are optional
purchase items.
Cleaning the mirrors
Step 2
Grasp here and
lift upward.
Cotton swab dampened
with lens cleaner
Cleaning the lighting
Step 3
Grasp here and
lift upward.
Cotton swab dampened
with lens cleaner
Cleaning the camera side
Step 4
Clean this area
(top side).
Camera
Cotton swab dampened
with lens cleaner
3-52
3
Periodic maintenance items
4.1.4 RS head side-view camera
The RS head is equipped with a side-view camera. The cleaning procedure for the lighting unit is described
below.
1
Prepare for work.
e
1. Remove all items sensitive to magnetic fields such as wristwatches and magnetic ID cards.
2. Return all nozzles to the nozzle station (when installed).
3. Press the emergency stop button to put the machine in emergency stop.
4. Use the CLAMP ON/OFF switch to lower the feeder exchange carriage and detach it.
5. Move the head unit to a position where easy to perform the task.
2
Detach the nozzles.
Detach all nozzles by manually (when not
equipped with a nozzle station).
n
NOTE
After cleaning, each nozzle must be returned to the
head from which it was detached.
3
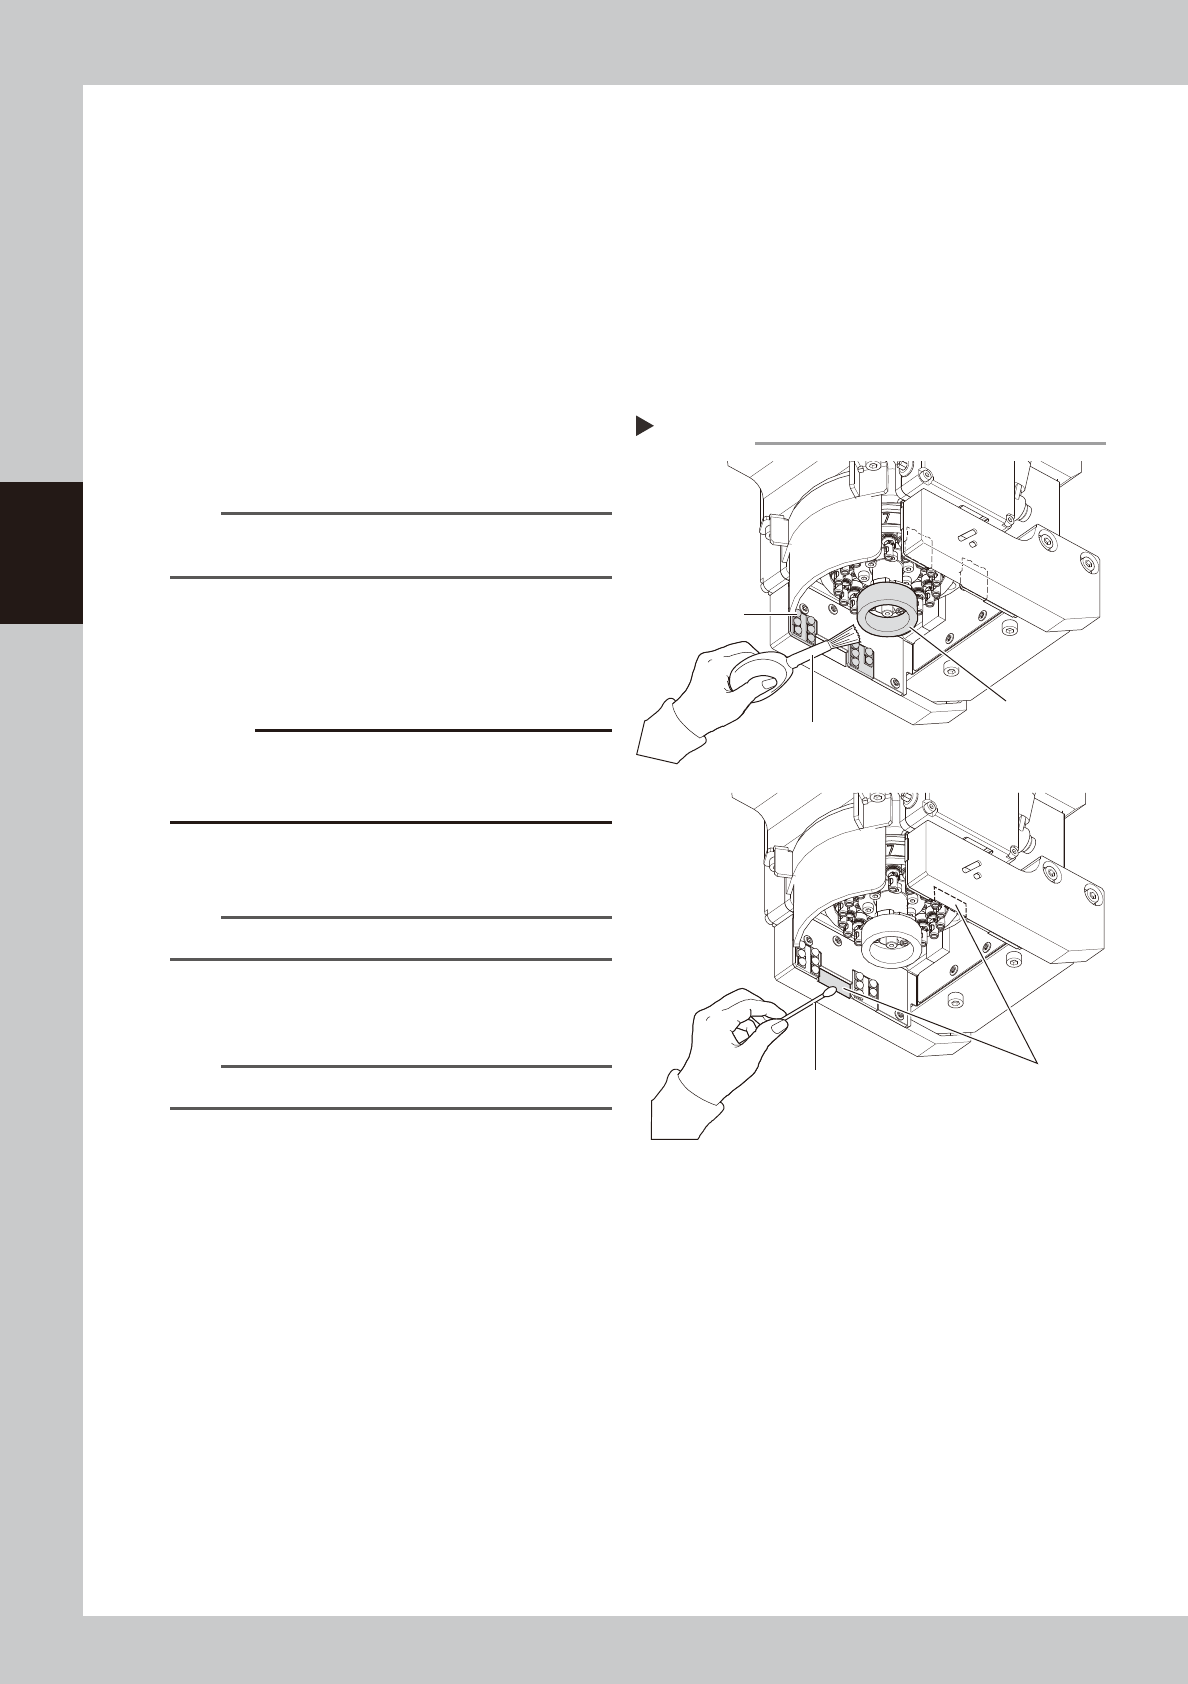
Clean the diffuser plate.
Use an optical brush to remove dust from
the diffuser plate and lighting surface.
53359-N9-10
c
CAUTION
When cleaning the diffuser plate, do not use a solvent
(including lens cleaner). Using a solvent may cause the
diffuser plate surface to discolor.
4
Clean the prisms.
Wipe the prisms with dry cotton swab.
TIP
Optical brush and lens cleaner are sold as options.
5
Return the nozzles.
Return each nozzle to the head.
n
NOTE
Return detached nozzle to the original head.
Cleaning RS head side-view lighting
Step 3-4
Diffuser plate
Lighting
(4 areas)
Cotton swab
Prism (2 areas)
Optical brush