YSM40R_Mainte_E.pdf - 第90页
3-20 3 Periodic maintenance items 4 Apply grease to the grease nipples on the outer and low er sides. 1. Move the head to the center of the machine. 2. Use the grease gun (bent nozzle type) to inject the specified grease…
3-19
3
Periodic maintenance items
2.1.2 Cleaning/lubricating X-axis guide (4-beam type)
1
Prepare for the task.
e
1. Remove all items sensitive to magnetic fields such as wristwatches and magnetic ID cards.
2. Press the emergency stop button and then open the machine safety cover.
3. Use the CLAMP ON/OFF switch to lower the feeder exchange carriage and detach it.
4. Place a square cloth on each Y-axis linear guide and push-up plate.
2
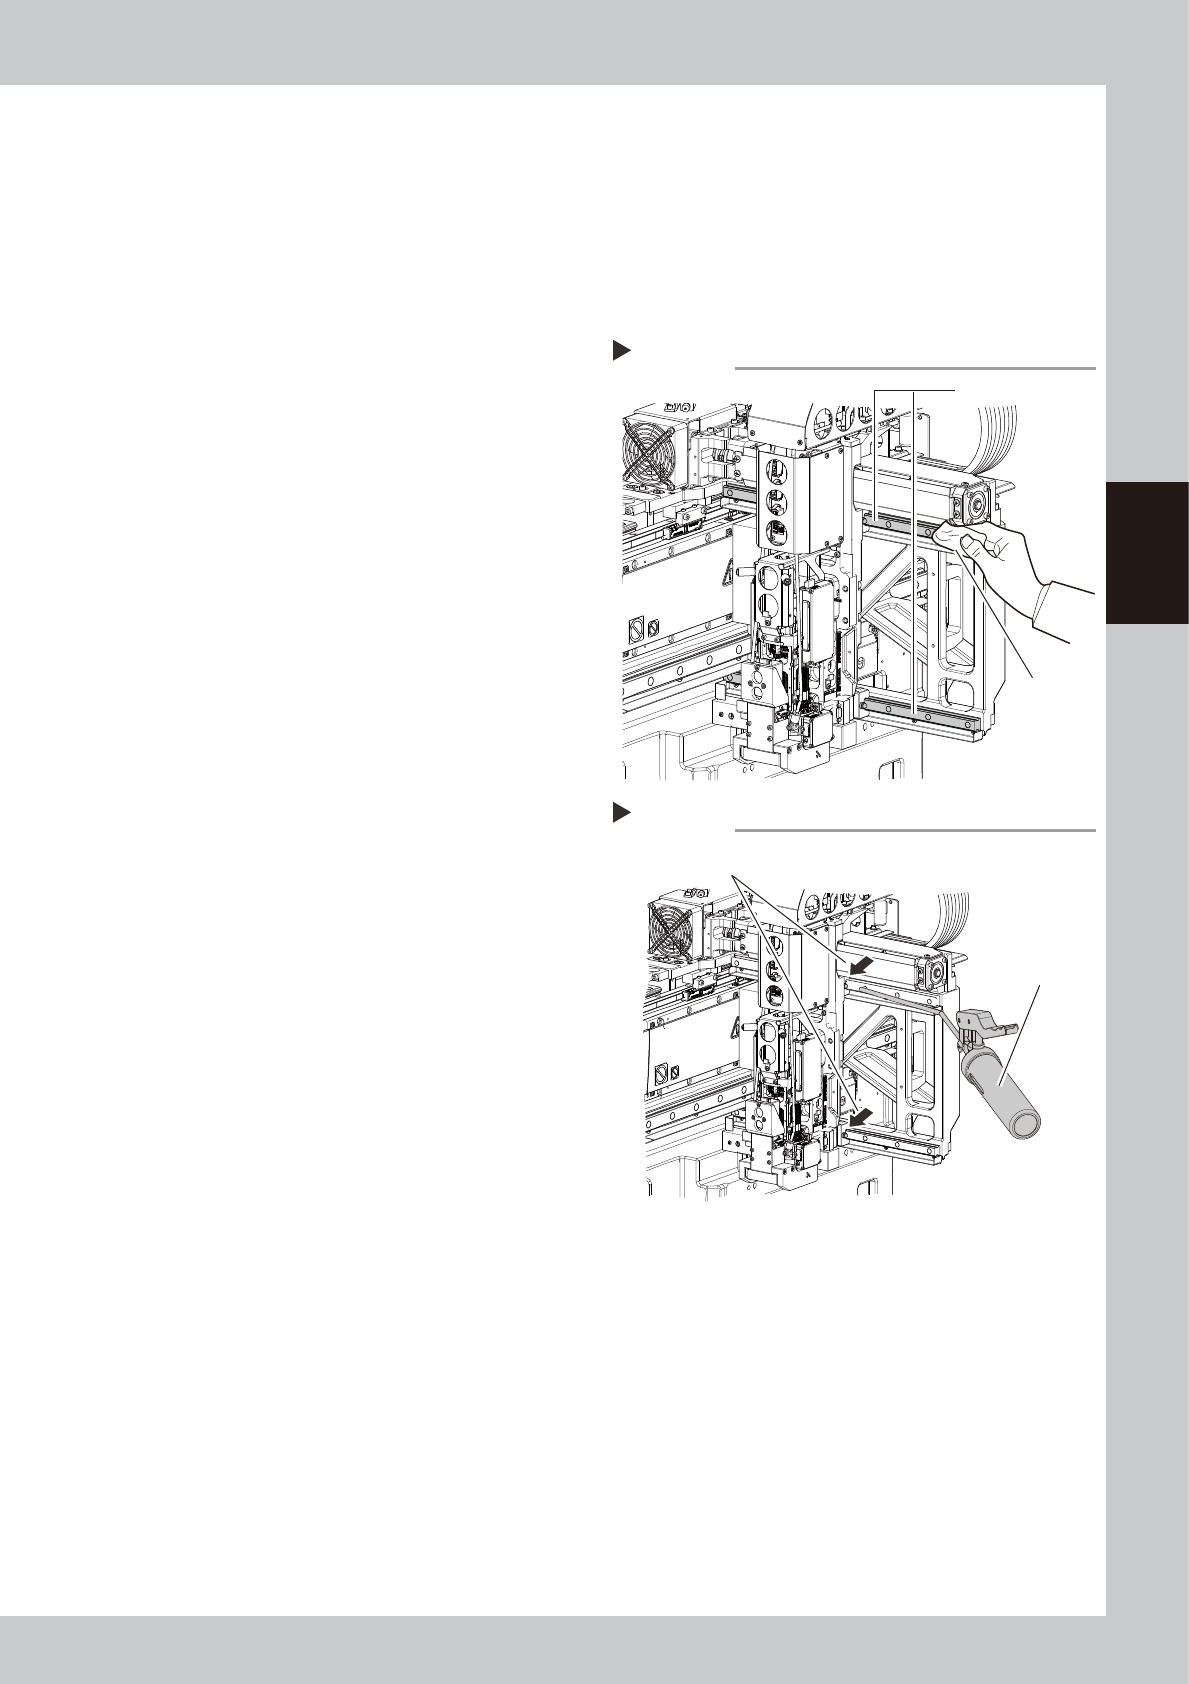
Clean the guide.
1. Move the head unit to one end.
2. Using a lint-free cloth (for clean room),
wipe the old grease and soiling from the
entire guide.
3. Move the head unit to the opposite side
and clean the opposite-side guide.
53316-N9-00
3
Apply grease into the center grease
nipples.
1. Move the head unit to the motor side.
2. Use the grease gun (bent nozzle type) to
inject the specified grease (NSL) into the
grease nipples (2 places) located near
the center of machine.
53317-N9-00
Cleaning the guide
Step 2
Cloth
Guide
Injecting the grease
Step 3
Center grease nipples (2 places)
Grease gun
(bent nozzle type)
3-20
3
Periodic maintenance items
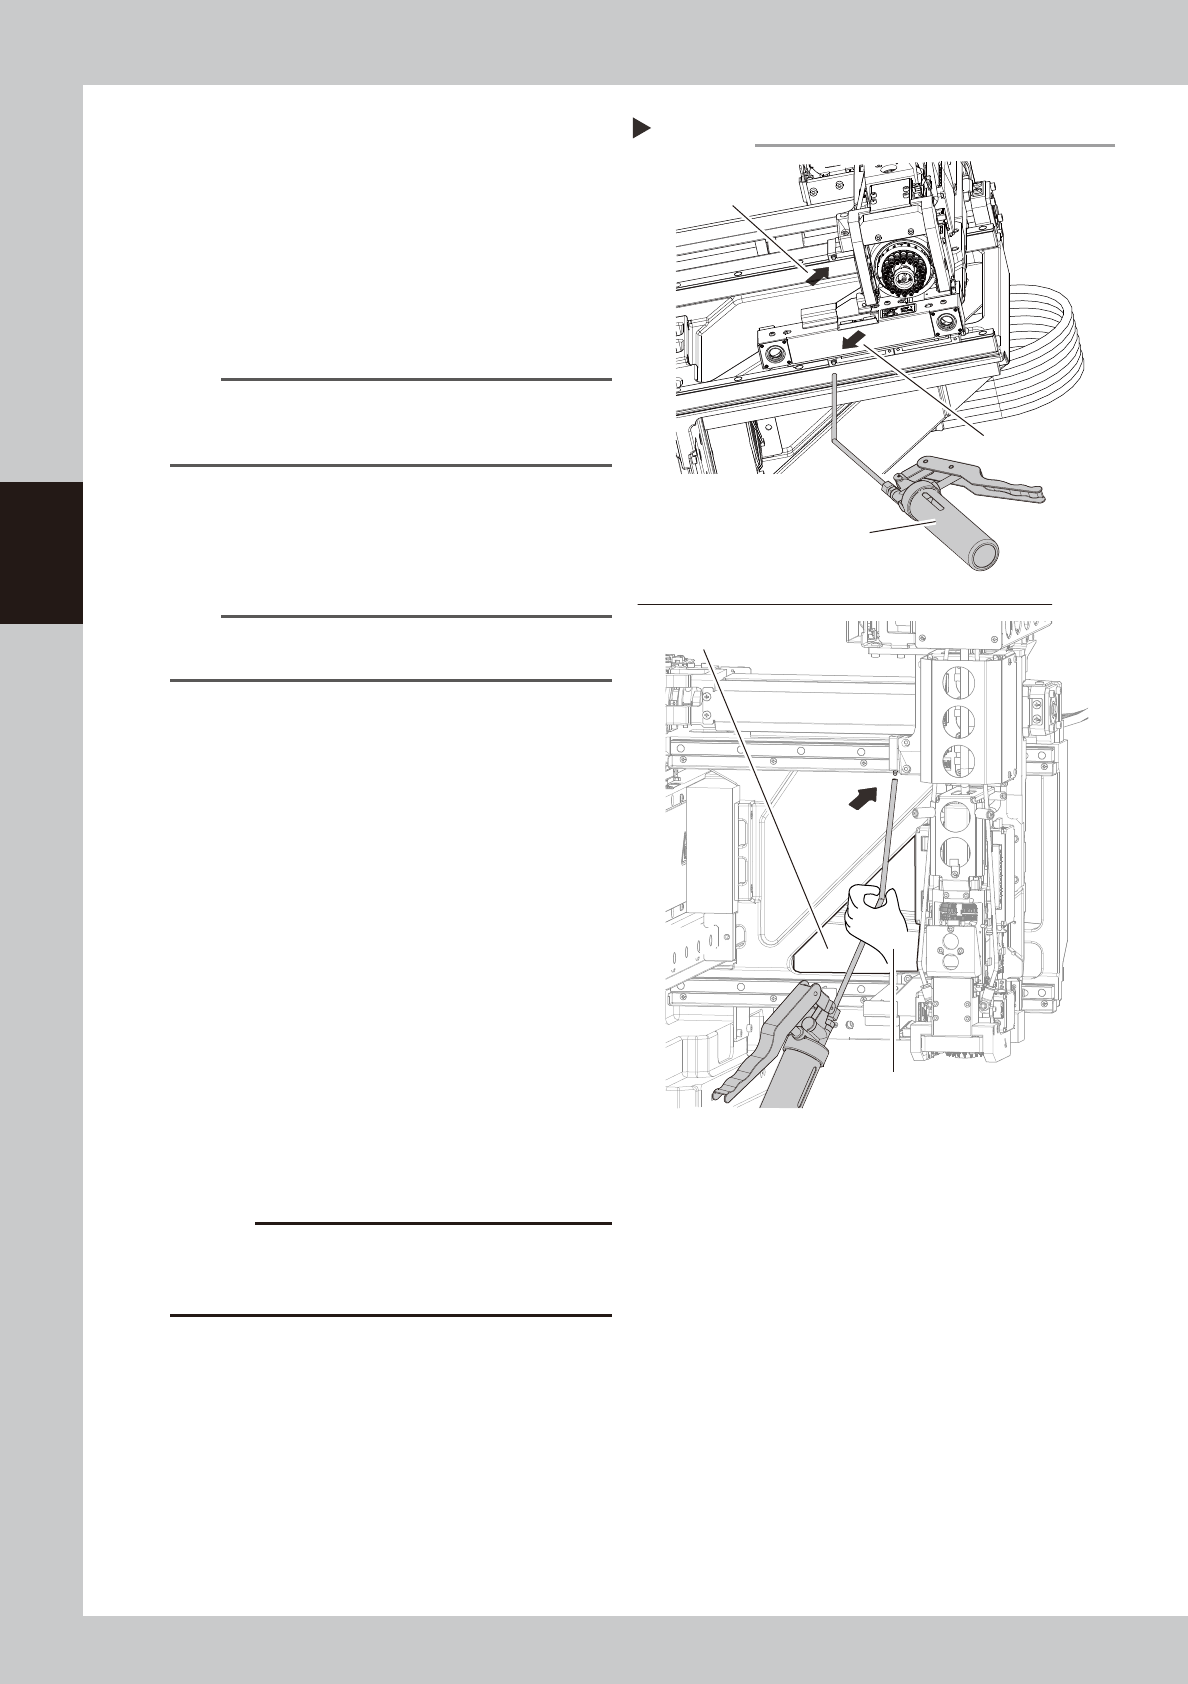
4
Apply grease to the grease nipples
on the outer and lower sides.
1. Move the head to the center of the
machine.
2. Use the grease gun (bent nozzle type) to
inject the specified grease (NSL) into the
grease nipples (2 places) located on the
outer and lower sides of the head.
53392-N9-00
n
NOTE
As shown in the figure at right, it is easier to apply
grease by accessing the grease nipple through the
opening in the X-axis frame.
5
Spread the grease.
Move the head right and left several times
manually along the X-axis to spread grease
over the guides.
n
NOTE
The grease injected into the grease nipples comes out
in the guides as the head moves along the X-axis.
6
Wipe off excess grease.
Wipe off excess grease that has collected at
both ends of the guides.
7
Apply grease again.
Repeat Steps 3 to 6 two more times. Then
visually check that the grease is evenly
applied over the guides.
8
Perform warm-up operation.
1. Remove the square cloth.
2. Close the safety cover, set the feeder
exchange carriage, and cancel
emergency stop.
e
3. Open the warm-up screen and warm up
the machine for about 8 minutes. After
the machine has stopped, press the
emergency top button and then wipe off
the grease that has collected at both
ends of the guides.
c
CAUTION
Repeat Step 7 until grease accumulations no longer
occur. Beginning production with grease accumulations
present could cause the grease to spatter.
Applying grease
Step 4
Opening in X-axis frame
Grease nipple on outer side
of head (one place)
Grease nipple on lower
side of head (one place)
Applying grease to the grease nipple on outer side of head
Pass the nozzle through the opening to access
the grease nipple while holding the grease gun.
Grease gun
(bent nozzle type)
3-21
3
Periodic maintenance items
2.1.3 Cleaning/Lubricating Y-axis guides, Cleaning linear scale (4-beam type)
1
Prepare for work.
e
1. Remove all items sensitive to magnetic fields such as wristwatches and magnetic ID cards.
2. Press the emergency stop button and then open the machine safety cover.
3. Use the CLAMP ON/OFF switch to lower the feeder exchange carriage and detach it.
4. Place a square cloth on each Y-axis linear guide and push-up plate.
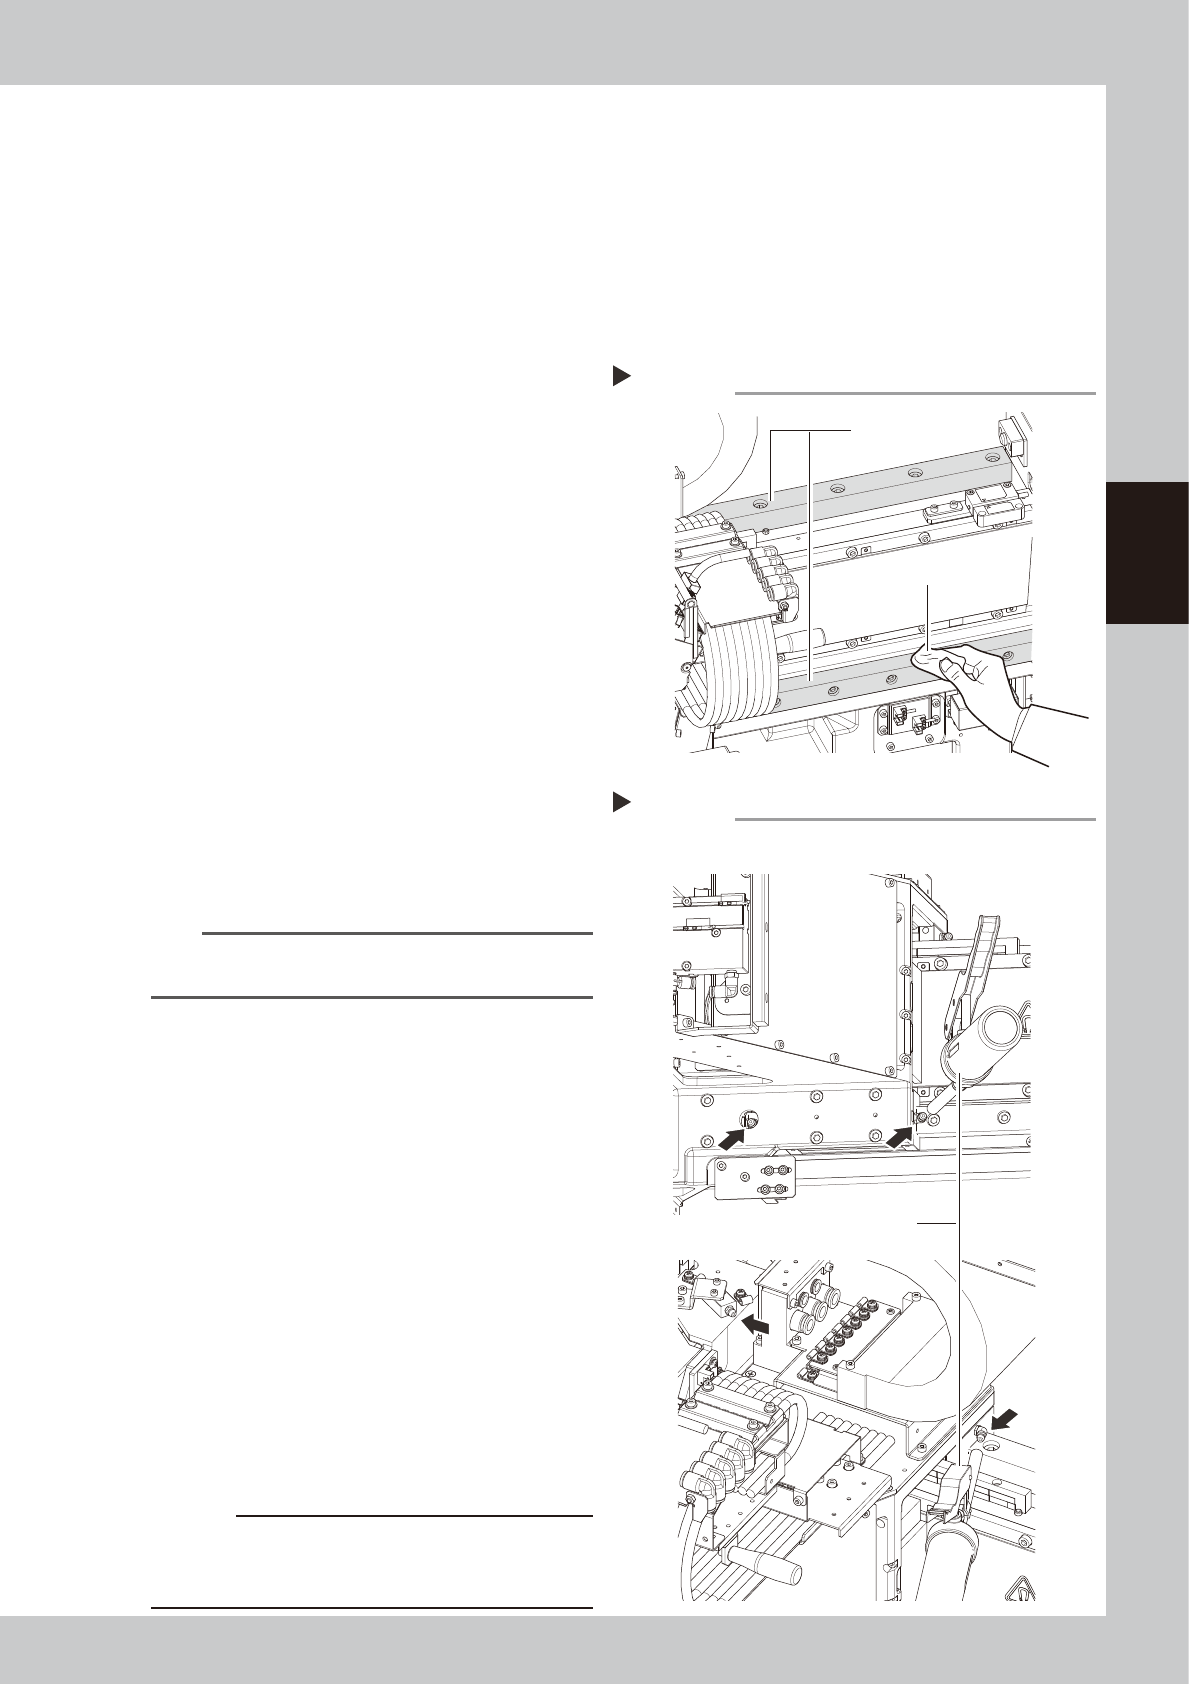
2
Clean the guide.
1. Move the Y-axis to one end, then use a
paper cloth which produces no lint, etc.,
(clean room type) to wipe the entire
guide.
2. Move the Y-axis to the opposite side and
wipe the opposite-side guide.
53318-N9-00
3
Inject the grease.
Using a grease gun (standard type), inject
the prescribed grease (NSL) at the Y-axis
guide's grease nipples (4 nipples).
1. Apply grease to 2 nipples at front bottom
side and rear bottom side.
2. Apply grease to 2 nipples at front top
side and rear top side.
53319-N9-00
4
Spread the grease.
Move the head back and forth several times
manually along the Y-axis to spread grease
over the guides.
n
NOTE
The grease injected into the grease nipples comes out
in the guides as the head moves along the Y-axis.
5
Wipe off excess grease.
Wipe off excess grease that has collected at
both ends of the guides.
6
Apply grease again.
Repeat Steps 3 to 5 two more times. Then
visually check that the grease is evenly
applied over the guides.
7
Perform a warm-up.
1. Remove the square cloth.
2. Close the cover, attach the feeder
exchange carriage, then release the
emergency Stop.
e
3. Open the Warm-up screen, and perform
the warm-up operation for about 8
minutes. After the machine stops, wipe
off grease which has collected on the
guide and the guide end face.
c
CAUTION
Repeat Step 7 until grease accumulations no longer
occur. Beginning production with grease accumulations
present could cause the grease to spatter.
Cleaning the guide
Step 2
Cleaning cloth
Guide
Injecting the grease
Step 3
Front bottom, rear bottom
Front top, rear top
Grease gun (standard)