00193631-0602.pdf - 第58页
5 Feed axes Adjustment Instructions MTC 2 5.1 Belt tension 12/2007 Edition 58 5.1 Belt tension 5.1.1 T ools and accessories – Belt frequency measurement device (indu ctive) – 2 toothed belt tension stickers – 1 set of he…
Adjustment Instructions MTC 2 5 Feed axes
12/2007 Edition
57
WARNING
Incorrectly set machine data can result in a crash between the lifting and feed axes or at the limit
positions of these axes.
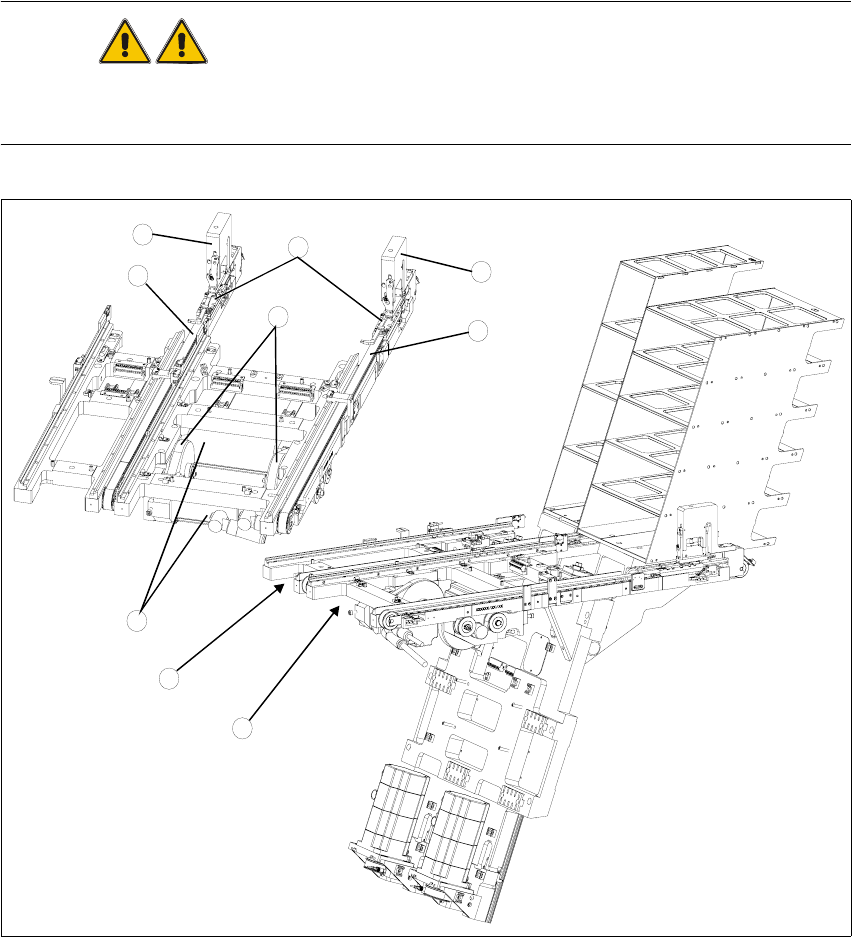
Fig. 5.0 - 1 Overview of the feed axes (cover plates and belt covers removed)
Key
1. Feed axis, tower 1
2. Feed axis, tower 2
3. Servo motors of the feed axes
4. Drive belt
5. Toothed belt
6. Disengaging mechanisms
7. Driver
2
1
3
4
5
6
5
6
7
5 Feed axes Adjustment Instructions MTC 2
5.1 Belt tension 12/2007 Edition
58
5.1 Belt tension
5.1.1 Tools and accessories
– Belt frequency measurement device (inductive)
– 2 toothed belt tension stickers
– 1 set of hexagon socket wrenches
– 1 set of open-ended wrenches
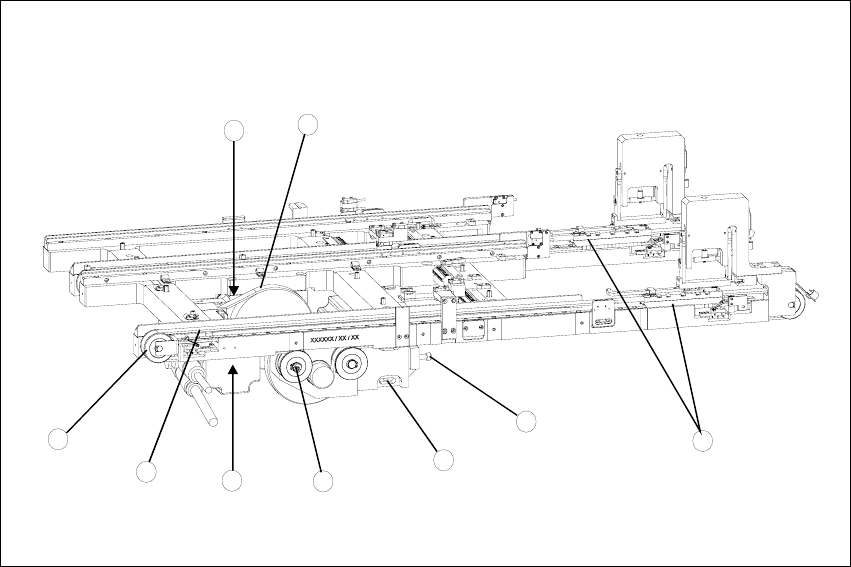
Fig. 5.1 - 1 Checking and setting the belt tension
Key
1. Drive belt (shown here for tower 2)
2. Motor mounting block with clamping screws (shown here for tower 1)
3. Adjustment screw, drive belt (shown here for tower 1)
4. Measuring point, drive belt (shown here for tower 2)
5. Toothed belt (shown here for tower 1)
6. Eccentric axle of toothed belt with clamping screw and flats for setting (shown here for tower
1)
7. Measuring point, toothed belt (shown here for tower 1)
8. Outer deflection roll (shown here for tower 1)
9. Driver
2
4
1
6
3
7
5
9
8
Adjustment Instructions MTC 2 5 Feed axes
12/2007 Edition 5.1 Belt tension
59
5.1.2 Preparatory measures
Empty the MTC 2 completely (see the User Manual).
Undock the MTC 2 from the SIPLACE station (see User Manual).
Remove both cover plates between the rails of the feed axes.
5.1.3 Checking and setting the drive belt
Carry out the relevant preparatory measures (see section 5.1.2 "Preparatory measures").
Measure the belt tension with the belt frequency measuring device in the following way:
Cause the drive belt to oscillate and measure the frequency in the middle of the sloping sur-
face between the motor axis and the belt wheel (for the measuring point, see Fig. 5.1 - 1,
item 4).
You must set the belt tension if the measured frequency deviation deviates from the nominal
value (120 Hz ± 5 Hz):
Turn the adjusting screw of the drive belt as far as it will go. Before doing this you will need
to loosen the lock nut.
Loosen the two clamping screws on the mounting block of the motor.
Use the adjusting screw to raise the belt tension (by turning in a clockwise direction) or lo-
wer it (by turning in an anticlockwise direction), until the nominal frequency is achieved.
Tighten the lock nuts each time you measure the belt tension.
Firmly tighten the clamping screws and varnish them with red screw locking varnish.
Check the belt tension again.
Secure the cover plates and dock the MTC 2 onto the SIPLACE station (see the User Manual).
Check the zero offset of the feed axis (see section 5.2.3 "Checking and setting the zero offset")
if you have changed the belt tension.