CP-842E-842ME System Reference-SYS-CP842-10E.pdf - 第69页
Machine System >> Basic Operation SYS-CP842-1.0E 4-33 4.1.1 1Changing the Conveyor Wid th On machines e quipped with an automatic conveyor wi dth changin g mechanism, the conveyor width can be automatically chan ge…

Machine System >> Basic Operation
4-32
SYS-CP842-1.0E
2 To load a new panel, select [Load Panel] from the “Load/ Unload” section. To
unload a panel from the machine, select [Unload]. After selecting one of these
commands, the START button is enabled.
Note: When the CP-842ME has the optional double panel loading function, two panels can be
loaded at one time by selecting [Load Two Panels].
3 Press START to commence.
Loading/unloading is carried out, and the machine awaits further input when
the operation is finished. To return to the [Main] screen, press [Close].
Clearing All Panels from the Machine (Flush Out)
The [Flush Out] command allows users to unload all panels currently held in the
machine, and prevent new panels from being loaded.
Procedure
1 At the [Main] screen, press [Panel Loader] to display the [Panel Loader] screen.
2 Press [Flush Out] to enable the START button, and press START to start flush
out.
The machine unloads all panels currently on the machine, and awaits input
from the operator when the operation is complete.
Machine System >> Basic Operation
SYS-CP842-1.0E 4-33
4.1.11Changing the Conveyor Width
On machines equipped with an automatic conveyor width changing mechanism, the
conveyor width can be automatically changed in 0.1 mm increments by commands
executed from the machine.
Automatic Conveyor Width Change Function
The automatic conveyor width change function is used to facilitate changeovers. To
use this function, enter the panel width (for the post-changeover production program)
at the [Conveyor Width] screen shown below. The conveyor then automatically moves
to that width.
Note: Be sure to remove the backup pins before performing width changes.
Procedure
1 At the [Main] screen’s “Changeover” area, select the [Conveyor] item to display
the [Conveyor Width Select] screen, then press the [Conveyor Width] button to
display the [Conveyor Width] screen shown below.
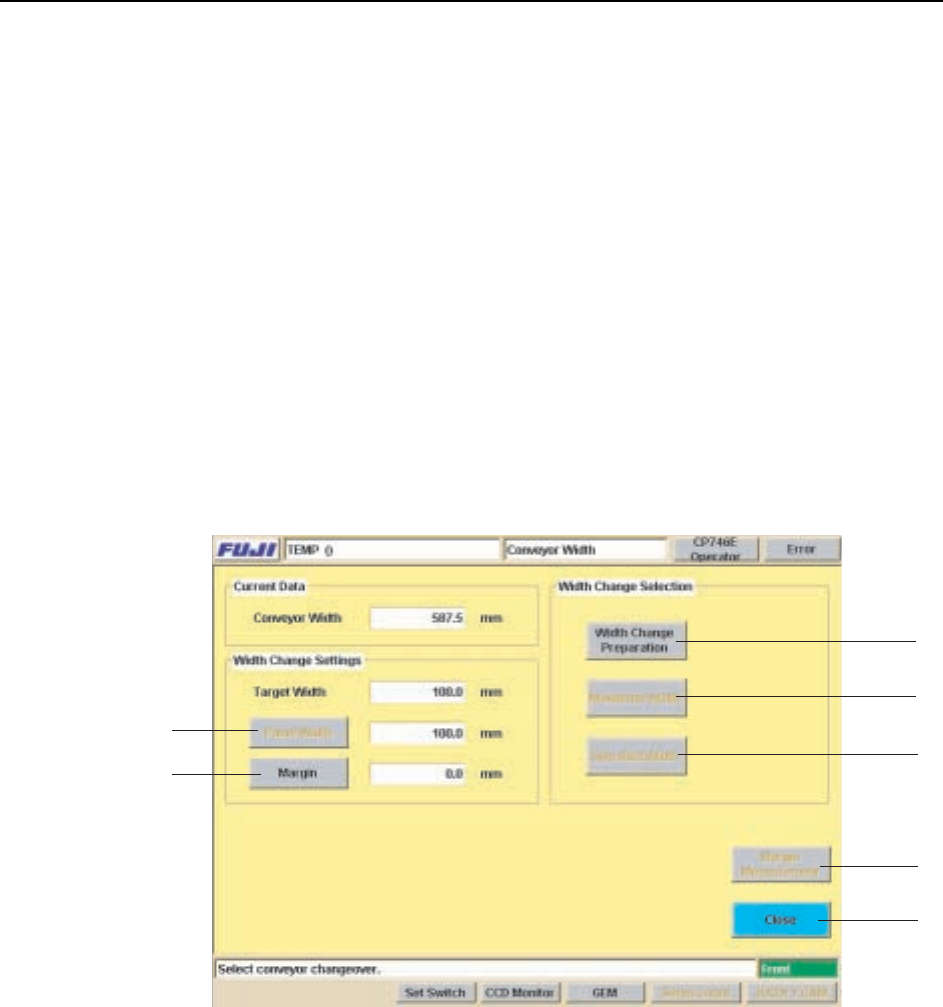
Screen Button Explanations
A. [Panel Width]: Specifies the Y-direction size of the production program panel.
B. [Margin]: Specifies the clearance between the conveyor and panel.
C. [Style]: Prepares for a conveyor width change (panel unloading, conveyor rail
linkage, etc.).
D. [Maximum Width]: Adjusts the conveyor to its maximum width minus 1 mm.
E. [Specified Width]: Adjusts the conveyor to the specified width.
F. [Margin Measurement]: Oeasures the margin (clearance between conveyor and
panel).
G. [Close]: Returns to the [Main] screen.
A
B
C
D
E
F
G

Machine System >> Basic Operation
4-34
SYS-CP842-1.0E
2 When the [Style] button is pressed, the START button becomes enabled. If the
START button is then pressed, all panels are unloaded from the machine.
Note: When set so that panels are not being transferred to a next stage, the last unloaded
panel remains on the conveyor. In this case, be sure to remove the panel from the
conveyor by hand before using inching or conveyor width change commands.
3 Press the [Panel Width] or [Margin] button to display a numeric keypad, then
entire the desired setting values. The total of the “Panel Width” + “Margin” val-
ues displays as the “Target Width”.
4 The START button is enabled when either the [Specified Width] or [Maximum
Width] button is pressed.
5 Press the START button to perform the conveyor width change.