Vermes MDS 358X user Manual.pdf - 第40页
Control Unit MDC VTK - TR -BA- 072e - 1 - User Manua l MDS 358X S eries 29 Fig . 6: Dis play main menu In th e lower lin e, a mai ntenance bar is shown (p osition 5). If a ll eigh t secti ons are filled, maintenance is r…
Control Unit MDC
28
VTK-TR-BA-072e-1 - User Manual MDS 358X Series
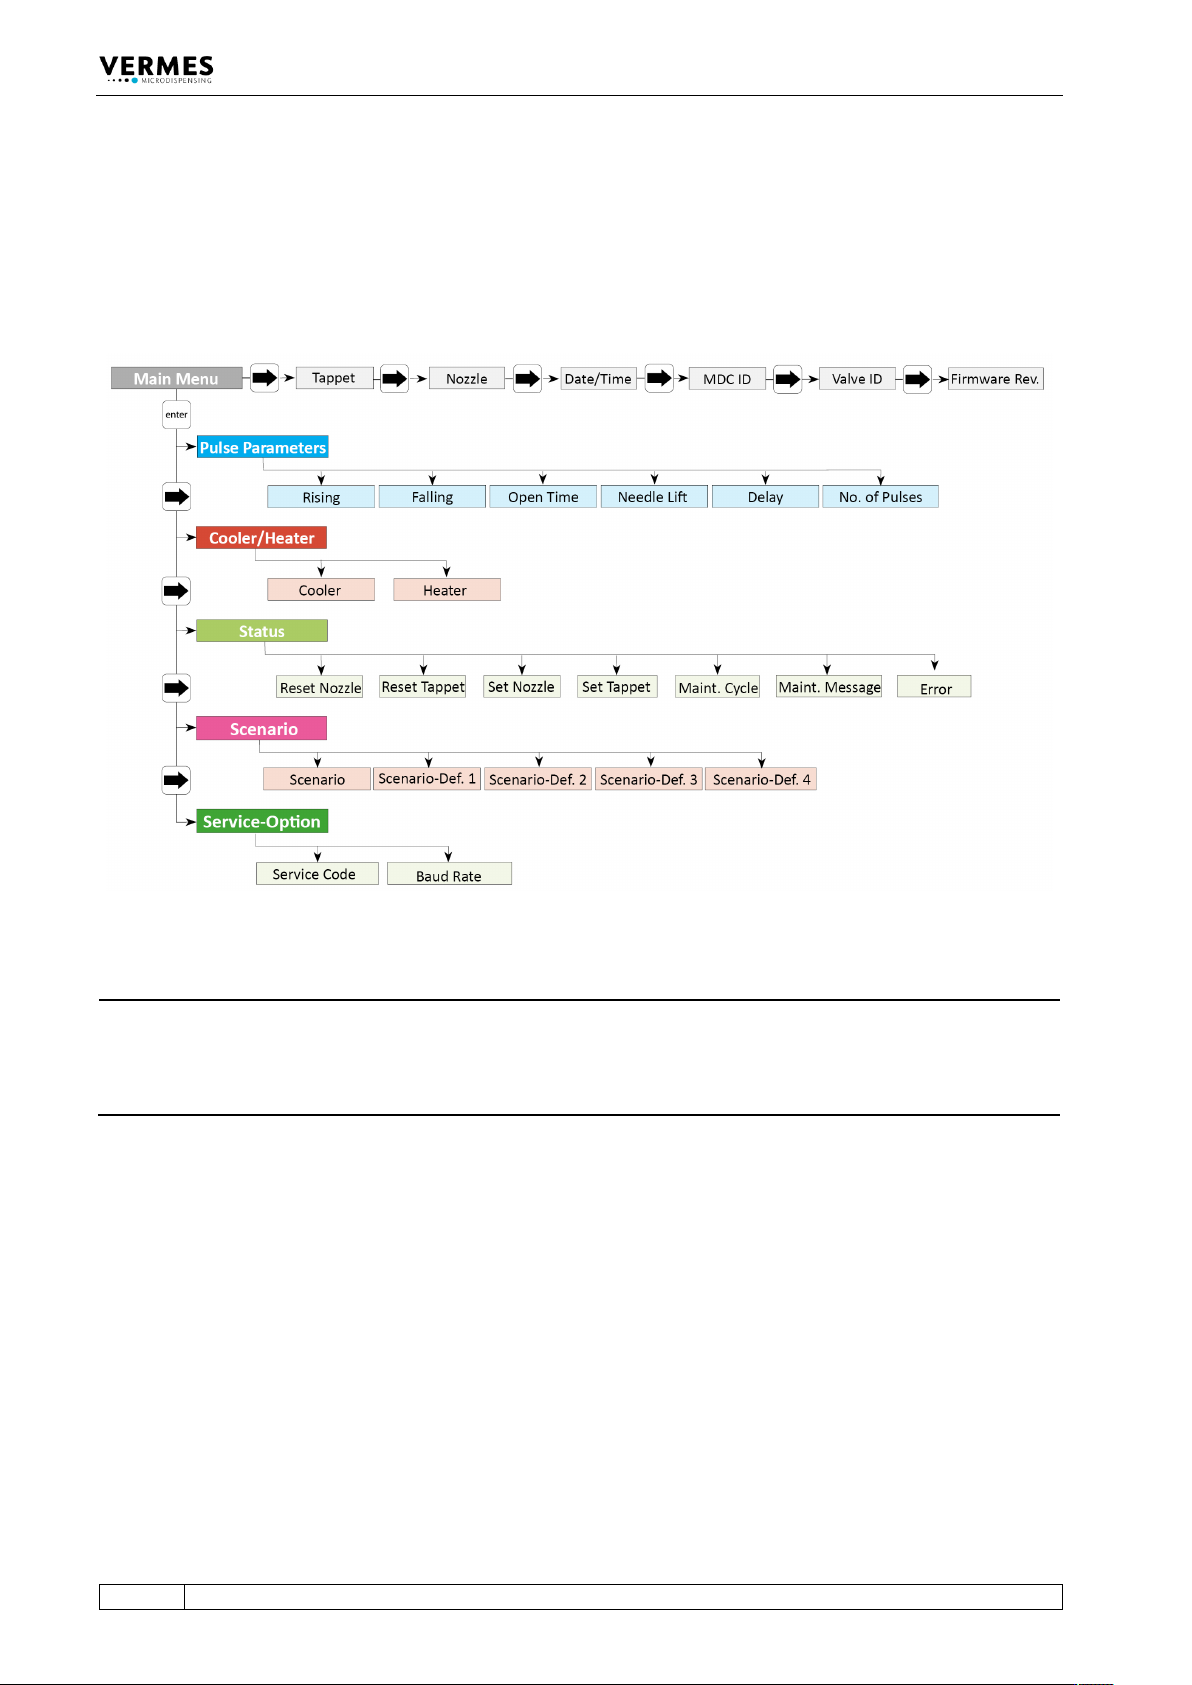
4.5.1 Main Menu
When you switch ON the MDC, you always start in the “Main Menu”. The display shows “Ready”
(position 1, see Fig. 6). With [enter] or [↓] you can reach the submenus. For the information on
the main level use [→] or [←]. All levels are “wrap-around”, i.e. you can circle around between
the items with both keys.
Fig. 5: Menu structure
INFORMATION
Automatic change back to the main menu
On this level, the display jumps automatically back to “Ready”, if you do not press any button for
longer than about 10 sec. From the submenus, the display will jump back as well, if no buttons
are pressed, but the wait is a bit longer.
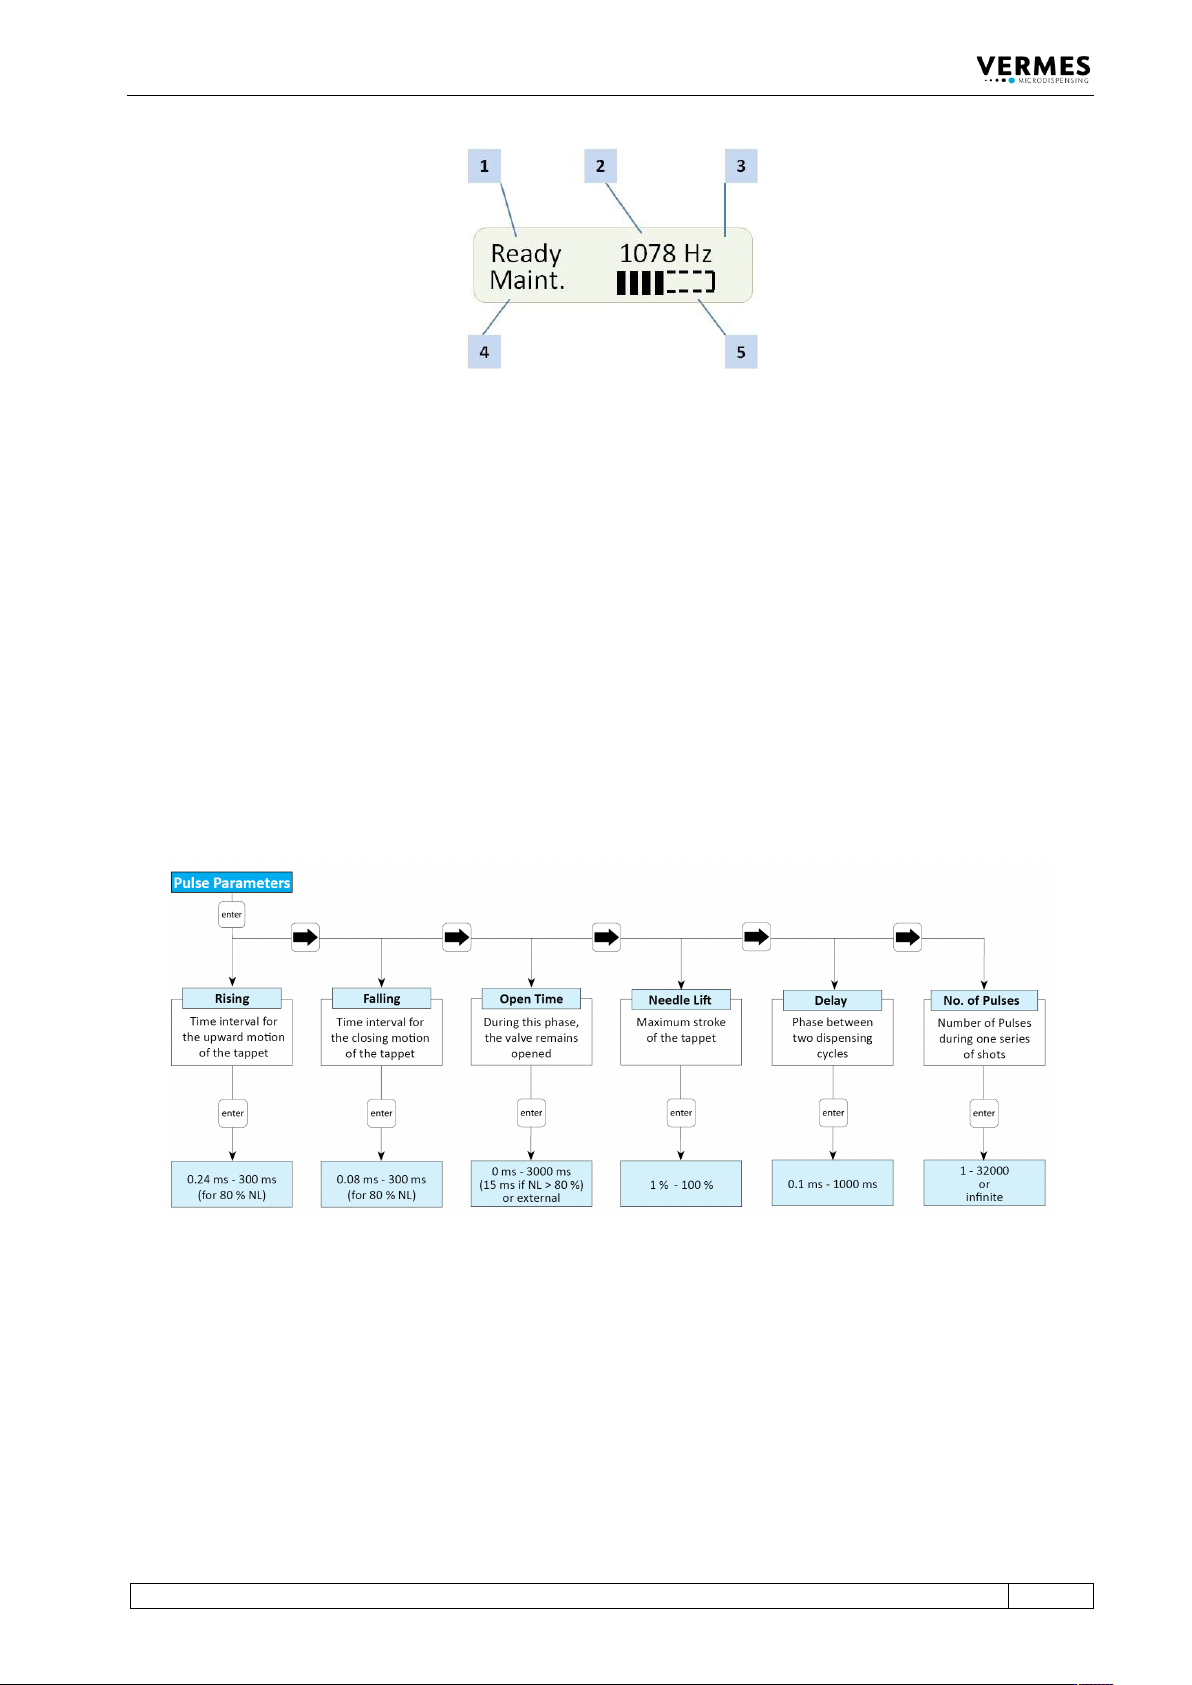
In the upper right corner of the display a frequency is shown (position 2, see Fig. 6). This is the
dispensing frequency resulting from your current parameter settings. While “Scenario” is “ON”,
the word “Scenario” is shown instead (only while entering parameters in the submenu, the
frequency is always shown). Next to the frequency, on position 3, one or two letters show the
submenu you are in (PP = Pulse Parameters, CH = Cooler/Heater, S = Status, Sc = Scenario, SO =
Service-Option).
Control Unit MDC
VTK-TR-BA-072e-1 - User Manual MDS 358X Series
29
Fig. 6: Display main menu
In the lower line, a maintenance bar is shown (position 5). If all eight sections are filled,
maintenance is recommended. Though be aware that this bar is only updated when starting the
MDC!
In “Tappet” and “Nozzle” you can see the current values as well as the respective reference value.
If a heater is used, instead of “Ready” the current temperature is displayed.
4.5.2 Submenu “Pulse Parameters”
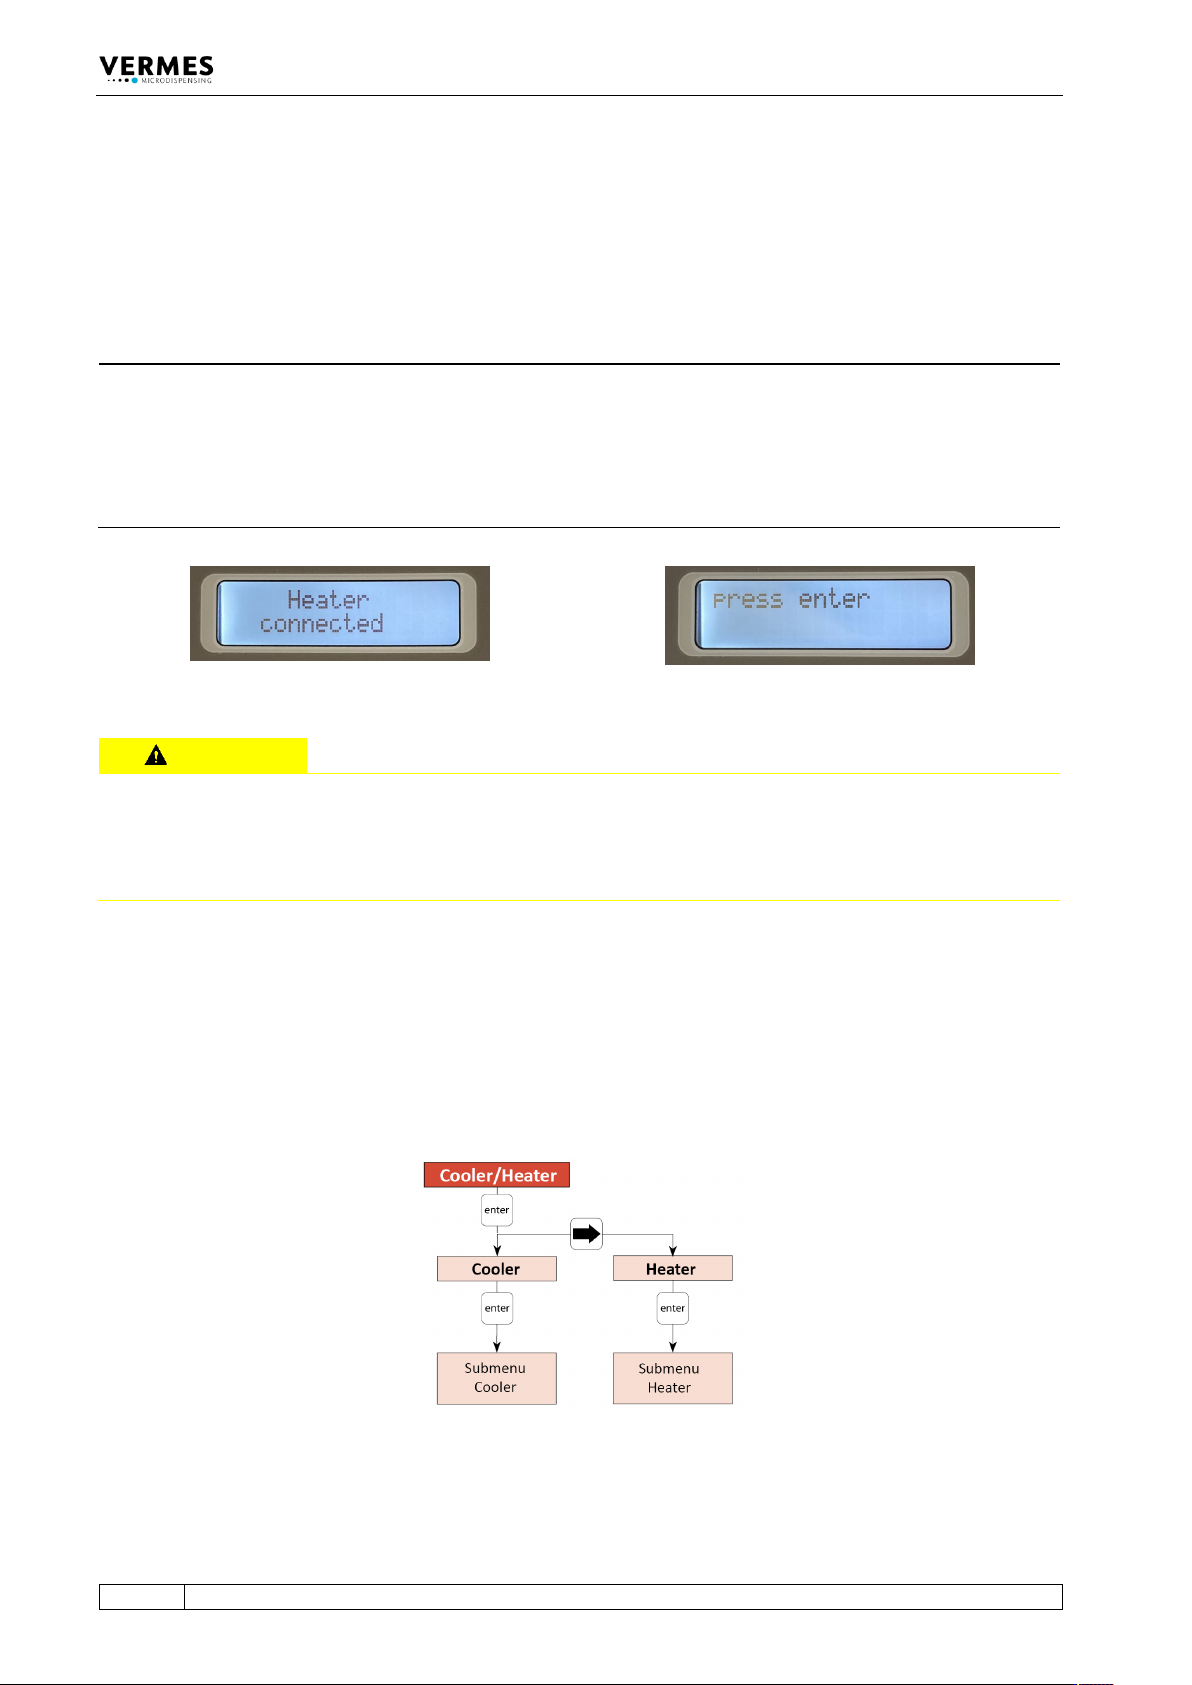
In the submenu “Pulse Parameters” you can recall and modify dispensing parameters for a
particular process. The limits for these parameters you can find in the diagram. You cannot enter
values outside these ranges. The values for rising and falling are for 80 % needle lift. If the needle
lift is smaller, the values might be lower. The dispensing frequency based on the current
parameters is shown in the main menu in the display (position 2, see Fig. 6, page 29), but only, if
“Scenario” is “OFF”.
Fig. 7: Submenu „Pulse Parameters“
Control Unit MDC
30
VTK-TR-BA-072e-1 - User Manual MDS 358X Series
4.5.3 Submenu “Cooler/Heater”
A Microdispensing System MDS can be equipped with a heater or a cooling valve. For heating,
you can use a 48 V heater (e.g. Heater MDH-48-BY, order no. 1014231). For cooling, you can use a
flow control valve (e.g. Flow Control Valve FCV-AC 6.0 M12, order no. 1016265).
Fig. 8: Message “Heater connected - press enter”
CAUTION
Danger of burns through high temperatures!
The heater can reach temperatures of up to 180 °C.
• Do not touch this area during operation.
• And afterwards only touch it once it has cooled down.
By using a heater, the dynamical viscosity of the fluid to be dispensed can be controlled. For
some liquids, dispensing without heating is impossible. Heating may also be required to ensure a
constant process temperature, or when the dispensing has to take place above room
temperature.
To reach a certain target temperature takes time. This time is influenced by many different
circumstances, e.g. the outer temperatures.
Fig. 9: Submenu “Cooler/Heater”
All relevant functions of the heater and the cooling valve can be set in this submenu. With
“Cooler” you can reach the submenu for the cooling settings (see paragraph 4.5.3.2, page 31).
INFORMATION
MDC detects the heater and the cooler during start-up
During start-up, the MDC also checks if a heater and/or a flow control valve is connected. The
messages “Heater connected” (or “Heater is disconnected!”) and “Cooler connected” (or “Cooler
is disconnected!”) will be displayed. When a heater is connected, the display switches between
the message “Heater connected” and the message “press enter” (see Fig. 8). You need to press
the [enter]-key to confirm it.