M20_Ope_E.pdf - 第234页
Chapter 5 Libraries 5-84 Model Centering z Summary This function allows the sample fiducial to be cent ered automatically for model registration. Be sure to use this function in using CAD data for programming. This fun…
Chapter 5 Libraries
5-83
Match. Threshold: The threshold value that compares the images between the fiducial
model and the actual fiducial image. Enlarging this setting makes
the criteria more severe. Specify “600”(default value) normally.
For example, when the model is hexagonal and if a similar round
object exists in the search area, it may be mis-recognized as the
fiducial if the threshold setting is too low (not severe enough). In
such a case, you must raise the setting.
On the other hand, when there is no chance of confusing objects that
appear in the search area, it is recommended to make the criteria
less severe to reduce possible fiducial error. Fiducial mark generally
has diverse reflectance. As the result, the mark may be distorted
when captured as an image. With too severe criteria, the system
fails to detect the mark even though the mark exists.
In the latter case, it is not recommended to change the default
setting.
Search Interval: This parameter implies the intervals to search the target mark in
search area. Default value is “4”(pixels). If there are any similar
objects in the search area, that may sometimes found as the target
mark wrongly, try smaller value, 4 Æ 3 Æ 2 Æ 1, to perform more
precise check by smaller intervals. However, the smaller value will
make the recognition time longer.
Chapter 5 Libraries
5-84
Model Centering
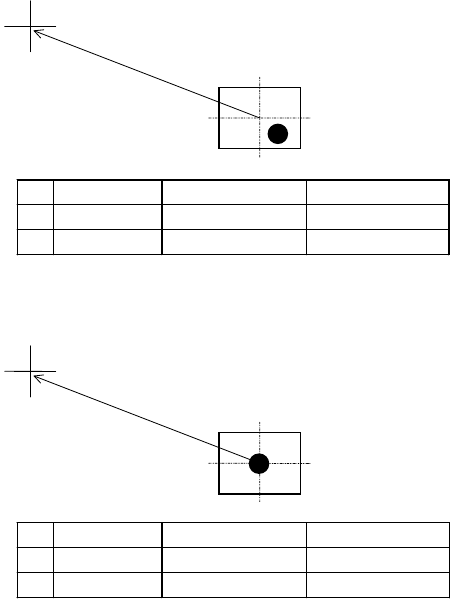
z Summary
This function allows the sample fiducial to be centered automatically for model registration. Be
sure to use this function in using CAD data for programming. This function makes fiducial
compensation exact by matching the fiducial center to the model center for even accurate
placement.
Manual mark centering
1
without using this function can yield offset.
Placement point
Registered model
CAD data Mark center offset Placement coordinate
X 80.0 2.0 78.0
Y 40.0 2.0 38.0
This function allows for matching the fiducial center to the model center automatically.
Placement point
Registered model
]
CAD data Mark center offset Placement coordinate
X 80.0 0.0 80.0
Y 40.0 0.0 40.0
This function is available only for the below fiducials:
z Color: White or black. Contrasts sharply against the surrounding.
z Number of blobs: One (recommendation) or two.
z Model X/Y setting: 1.2 to 1.5 times as large as the usual size.
z When using the Distance X/Y feature, centering is performed away from the camera
center for the specified offset.
1
In most cases, the operator performs two-point teach by visually aligning the teach the center of the camera
(cross hairs of the VCS monitor) to the fiducial for two points.
Chapter 5 Libraries
5-85
Action: Center searching based on a fiducial shape:
The shape should be circle, square, triangle or corner square. (Maximum size : □3.0mm)
① In the Fiducial Data dialog box, select [Center Search] for [Algorithm].
② Enter all the required data.
③ When the coordinates of the fiducial center are not yet entered, click
Prearrange>Teach&Move Pallet to perform teach entry. When the coordinates have been
entered, use the Trace menu to move the main teach camera to the coordinates.
④ Adjust the Gain, Offset, and Inside/Outside Light settings so the fiducial image is shot
clearly.
⑤ Click <Image Test> button to execute image test. Confirm the test ends in success.
⑥ Save the data.
Pattern matching:
There is no restriction in shape, however circle is ideal. The size isφ0.2mm to φ1.0mm.
This method is most suitable for the mark plated with silver, gold or nickel etc.
① In the Fiducial Data dialog box, select [Pattern Matching] for [Algorithm].
② Enter all the required data.
③ When the coordinates of the fiducial center are not yet entered, click
Prearrange>Teach&Move Pallet to perform teach entry. When the coordinates have been
entered, use the Trace menu to move the main teach camera to the coordinates.
④ Adjust the Gain, Offset, and Inside/Outside Light settings so the fiducial image is shot
clearly.
⑤ Click <Model Centering> button to center the fiducial.
⑥ Click <Acquire Model> button to acquire the model.
⑦ Click <Image Test> button to execute image test. Confirm the test ends in success.
⑧ Save the data.