M20_Ope_E.pdf - 第408页
Chapter 14 Intelligent Feeder 14-8 After the IP address and port No. are been set, select Option > Connect in the case of barcode input software. (Or right-click on the barcode input software icon on t he Windows task…
Chapter 14 Intelligent Feeder
14-7
14-1-4 Connecting to a Server
Communication with the server software, client software and barcode input software is carried
out using TCP/IP. An explanation of how to make necessary communication settings is given
below.
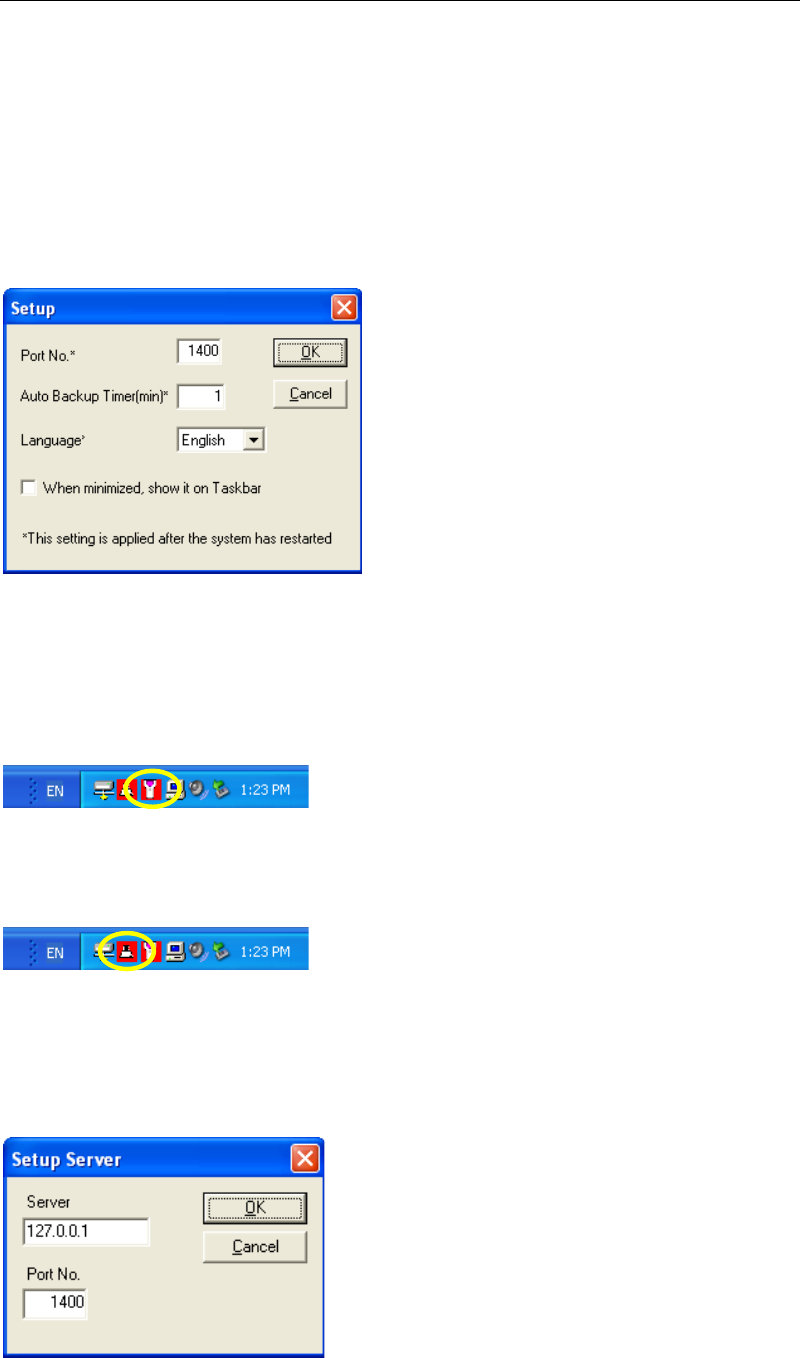
■Setting the Server Software
From the taskbar of the server software window, select Option > Setup. (Or right-click on the
server software icon and select “Setup”.)
The following dialog box appears, so enter a port No. in [Port No.]. (The default is “1400”.
Normally, the default setting is satisfactory, so do not change it.)
■Setting the Barcode Input Software and Client Communication Software
From the taskbar of the barcode input software window, select Option > Setup Server. (Or
right-click on the barcode input software icon on the Windows task bar and select “Setup
Server”.)
For the client software, right-click on the client software icon on the Windows task bar and
select “Setup Server”.)
The Setup Server window appears, so specify the server’s IP address and port No. By default,
“127.0.0.1” is set for the IP address, and “1400” for the port No. Make sure that the same port
No. as that for the server software is set. When using the server software by only one mounter,
the default IP address and port No. can be left unchanged. When using the server software for
another mounter or PC, the IP address by which the server software is run must be specified.

Chapter 14 Intelligent Feeder
14-8
After the IP address and port No. are been set, select Option > Connect in the case of barcode
input software. (Or right-click on the barcode input software icon on the Windows task bar and
select “Connect”.)
(For the client software, right-click on the client software icon on the Windows task bar and
select “Connect”.)
When connection is established, the background color for the icon will change to blue.
If connection has failed, check whether the settings are correct.
Once the settings are made, an attempt to establish connection with the server software will be
made automatically when the software starts up next time.
Note: To run the server software on a PC, make sure that the server software is started up before the
client software and barcode input software.
Chapter 14 Intelligent Feeder
14-9
14-2 Creating a Database
14-2-1 Registering Component Barcodes
This section explains how to register the link information between component codes and
component barcodes to the server’s database.
Up to 12,000 component barcodes can be registered.
Action:
① Scan the "Show / Hide" barcode to display the ID registration window (InputBar). (Note
1)
② Scan the component’s barcode.
The scanned barcode will be input in [Comp. Barcode] and [Comp. Code] under [Comp.
Information]. (Note 2)
If you want to link the component code with an existing component code registered to the
mounter’s component library, select that component code from the Comp. Code combo
box. (Note 3)
③ The default initial component count that has been set will be entered in [Initial Count]. If
necessary, enter a desired component count. (Note 4)
If the “EIAJ” checkbox is checked (the checkbox is displayed when Option > Setup is
selected), the component count written on the barcode will be set in [Initial Count] when
an EIAJ-compatible barcode is scanned.
Example: 3N1CR1/8-100JV 5000
In this example, “5000” given after a space will be set as the initial component value.
In fact, the first and next spaces are searched and the number found between the spaces
will be set.
④ The lot No. that has been set for Lot No. in the Setup window will be entered in [Lot No.].
If necessary, enter a desired lot No. (Note 5)
⑤ From the Target Comp. Record combo box, select the component that is similar to the one
you are going to register. By setting the target component record, a component code can
be created and exported to the component library via a floppy disk. For details, refer to
“Registering to the Component Library”. (Note 6)
This setting is not necessary if the link with an existing component code has been set at
step ②. (Note 7)
⑥ Scan the "Register Comp." barcode.
⑦ “OK” will be displayed if registration is completed successfully. If registration has failed,
read the displayed message, make necessary corrections, and then scan the "Register
Comp." barcode again.
⑧ Scan the "Show / Hide" barcode to close the ID registration window (InputBar).