SME_Jig_User_Guide(Eng_Ver1).pdf - 第42页
3-10 User's Guide For Tape Fe eder Calibration Jig 3.3.2. Feeder Data Check (Check Feeder Info) After executing the calibration j ig program, performing the "3.3.1. Serial Number Input" procedure will disp…
3-9
Tape Feeder Calibration
3. Input the barcode information by scanning the barcode using a barcode reader or
keyboard and click the <OK> button.
Memo
Scanning the serial number using a barcode reader will immediately
save the serial number scanned on the main board of the tape feeder
and exit the barcode scan window.
Caution
If the serial number of the feeder is not inputted correctly, an
error message is displayed.
Even though the serial number can be inputted using the
keyboard, it is recommended to scan the serial number
using a barcode reader.
3-10
User's Guide For Tape Feeder Calibration Jig
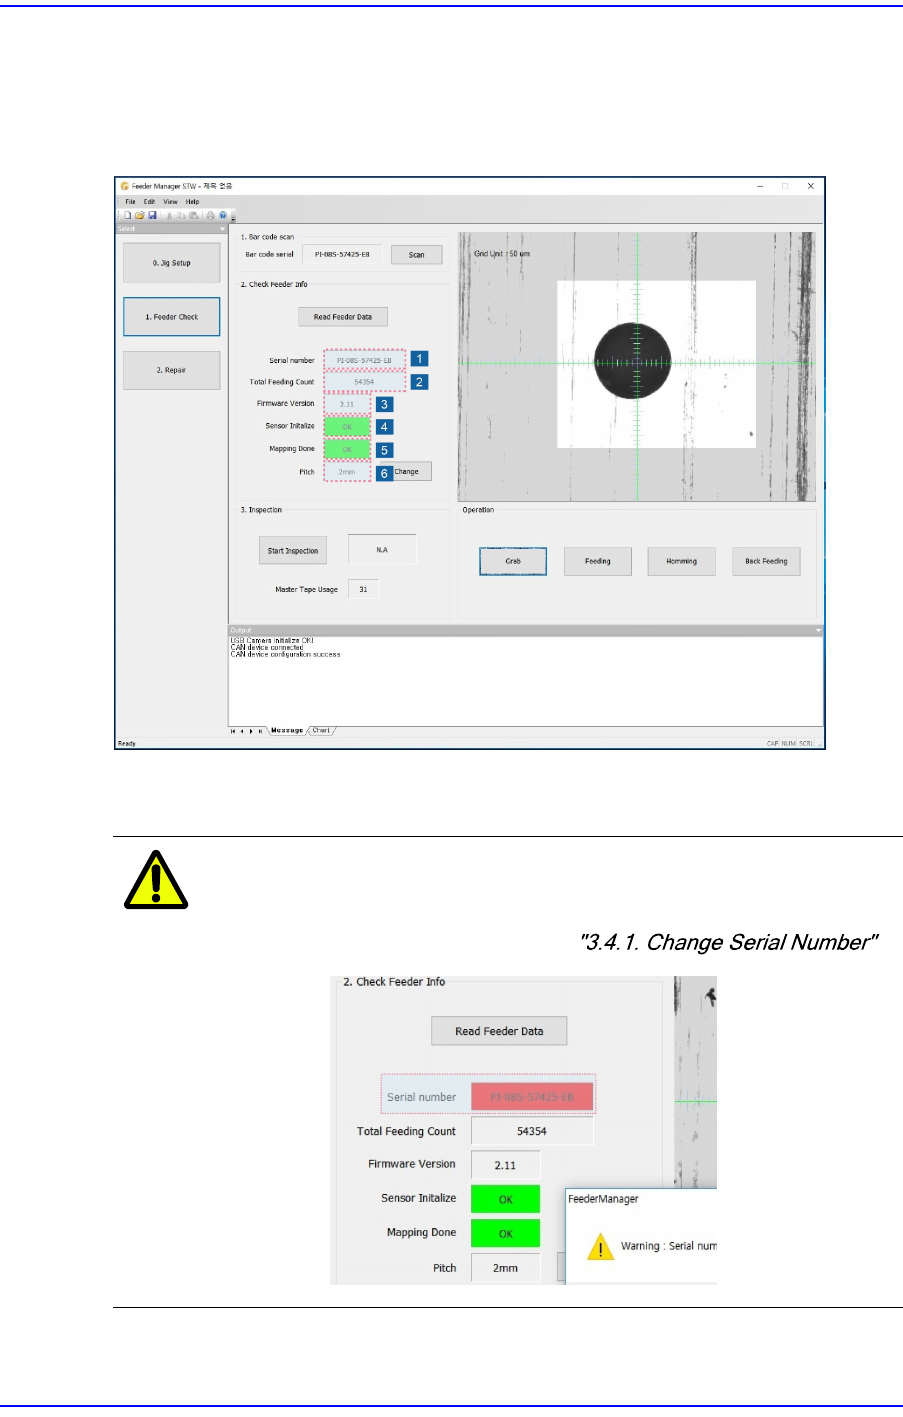
3.3.2. Feeder Data Check (Check Feeder Info)
After executing the calibration jig program, performing the"3.3.1. Serial Number Input"
procedure will display the feeder data as shown below. Check whether the feeder data is
normal.
1. Check whether the serial number displayed in the <Serial number> caption box
corresponds to that of the sticker attached to the tape feeder.
Caution
If the serial number is different, the serial number caption
box turns red along with a warning message. Modify the
serial number referring to .
2. Check the cumulative feeding count displayed in the <Total Feeding Count> caption
3-11
Tape Feeder Calibration
box and take the following measures:
w If the measurement value is greater than 40,000,000
If the inspection result of the part supply accuracy is 'NG', perform an overhaul of
the feeder. If the inspection result of the part supply accuracy is 'OK', perform an
overhaul of the corresponding feeder after using it until its feeding count becomes
60,000,000.
w If the measurement value is greater than 60,000,000
Perform replacement and overhauling of the components related to the part supply
accuracy of the feeder.
Caution
The recommended feeding count differs depending on the
tape feeders. Mange the lifetime of the tape feeder referring
to .
3. After checking the firmware of the feeder displayed in the <Firmware Version>
caption box, if the following conditions are not met, update the feeder firmware using
the firmware saved in the USB provided when purchasing the calibration jig.
w Tape feeder using an old main board: Firmware version of 1.26 or above
w Tape feeder using a new main board: Firmware version of 2.10 or above
Memo
For more details regarding the feeder’s firmware update, refer to "4.2.
Tape Feeder Firmware Upgrade".
4. Check whether 'OK' is displayed in the <Sensor Initialize> caption box. If 'NG' is
displayed in the <Sensor Initialize> caption box, initialize the feeder sensor referring
to the "3.4.2. Tape Feeder Sensor Initialization".
5. Check whether 'OK' is displayed in the <Mapping Done> caption box. If 'NG' is
displayed in the <Mapping Done> caption box, initialize the feeder sensor referring to
the "3.4.2. Tape Feeder Sensor Initialization".
6. The <Pitch> caption box shows the pitch set to the current tape feeder.