3_AVS-V2_MCT-UM-internal_EN_07-2019.pdf - 第109页
ASM AVS - U SER M ANUAL P AGE 109 OF 182 5.2.25.4 Printer Project General-Tab In thi s tab , t here is no d iffe renc e bet wee n t he pr oj ec t o f a pla ceme nt m achi ne a nd t he p ro- ject o f a printe r. S ee 5 .2…

ASM AVS - USER MANUAL
PAGE 108 OF 182
5.2.25.3 Printer adjustment
Before completing the AVS test on a printing machine, the machine maintenance history
should be checked and any remedial work recommended is completed.
Step 1: Paste Preparation
First, 5 prints in each direction should be completed without AVS measurement. This is to
prepare the glue and stabilize the squeegee pressure, to ensure good consistent prints for the
test.
Step 2: Adjust (Theta)
Now make min. 4 prints, 2 in each direction, Front to Back (Reverse direction) and Back to
Front (Forward direction), obtain (Theta) rotational error correction, which are then applied
to the machine.
On the following steps during X/Y adjustment, check the theta to make sure it is stable.
Step 3: Adjust X/Y
Now make min. 4 prints, 2 in each direction, Front to Back (Reverse direction) and Back to
Front (Forward direction), obtain (Theta) rotational error correction, which are then applied
to the machine.
On the following steps during X/Y adjustment, check the theta to make sure it is stable.
Step 4: Perform MCT
Mark the first measurement that you would like to measure in the stable measurement se-
ries, e.g. by writing "Start MFU" into the comment field of the measurement.
From this measurement, you must perform at least 20 measurements (10 in each direction).
Parameters for printer adjustment in AVS Software
The main parameters what can be adjusted on a printer during a MCT are:
X-Offset: as a result of the AVS measurement
Y-Offset: as a result of the AVS measurement
Stencil rotation (Theta): as a result of the AVS measurement
Print speed: determined by the evaluation of the printing quality.
Print pressure: determined by the evaluation of the printing quality.
Separation distance: determined by the evaluation of the printing quality.
Separation speed: determined by the evaluation of the printing quality.
NOTICE
Use USC – Vac/Dry if possible.
Use Dry with OSC using cyclone cleaner system!

ASM AVS - USER MANUAL
PAGE 109 OF 182
5.2.25.4 Printer Project General-Tab
In this tab, there is no difference between the project of a placement machine and the pro-
ject of a printer. See 5.2.24.1.1.
5.2.25.5 Printer Project Machine-Tab
In this tab, there is no difference between the project of a placement machine and the pro-
ject of a printer. See 5.2.24.1.2.
ASM AVS - USER MANUAL
PAGE 110 OF 182
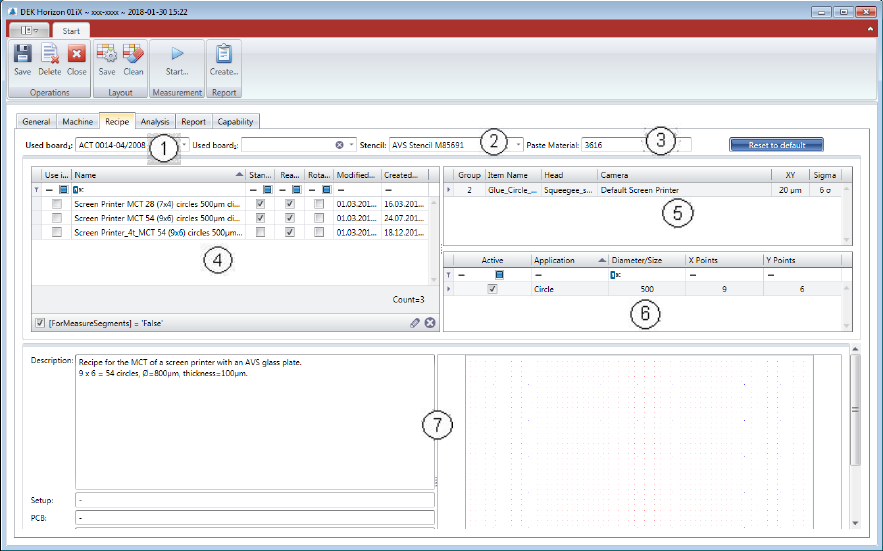
5.2.25.6 Printer Project Recipe-Tab
(1) Select measurement board:
Choose a board from the list. The board must be configured in the database and assigned to
the present AVS device. You can dedicate a second board to the project, in case that you like
to use a second board to accelerate the process.
(2) Stencil allocation:
Choose a stencil from the list. The stencil must be configured in the database and allocated
to the device.
(3) Paste allocation:
The paste or the glue which is used, must be entered in text format.
(4) The recipe list is empty at the beginning. Once you choose a Stencil from the list (2), the rec-
ipes which are connected to the stencil are being listed. Select one Recipe with the check-
box in the left side.
(5) In the Item configuration list, there is normally only one line, so there is not much to con-
figure. At this point you can change the specification for this project. And you can go back to
default spec. with the blue colored button above.
(6) In this table you find the information to the applications that are available on the stencil.
(7) Detailed information and layout of the selected recipe.