3_AVS-V2_MCT-UM-internal_EN_07-2019.pdf - 第51页
ASM AVS - U SER M ANUAL P AGE 51 OF 182 5. 2.16 D epa rt ment s Click on the button “Departments” in the gr oup customer data of the menu list. , or In the following window, choose the cu stomer, wher e you want to edi t…
ASM AVS - USER MANUAL
PAGE 50 OF 182
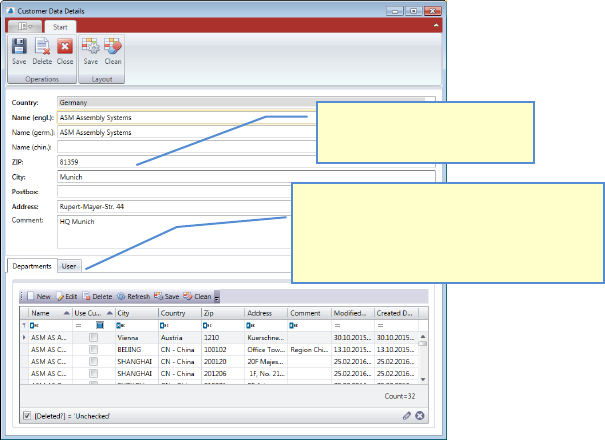
5.2.15.1 Customer Data Details
The data structure for Contacts/Users is as follows: Customer -> Department -> Con-
tact/User
Enter Customer name (Company name) and address.
3TTo create3T 3Ta3T 3Tcontact with a3T 3Tcustomer3T, a division 3Thas to be created3T 3Tfirst3T.
One department at least must be created
to each customer.
This can be done here directly after
saving the customer data once.
1. The customer data also
contain the address data.

ASM AVS - USER MANUAL
PAGE 51 OF 182
5.2.16 Departments
Click on the button “Departments” in the group customer data of the menu list.
, or
In the following window, choose the customer, where you want to edit departments data.
A list with all departments from this customer appears.
Double Click the Department you want to change or mark the line and press “Edit” to open the
“Department Details” view.
Press “New” if you want to add another customer to the database.
Enter the full name of the department of the contact you like to enter later.
Activate this Checkbox, if the address
of the department is equal to the
companies address (Customer).
If the address of the department is
different to the company’s address,
deactivate this Checkbox and enter
the address data in the fields below.
After saving of the departments
data, the desired contact can be
added directly here.
ASM AVS - USER MANUAL
PAGE 52 OF 182
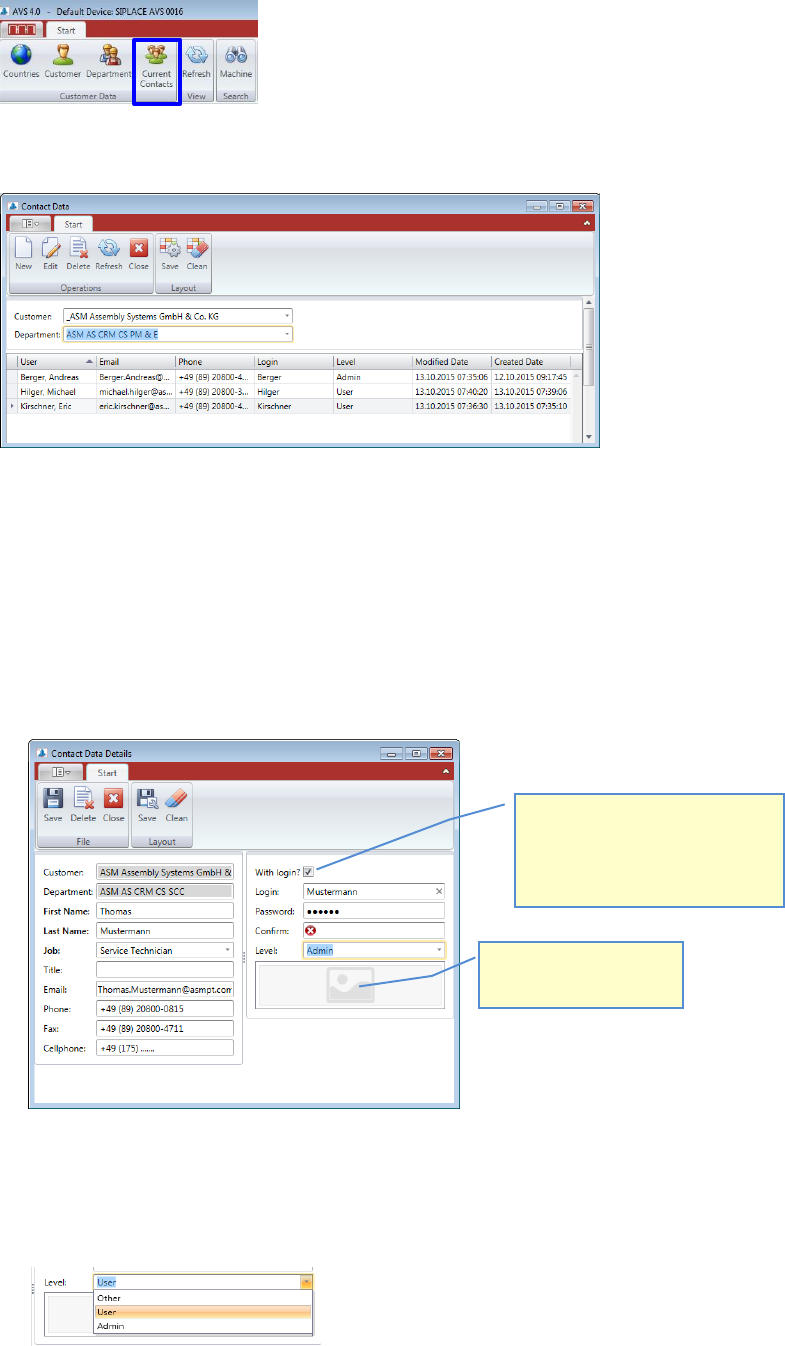
5.2.17 Current Contacts
Click the Button “Current Contacts” in the group “Customer Data” in the Menu bar.
A list opens, containing all Contacts from the Customer which is defined as Default for the AVS
device that is set as default.
Choose the required Department.
Double Click the Contact you want to change or mark the line and press “Edit” to open the “Con-
tact Details” view.
Press “New” if you want to add another Contact/User to the database.
Now enter the data for the contact/user, as described as follows.
5.2.17.1 Contact/User Data Details
Enter all available data of your contact.
If the contact should also sign up as a user in the Software, select this check box and enter the
required login information below.
Also select the user-level, which the user should have.
Note: Only administrators can create additional users.
If the contact should also be able
to login at the software as a User,
activate this checkbox and enter
the login data in the fields below.
You can also add a photo
to each contact/user.