3_AVS-V2_MCT-UM-internal_EN_07-2019.pdf - 第32页
ASM AVS - U SER M ANUAL P AGE 32 OF 182 3.5 Co ntro llin g t he A SM A VS The en ginee r's note book is alway s s et t o DH CP (a utom ati c ref ere ncin g of netwo rk ad - dr ess ). To avoi d h avin g to mod ify th…
ASM AVS - USER MANUAL
PAGE 31 OF 182
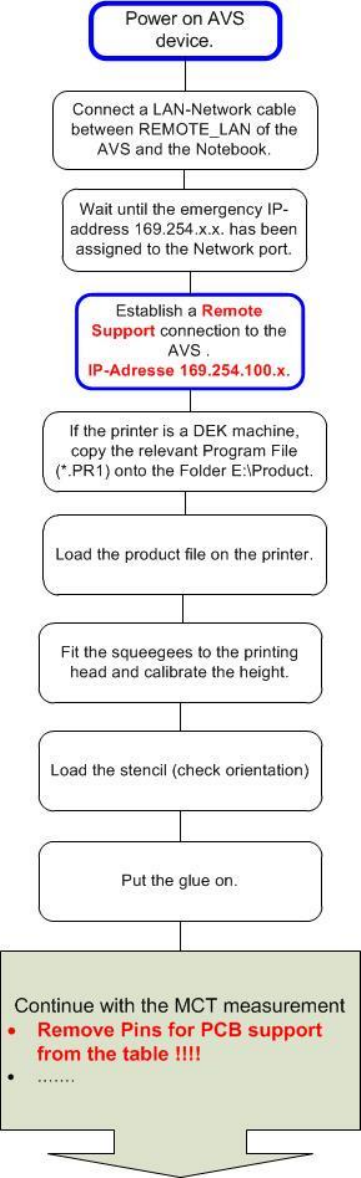
3.4.3 Prepare work on printers
ASM AVS - USER MANUAL
PAGE 32 OF 182
3.5 Controlling the ASM AVS
The engineer's notebook is always set to DHCP (automatic referencing of network ad-dress).
To avoid having to modify the standard TCP/IP settings at the notebook, the ASM AVS network
card responsible for the remote connection uses an address from the address range
169.254.xxx.xxx which has been released by Microsoft for emergency addresses.
If a connection is established to another subscriber and it is not possible to assign an ad-dress to
this connection (because the network in question does not have a DHCP server) then, on the ex-
piry of a timeout, an address from the range 169.254.xxx.xxx is assigned automatically.
The procedure described below can then be used to establish a remote connection to the ASM
AVS computer.
NOTICE
The time that elapses before a remote desktop connection is successfully established depends, on the one
hand, on the notebook timeout described above and, on the other, on the ASM AVS computer boot time.
This can take several minutes.
If the automatic allocation of the emergency address is not working properly, the IP address can
be applied via the properties window of the Ethernet connection on the notebook.
3.5.1 Establishing the Notebook ASM AVS connection
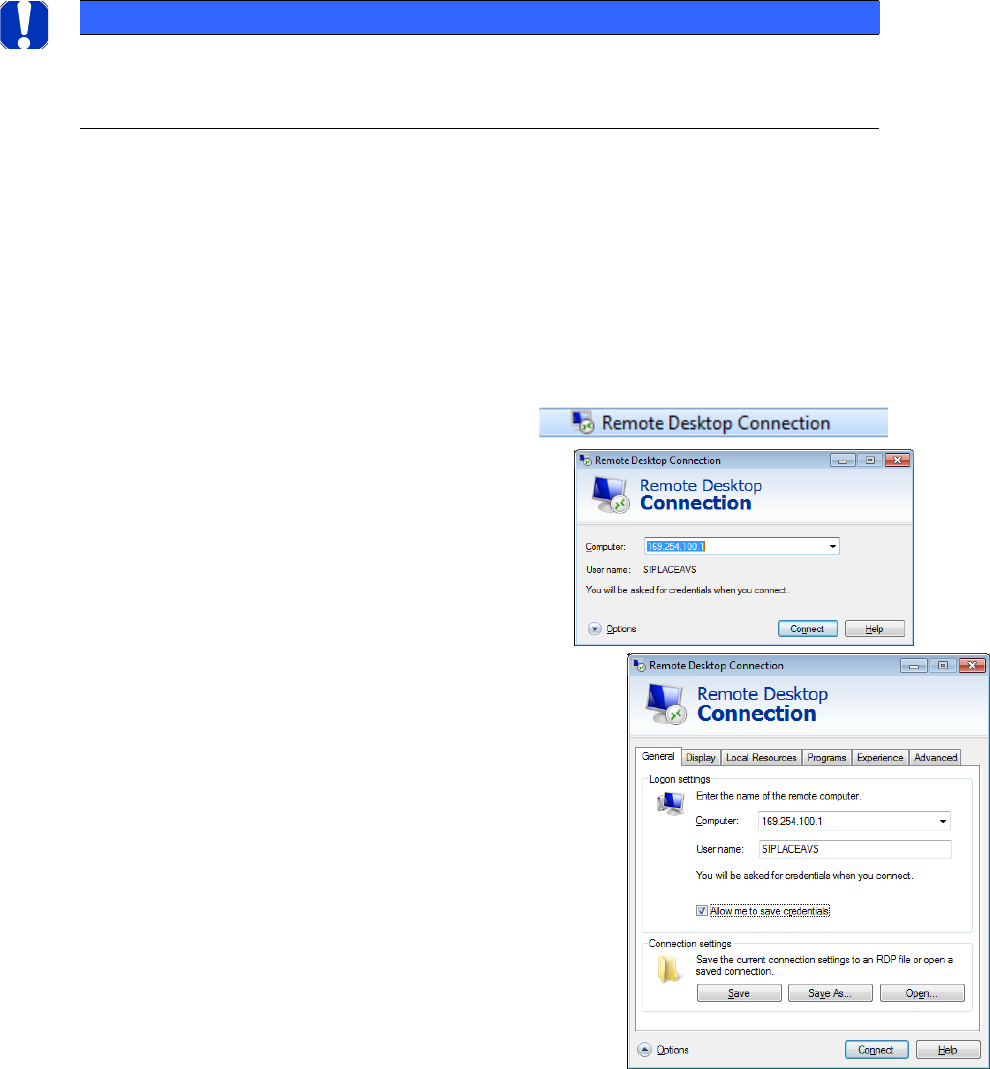
Establishing the Remote Desktop connection:
On the Notebook: START => Accessories =>
Insert the TCP/IP-address of the ASM AVS and
press »Connect« =>
The TCP/IP-address is always like 169.254.100.x.
The last number of the address means the
serial number of the AVS device.
Click on the Button »Options«.
Here you can insert your login data:
Username: SIPLACEAdmin
Password: MS128
Activate the option »allow me to save credentials«.
The remote connection can be stored for the next time as
a Link on the desktop of your computer. Therefore, click
onto the »Save As…« Button and follow the instructions.

ASM AVS - USER MANUAL
PAGE 33 OF 182
4 Preparation in SIPLACE Pro (SIPLACE only)
4.1 General
The Recipe Layout to measure the different heads, cameras,… on placement machines are usually
created in the AVS/AVS_Scan Software and are exported from there, as CAT-files.
For SIPLACE Pro there are prefabricated setup tables and circuit board data available for different
software versions.
These are so-called * .sipro files that can be imported via data model import into the SIPLACE Pro
database.
This also includes the associated housing shapes and components.
NOTICE
Software Version of SIPLACE Pro
Remember that it is absolutely necessary, that the SIPLACE Pro software is always on
the actual released version.
You can only download SIPLACE Pro Programs on Stations Software that is lower than
its equivalent.
You cannot download programs if the Stations software version is higher than the
equivalent.
For example: equivalent to Stations Software 712.x - SIPLACE Pro 16.1.
NOTICE
Update the SIPLACE Pro AVS Data
• Recommendation: Delete the old data before importing the latest SIPLACE Pro data
to avoid confusing data.
• Or, use an empty Database (e.g. from SDC) to import data without old data!
• If you want to delete the data from a given database but still want to use this DB,
proceed as follows:
Manually remove all Recipes, Jobs and Setups for AVS.
Now you can successively delete tables, circuit boards, parts lists, components,
housing shapes, FMTs, and marks from the AVS folders.
• If deletion is not possible due to time constraints:
Rename all AVS folders of each view (Components, Enclosures, Brands, Assembly
Lists, Circuit Boards, Tables, Trays) to AVS_Old.
Importing the new data automatically brings back the AVS structure.
NOTICE
Import of Data
• Import the data WITHOUT specifying a destination folder. The data must always be
in an AVS folder and this folder structure is imported with it.
• DO NOT check the Reduced Directories option.
• Always overwrite everything (including image data / blobs, possibly resolving con-
flicts by creating new image data). This cannot be avoided, because the table and
PCB files are partially removed. redundant data (BE, GF, ...) included.