印刷机通用说明书(中英文版) 450+.pdf - 第56页
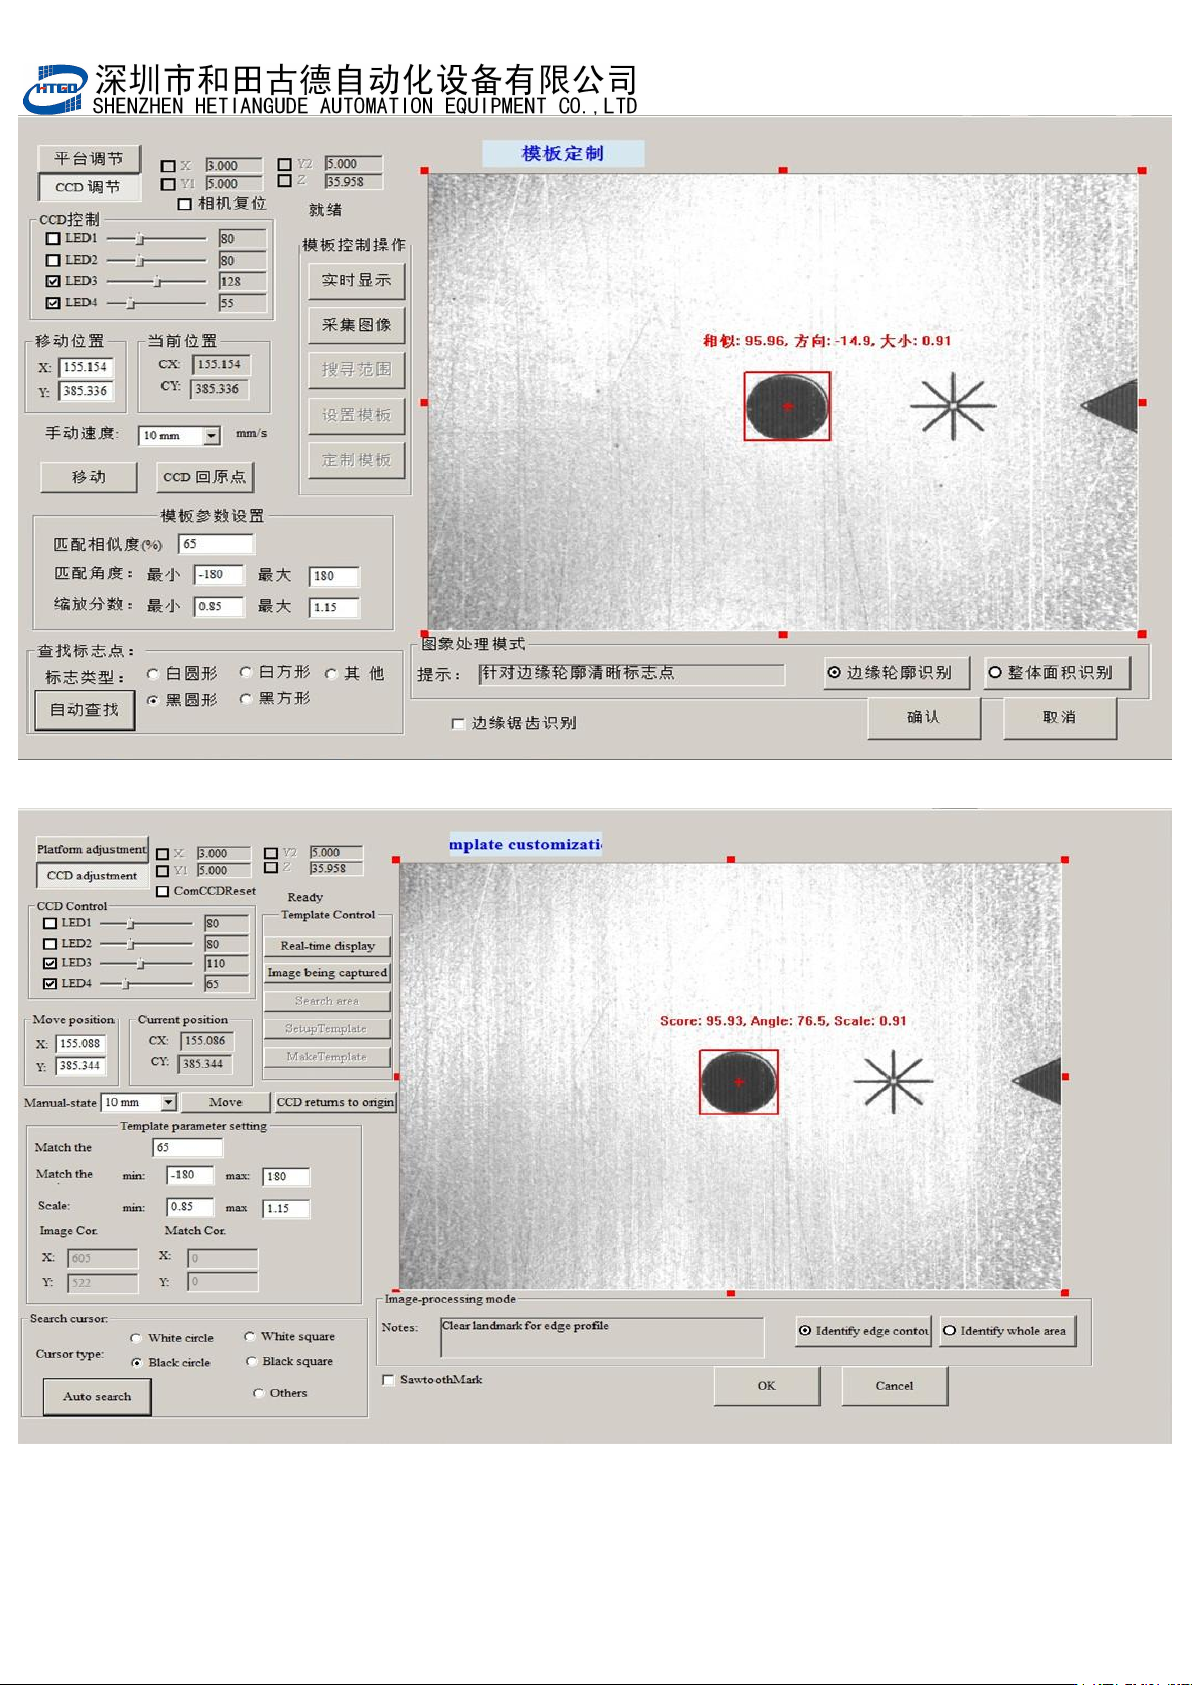
- 56 - 图 3 -16 钢 网 Mark 点的匹配,匹配完成后点击 [ 确定 ] Pix 3-16 the matching of st encil mark point. Click “ 确定 ” ( ok ) bu tton af ter the matching is f inished.

- 55
-
J,[标志点类型]:5 种选项供勾选;
(remark type):There are five options for selecting.
K,[自动查找]:系统自动识别选定类型 Mark 点;
(automatic searching): The system will automatic searching the selected mark
point.
L,[模板控制操作]:设定搜索范围,并当自动查找失败时手动设置 MARK 点;
(template control operation): Specify the searching scope. When the automatic
searching fails, operator sets the mark point manually.
M
,
[
实时显示
]
:实时显示图像,手动设置
MARK
点使用;
(real-time display): Display the real-time image. Click this button when set the
mark point manually.
N
,
[
采集图像
]
:采集当前图像,手动设置
MARK
点使用;
(image capture): Capture the current image. Click this button when set the mark
point manually.
O,[搜索范围]:在视域中划出一个区域后点击该按钮设定搜索范围,系统只在该范围
中识别
Mark
点,该功能用在视域中有
2
个以上相似
Mark
点时。用于过滤掉不需
要识别的
Mark
点;
(searching scope): Click this button to set the searching scope after drawing a
region in the field of vision. System only identifies mark point in this scope. This
function can be used when there are above 2 similar marks in the field of vision
and it can filter the useless identified mark points.
P,[设定模板]:在视域中标示一个图像范围,点击『定制模板』系统将该范围中图形
识别为
Mark
点模板,
(template setting): Mark a image scope in the field of vision. Click “
定 制 模
板”(template customization) button and the system will identify the image in this
scope as the template of mark point.
Q,[定制模板]:将设定的图形范围作为 MARK 点模板;
(template customization): Setup the image in this scope as the template of
mark point.
- 56
-
图 3-16 钢网 Mark 点的匹配,匹配完成后点击[确定]
Pix 3-16 the matching of stencil mark point. Click “确定”(ok)button after the matching
is finished.

- 57
-
9
,在图
3-15
中调节
Led1
、
LED2
的亮度,使
Mark
和周围背景颜色区分开,一直调到
Mark
点轮廓清晰,黑白分明方可。然后点击[自动查找]按钮,系统会自动捕捉到 Mark 点,点击[确
定]完成 Mark 点的抓捕,回到图 3-13 界面。
Adjust the brightness of Led1 and LED2 in the interface of Pix 3-15. Distinguish the mark
point from the background color until the outline of mark point is clear, black and white.
Click “ 自动查找”(automatic searching )button, the system will automatically capture mark
point. Click “
确定
”
(
ok
)
button to finish the image capture and return to the interface in the Pix 3-13.
10
.钢网和
PCB
的
Mark
点匹配完成后在图
3-13
界面上点击
[
确认
]
按钮进入图
3-14
界面,
再点击[ 是 ]按钮回到主界面,至此,完成 Mark 点的匹配。
Click “
确定
”
(
ok
)
button after the matching of stencil mark point and PCB mark point is
finished and it will enter into the interface in pix 3-14. Click “是”(yes)button to return to main
interface. Then the mark point matching is finished.
3.2.4 刮刀压力和速度的选择 Selection of the pressure and speed of the scraper
刮刀的压力及刮刀速度是钢网印刷中两个重要的工艺参数。
The two parameters of the pressure and speed of the scraper in the stencil
printing are very important.
刮刀速度:选取的原则是刮刀的速度和锡膏的粘稠度及
PCB
板上
SMD
的最小引脚间距
有关,选择锡膏的粘稠度大,则刮刀的速度要低,反之亦然。对刮刀速度的选择,一般先从
较小压力开始试印,慢慢加大,直到印出好的焊膏为止。速度范围为
15
~
50mm/s
。在印刷
细间距时应适当降低刮刀速度,一般为 15~30mm/s,以增加锡膏在窗口处的停滞时间,从
而增加
PCB
焊盘上的锡膏;印刷宽间距元件时速度一般为
30
~
50mm/s
。(>
0.5mm pitch
为宽间距,<
0.5mm pitch
为细间距〕
Scraper speed: The selection of scraper speed is related to the solder paste viscosity
and the min pin space of the SMD on PCB board. The viscosity of solder paste is higher,
the speed of scraper is lower and vise versa. For the selection of scraper speed, do the trial
printing with small pressure in general. And add the pressure slowly until print the good
solder paste. The speed range is 15~50mm/s. Lower the scraper speed in order to add the
delay time in entrance for solder paste so that to add the solder paste on the bonding pad of