88242361-04-01 Vol 1 DEK TQ TECHNICAL REFERENCE (1).pdfPDFA.pdf - 第117页
7 PRINT CARRIAGE MODULE 7.3 CALIBRATIONS TECHNICAL REFERENCE MANUAL DEK TQ 04/2021 117 7.3 CALIBRATIONS 7.3.1 Print Carriage Home Offset W ARNING BOARD CLAMPS. EXTREME CARE MUST BE EXERCISED WHEN WORKING IN THE TOOLING A…
7 PRINT CARRIAGE MODULE
7.2 ELECTRICAL SCHEMATIC
116 TECHNICAL REFERENCE MANUAL DEK TQ 04/2021
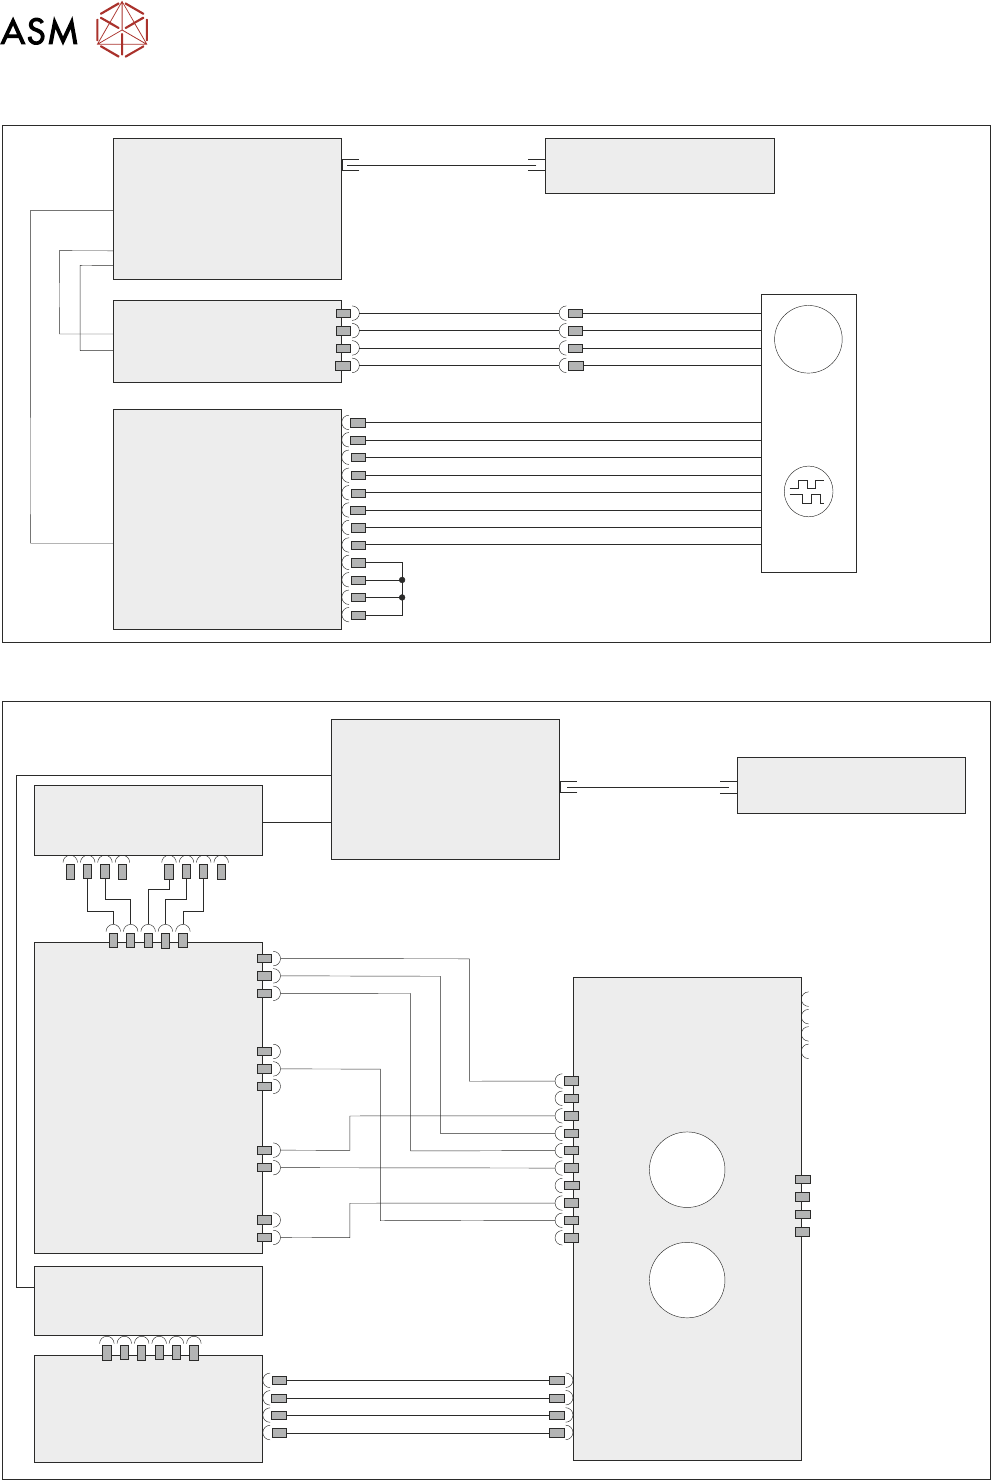
7.2 ELECTRICAL SCHEMATIC
Machine Controller
Controller Power Module
(CPM)
Fibre Optic Links
Ribbon Cables
SIO Link Cable
M
Print
Carriage
Drive Motor
MTR17
Extended Power Module
EPM3-1
J3
EPM3PL11
Print
Carriage
Encoder
4ENC3
ESIO-4
ENC3
7.2.1 Conditioning Board
Machine Controller
Controller Power Module
(CPM)
Fibre Optic Links
SIO Link
Cables
ESIO-5
ESIO-3
ESIO-3: Breakout A
ADC/DAC
Board 5
Conditioning Board
IO4 IO5
3ASK2
M73PL5
5PL3
M73SK1
3ASK23
3ASK24
3ASK13
3ASK14
M73SK4
M73PL2
Connector for
break-off
temperature and
humidity board
Connector for
squeegee load cell
°C
%RH
7 PRINT CARRIAGE MODULE
7.3 CALIBRATIONS
TECHNICAL REFERENCE MANUAL DEK TQ 04/2021 117
7.3 CALIBRATIONS
7.3.1 Print Carriage Home Offset
WARNING
BOARD CLAMPS. EXTREME CARE MUST BE EXERCISED WHEN WORKING IN
THE TOOLING AREA OF THE MACHINE TO AVOID INJURY. THE FOILS ON THE
FRONT AND REAR BOARD CLAMPS ARE VERY SHARP.
Before starting this procedure, ensure the stencil is removed from the machine.
To calibrate the print carriage home offset, carry out the following:
1. Select Menu.
2. Select Service\Calibration.
3. Select Print Carriage Home Offset.
4. The print carriage moves to the previous print carriage home offset position and the convey-
ors lift to print height.
5. Open the front cover.
7 PRINT CARRIAGE MODULE
7.3 CALIBRATIONS
118 TECHNICAL REFERENCE MANUAL DEK TQ 04/2021
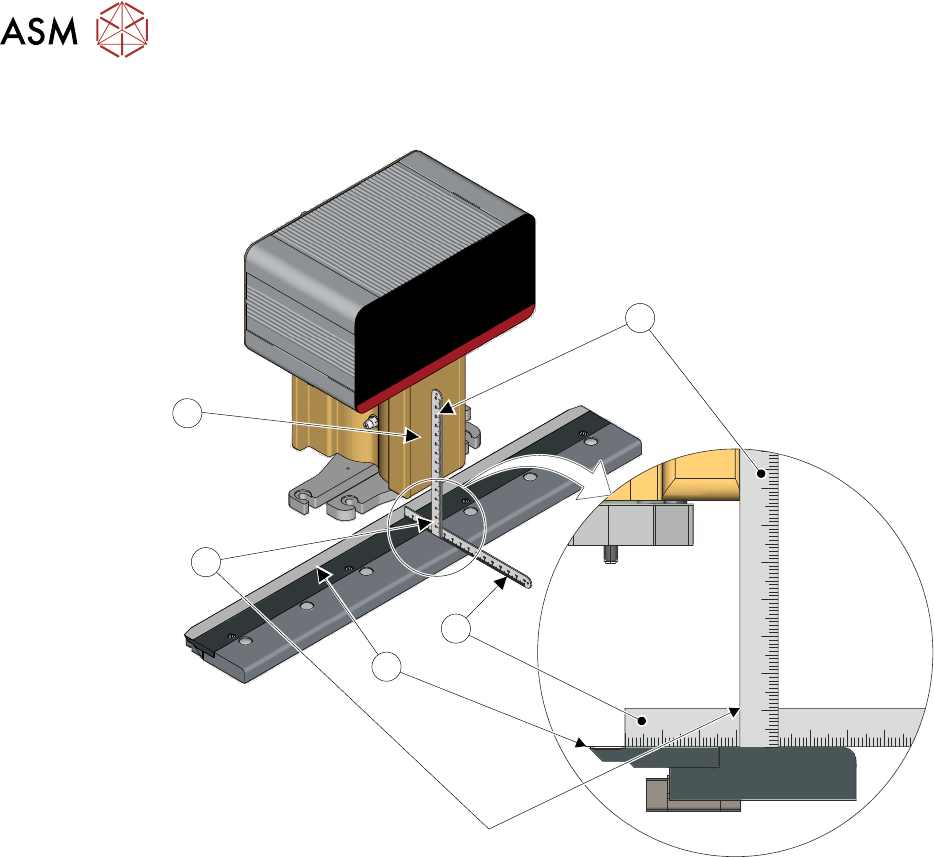
6. Place a 150mm steel rule (1) against the front face of the squeegee mechanism (5) down to
the top of the board clamp.
10 20 30 40 50 60 70 80
10 20 30 40 50 60 70 80
1
2
3
4
5
7. Place a second steel rule (2) on the board clamp, butted up against the back edge of the
board clamp foil (3).
8. Ensure the measurement (4) from the back edge of the foil to the front face of the squeegee
mechanism is 31mm ±0.5mm
.
9. If the measurement is correct, go to Step 18.
10. Remove the steel rulers and close the front cover.
11. Press the System button.
12. Select the Print Carriage Home Offset parameter.
13. If the measurement taken in Step 7 is greater than 31mm, decrease the current offset by the
difference. If the measurement taken in Step 7 is less than 31mm
, increase the current offset
by the difference.
14. Select Accept.
15. Select Move To Home Offset.
16. Open the front cover.
17. Recheck the measurement. If the measurement is not correct, repeat Steps 10 to 16.
18. Remove the steel rulers and close the front cover.
19. Press the System button.
20. Select Move To Home Offset.
21. Select Set Home Offset.
22. Select Save And Exit.
23. Select Confirm.