88242361-04-01 Vol 1 DEK TQ TECHNICAL REFERENCE (1).pdfPDFA.pdf - 第131页
8 SQUEEGEE MODULE 8.3 ADJUSTMENTS AND SETTINGS TECHNICAL REFERENCE MANUAL DEK TQ 04/2021 131 8.3 ADJUSTMENTS AND SETTINGS 8.3.1 PRHM Sensor C AU T I ON R AD I A T IO N. RI S K OF I NJ U RY T O T H E E Y E S D U E T O L A…
8 SQUEEGEE MODULE
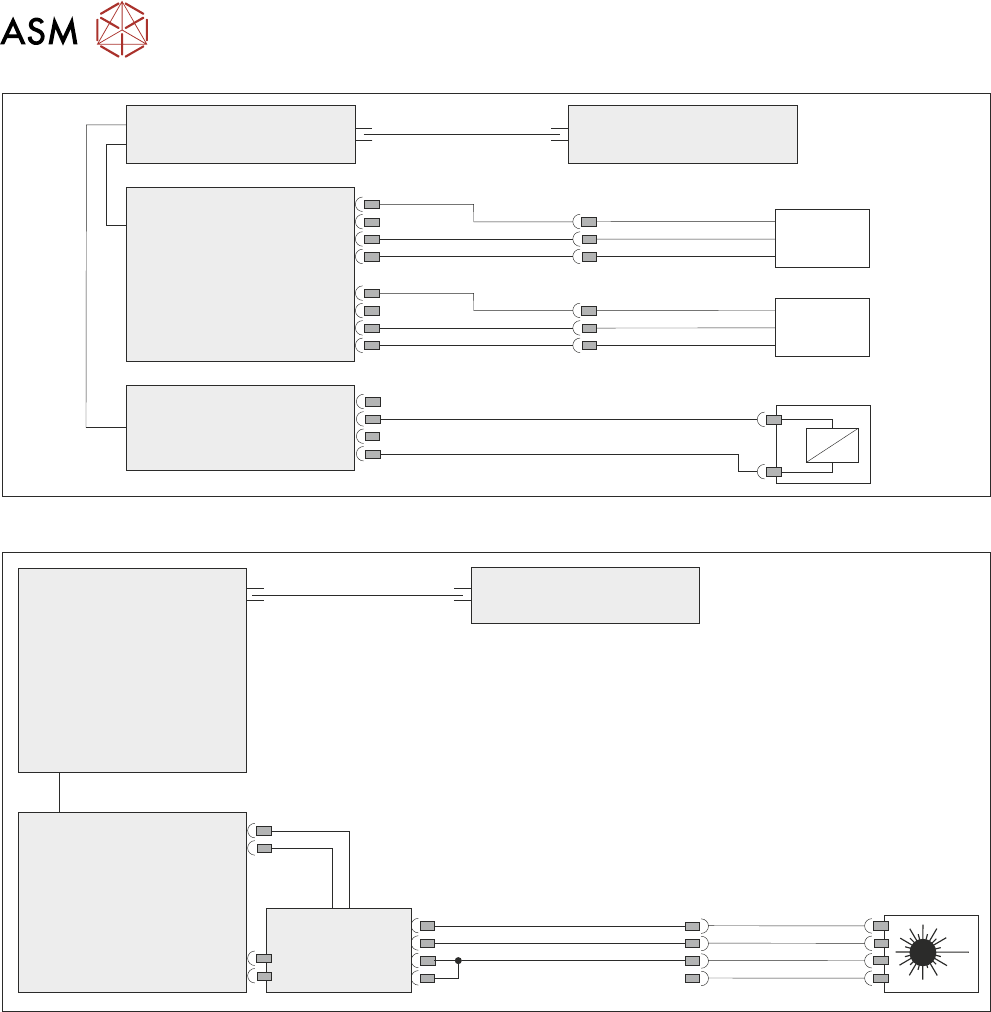
8.2 ELECTRICAL SCHEMATIC
130 TECHNICAL REFERENCE MANUAL DEK TQ 04/2021
Machine Controller
Controller Power Module
(CPM)
Fibre Optic Links
SIO
Link
Cables
Drip Tray
Cylinder In
4SE13
Drip Tray
Cylinder Out
4SE14
ESIO-4
ESIO-5
IO3
IO4
4PL22
4PL23
Sensor
Sensor
Drip Tray
5SOL5
IO2
Squeegee Drip Tray
Machine Controller
Controller Power Module
(CPM)
Fibre Optic Links
SIO Link
Cable
ESIO-5
Paste Roll
Height Monitor
5SE5
5PL85PL2
ADC/DAC
Board 5
ADC/
DAC
IO4
Paste Roll Height Monitor
8 SQUEEGEE MODULE
8.3 ADJUSTMENTS AND SETTINGS
TECHNICAL REFERENCE MANUAL DEK TQ 04/2021 131
8.3 ADJUSTMENTS AND SETTINGS
8.3.1 PRHM Sensor
CAUTION
RADIATION. RISK OF INJURY TO THE EYES DUE TO LASER LIGHT BEING
PRESENT IN THE VICINITY OF THE LABEL. DO NOT LOOK AT THE LIGHT
SOURCE OR REFLECTIONS FROM A SURFACE.
CAUTION
EQUIPMENT SERVICING. THE LASER DOES NOT CONTAIN USER
SERVICEABLE PARTS. OPENING THE UNIT COULD CAUSE MIS-ALIGNMENT
OF THE LASER, THIS MAY MAKE THE EQUIPMENT DANGEROUS TO
OPERATE.
CAUTION
LASER CONTROLS AND ADJUSTMENTS. USE OF CONTROLS OR
ADJUSTMENTS OR PERFORMANCE OF PROCEDURES OTHER THAN THOSE
SPECIFIED HEREIN MAY RESULT IN HAZARDOUS RADIATION EXPOSURE.
To reset the paste roll height monitor laser sensor to its factory default setting, carry out the follow-
ing procedure:
1. Select Menu.
2. Select Service\Diagnostics.
3. Select Confirm.
4. Select Print Carriage.
5. Select Carriage To Front.
6. Press the E Stop button.
7. Open the front cover.
8 SQUEEGEE MODULE
8.3 ADJUSTMENTS AND SETTINGS
132 TECHNICAL REFERENCE MANUAL DEK TQ 04/2021
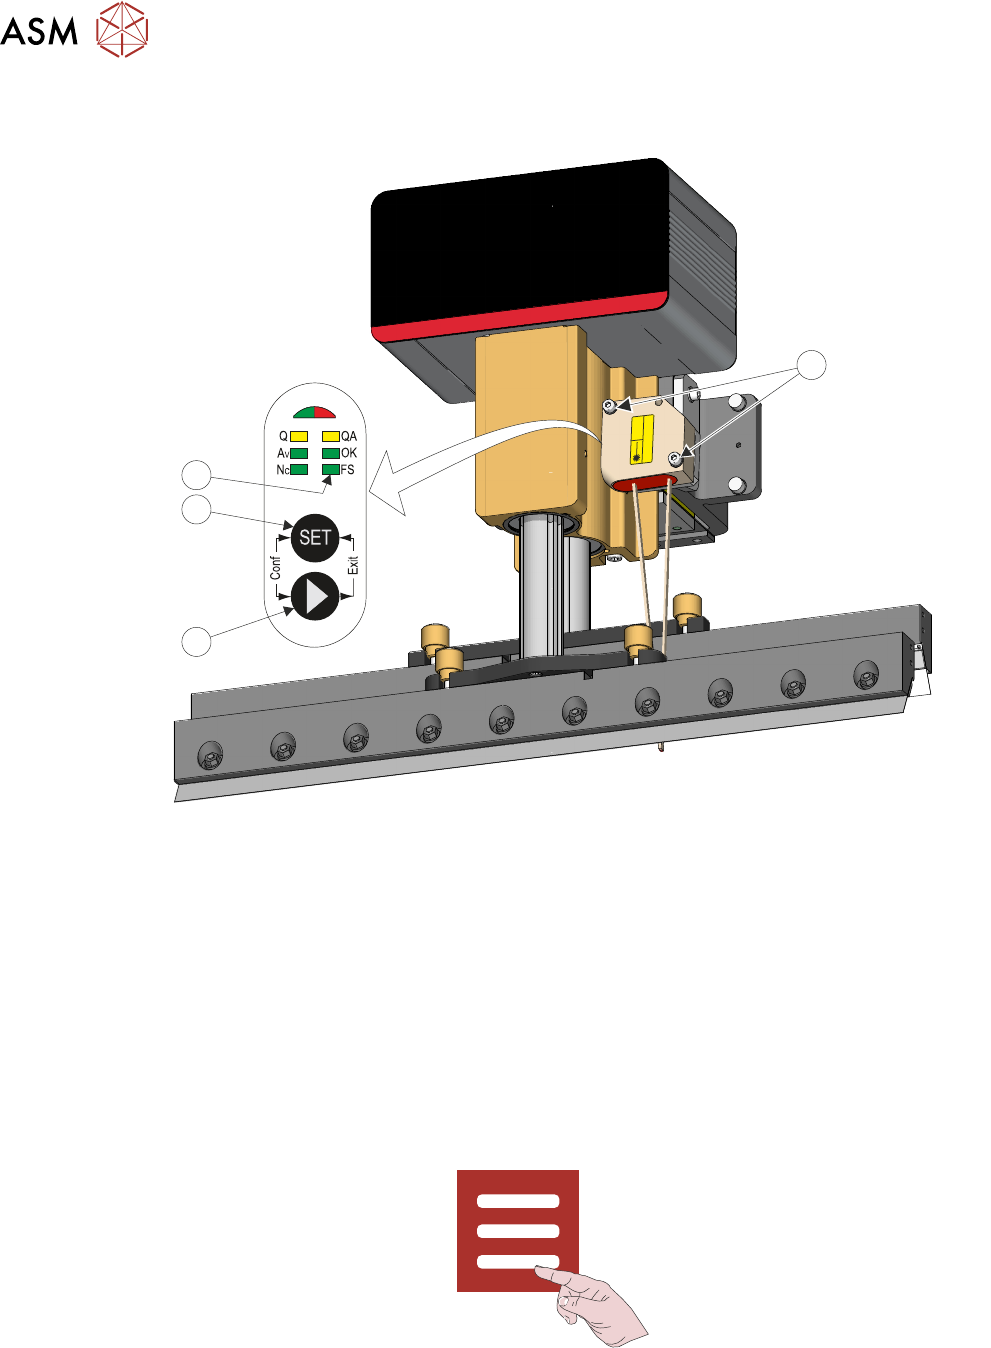
8. Using a 3mm Allen key, remove the two securing screws (1) that secure the sensor to the
bracket.
Laser
1
IEC 60825-1:2014
1
4
3
2
9. Press and hold the arrow button (2) until the FS LED (4) lights.
10. Press the SET button (3).
11. Refit the sensor to the bracket.
12. Close the front cover.
13. Reset the E Stop.
14. Press the System button.
15. Select Reinitialise.
8.3.2 Drip Tray Retracted Sensor
If replacing the drip tray retracted sensor, use the following procedure to set the correct position:
1. Select Menu.
2. Select Service\Diagnostics.
3. Select Confirm.
4. Select Front or Rear Squeegee.
5. Toggle the Drip Tray Extended switch to 0, ensuring that the drip tray retracted sensor I/O is
ON
(green).