Printer 710_810 v8 Transportation.pdf - 第53页
TRANS PORTATION MAJOR RELO CATION Chapter Issue 7 Oct 06 Technical Reference Manual 34.53 Grease Protect ion Before the machi ne was packa ged, some areas withi n the machine were coated with LM grease or WD40 to protect…
TRANSPORTATION
MAJOR RELOCATION
34.52 Technical Reference Manual Chapter Issue 7 Oct 06
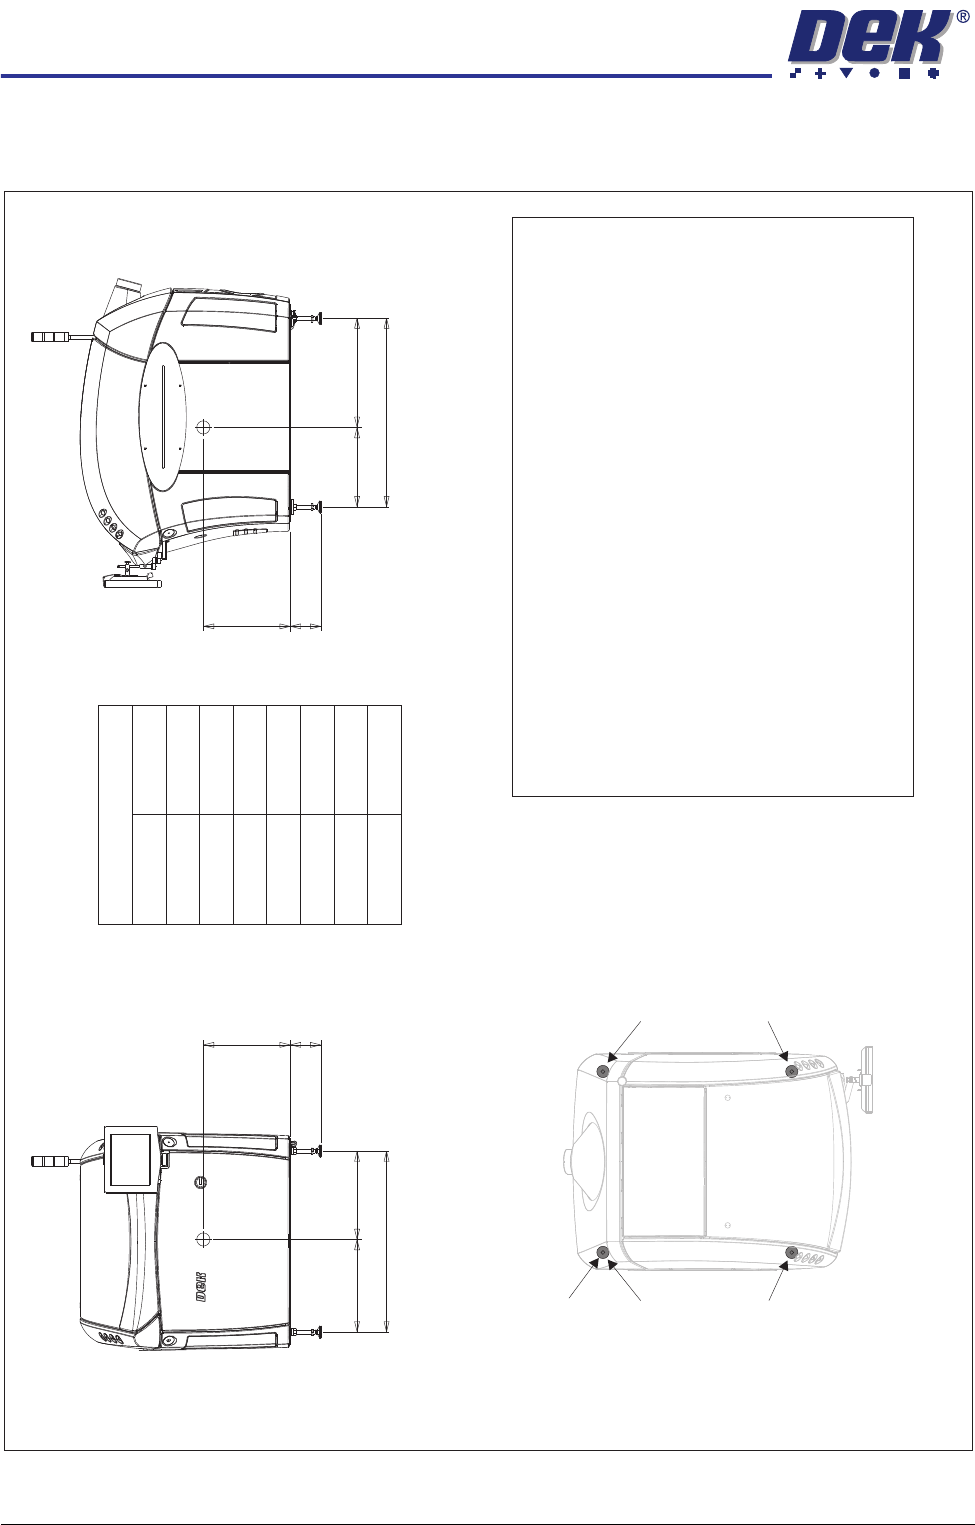
Centre of Gravity and Seismic Anchorage
Figure 34-18 Sliding Glass Cover Machine (Only)
Side View (right)
CG
L2
a
b
h
L1
Front View
CG
L3
d
b
h
c
Centre of Gravity
a
b
c
d
h
L1
L2
L3
1150mm
130mm
1106mm
530mm
485mm
565mm
665mm
541mm
Plan View
Centre of Gravity
Seismic Anchorage
Machine Feet
(in 4 positions)
Min = -100kg
Max = +400kg
Min = -100kg
Max = +400kg
Min = -100kg
Max = +400kg
Min = -100kg
Max = +400kg
Seismic Anchorage
b
The calculations for the downward and upward force of the feet
is calculated in line with the 1997 Uniform Building Code and
SEMI S2-0703. Results indicate that under worse circumstances
(calculation for hazardous fluids) an upward lifting force has to be
expected and it is strongl
y recommended to secure the machine
directly to the floor.
Appropriate attachment points may be fitted to the front and rear
of the machine base frame. For more information, contact DEK
Printing Machines.
Alternatively, the supplied machine feet can be replaced with feet
incorporating holes allowing the feet to be secured directl
y to the floor
.
Additional seismic calculations must be undertaken for the floor and
any anchor points that are used.
The length of the machine feet (measurement in the figures above)
must not exceed 130mm to meet seismic anchorage calculations.
NOTE
In the figure on the left, negative numbers are upward loads and
positive numbers are downward loads.
TRANSPORTATION
MAJOR RELOCATION
Chapter Issue 7 Oct 06 Technical Reference Manual 34.53
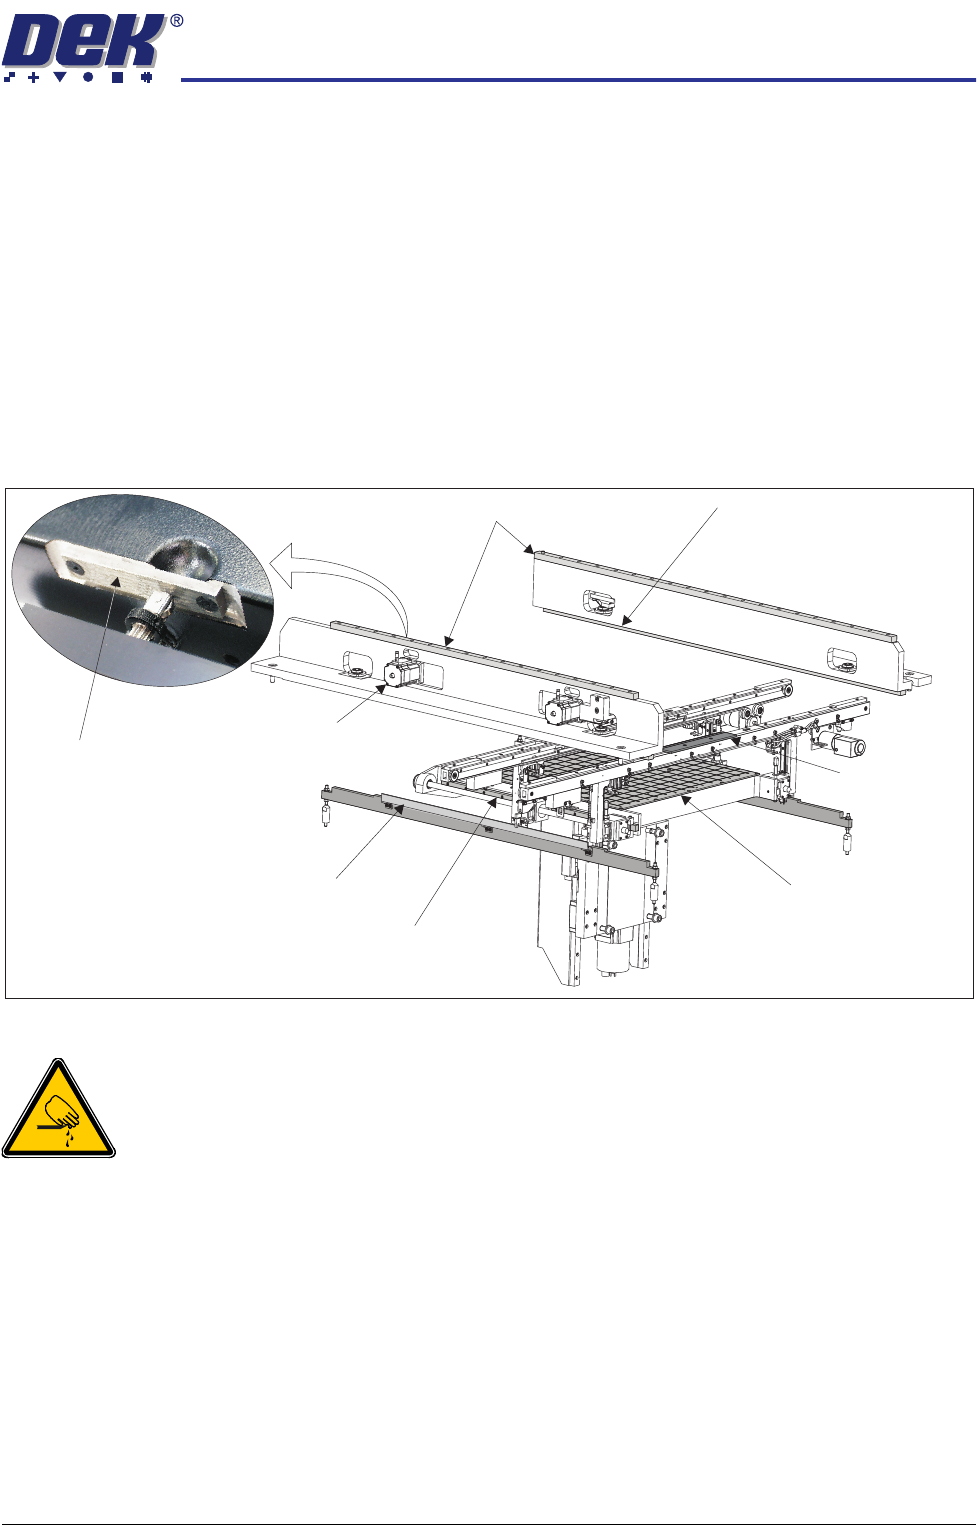
Grease Protection Before the machine was packaged, some areas within the machine were coated
with LM grease or WD40 to protect the metal surfaces from corroding during
transportation.
Using a lint free cloth, remove any surplus grease from the following areas,
ensuring that a light coating remains:
• Print carriage linear bearing guides (above the printheads)
• Camera linear bearing guides (below the printheads)
• Rear moving rail linear bearing guides (either side of the rising table)
• Top face of both clatter bars (either side of the rising table)
• Actuator striker plates (in 3 positions)
Figure 34-19 Grease Protection
WARNING
BOARD CLAMPS. EXTREME CARE MUST BE EXERCISED WHEN WORKING IN
THE TOOLING AREA OF THE MACHINE TO AVOID INJURY. THE FOILS ON THE
FRONT AND REAR BOARD CLAMPS ARE VERY SHARP.
The front and rear board clamp foils are greased for protection during transpor-
tation. This grease protection must to be removed completely using a lint free
cloth.
The manual tooling plate on the rising table was coated with WD40 for trans-
portation. Using a lint free cloth, wipe the manual tooling plate to remove any
residue.
Print Carriage Linear Bearing Guides
Moving Rail Linear Bearing Guide (in 2 positions)
Clatter Bar (in 2 positions)
Board Clamp
(in 2 positions)
Camera Linear Bearing Guide
(in 2 positions)
Manual Tooling Plate
Actuator (in 3 positions)
Actuator Striker Plate
(in 3 positions)

TRANSPORTATION
MAJOR RELOCATION
34.54 Technical Reference Manual Chapter Issue 7 Oct 06
Transit Brackets and Screws
CAUTION
TRANSIT BRACKET AND SCREW REMOVAL. All transit brackets and screws
must be removed from the machine before power is applied. Machine
damage may occur if transit brackets or screws are not removed prior to
power up. Transit brackets and screws are painted red for easy identifi-
cation.
Overview Transit brackets and screws are fitted to the machine to prevent the various
machine assemblies moving during transit, these are:
• Front and rear transit brackets
• Rear chase transit bracket
• Squeegee transit screws
• Print carriage transit screw
• Paste dispenser transit screw (if applicable)
• Camera transit screws