Printer 710_810 v8 Transportation.pdf - 第94页
TRANSPORT ATION PRE POWER UP CHECKS 34.94 Technical Reference Manual Chapter Issue 7 Oct 06 7. Measure th e resistance betwee n the following poi nts ensuri ng that all the measurement s are greate r than 2M Ω : a. Earth…
TRANSPORTATION
PRE POWER UP CHECKS
Chapter Issue 7 Oct 06 Technical Reference Manual 34.93
PRE POWER UP CHECKS
Electrical Test Before the machine is connected to the factory electrical supply, the following
electrical tests must be performed:
1. Ensure the mains isolator switch is in the OFF position.
2. Remove the front cover of the machine to gain access to the mains isolator
switch.
3. Remove the front cover of the mains isolator switch.
4. Perform a visual inspection of the mains isolator switch ensuring the follow-
ing:
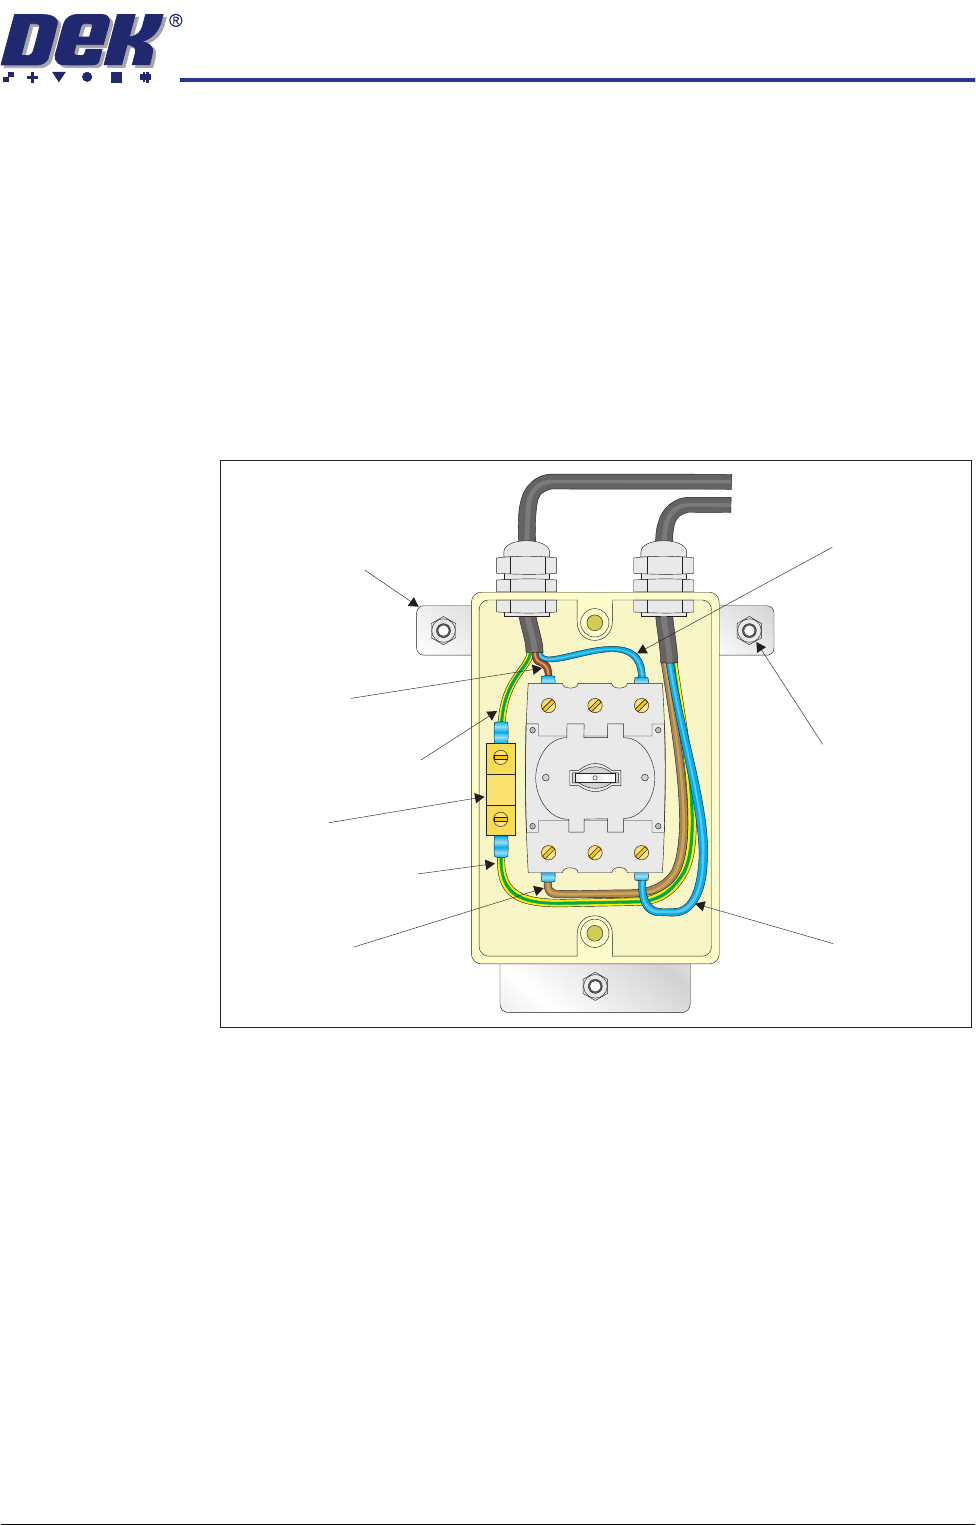
a. The earth input and earth output cables are connected to the earth tag.
b. The live input is connected to the top of the isolator switch on the left hand
side.
c. The live output is connected to the bottom of the isolator switch on the left
hand side.
d. The neutral input is connected to the top of the isolator switch on the right
hand side.
e. The neutral output is connected to the bottom of the isolator switch on the
right hand side.
5. Ensure that all six cables are secure and no bare wires are showing.
6. Connect the two probes of a digital volt meter (DVM) together and ensure
that the DVM is reading 0Ω.
Neutral (Blue)
Input
Isolator Mount
Securing Nut
(in 3 positions)
Isolator Mount
Live (Brown)
Input
Earth (Green/Yellow)
Input
Earth (Green/Yellow)
Output
Earth Tag
Live (Brown)
Output
Neutral (Blue)
Output

TRANSPORTATION
PRE POWER UP CHECKS
34.94 Technical Reference Manual Chapter Issue 7 Oct 06
7. Measure the resistance between the following points ensuring that all the
measurements are greater than 2MΩ:
a. Earth tag and the live output.
b. Earth tag and the neutral output.
c. Isolator mount and the neutral output.
d. Isolator mount and the live output.
8. Measure the resistance between the earth tag and all three isolator mount
securing nuts ensuring that all measurements are less than 0.5Ω.
9. For gull wing cover machine only, measure the resistance between the earth
tag and the earth screw on the MMI arm (located inside the machine)
ensuring that the measurement is less than 0.5Ω.
10. Remove the rear cover of the machine.
11. Measure the resistance between the following points ensuring that all
measurements are less than 0.5Ω:
a. PC earth stud and a securing screw that secures the PC to the machine
frame.
b. M36 earth stud and a securing screw that secures the M36 to the machine
frame.
c. M37 earth stud and a securing screw that secures the M37 to the machine
frame.
12. Refit the rear cover.
13. Refit the mains isolator cover.
14. Refit the front cover.
TRANSPORTATION
PRE POWER UP CHECKS
Chapter Issue 7 Oct 06 Technical Reference Manual 34.95
Vacuum Filtration
Unit
There are three types of onboard vacuum filtration unit, for use with the under
screen cleaner, the VF25, the VF10 and the VF35i. The VF25 is a fixed voltage
unit at either 110V or 230V, ensure that the unit fitted matches the supply
voltage.
The onboard VF35i vacuum filtration unit is dual voltage 110V/230V (50Hz/
60Hz) switchable from the front panel of the unit.
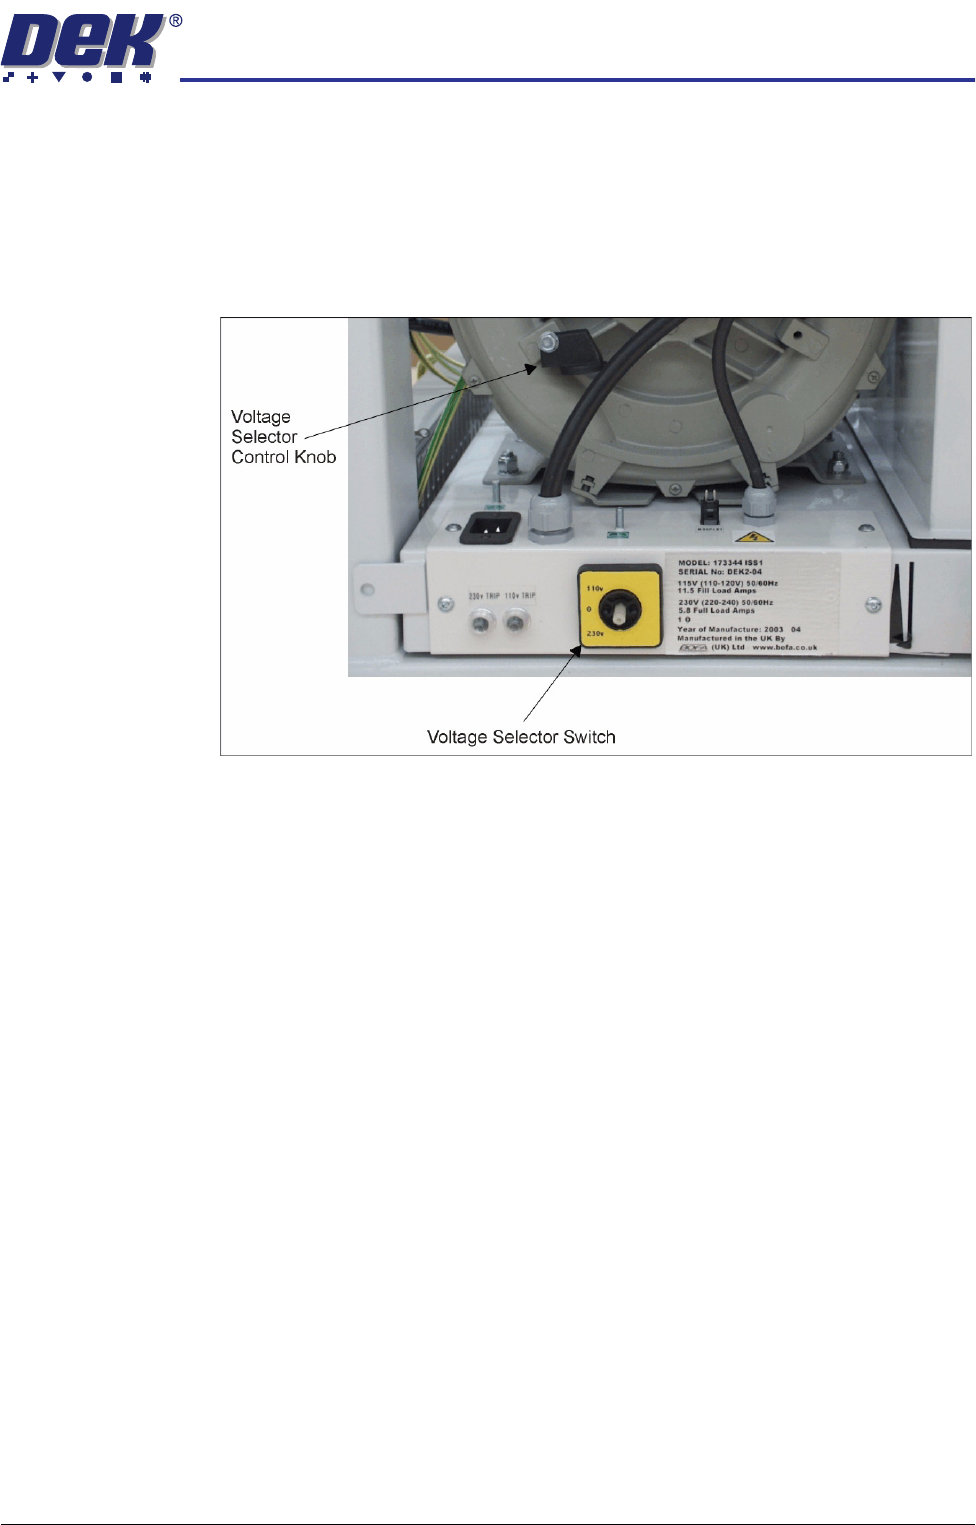
Figure 34-25 Vacuum Filtration Unit
Ensure that the voltage selector switch, on the front panel of the onboard
vacuum filtration unit, is set to match the supply voltage. To check or switch the
voltage selector, carry out the following:
1. Using a 10mm spanner, remove the voltage selector control knob from the
fan housing.
2. Fit the voltage selector control knob to the voltage selector switch.
NOTE
The spindle has three keyways allowing the knob to be fitted in one position
only.
3. Ensure that the pointer of the knob is indicating the voltage that closely
matches the mains supply voltage.
CAUTION
VACUUM FILTRATION UNIT.
This unit is liable to damage if the voltage
selector does not match the supply voltage.
NOTE
The ‘0’ position on the voltage selector is OFF disabling the vacuum filtration
unit.
4. Return the voltage selector control knob to the fan housing to prevent further
adjustment.