CYCLONE-User-Manual.pdf - 第114页
User Manual For Cyclone LC Programmers 114 • MAC Address If you are in Static IP mode, these settings (excluding the MAC address) may be changed by tapping on them. In this case a tap will take you to the Edit menus. If …

User Manual For Cyclone LC Programmers 113
device to match those of the network.
10.4.2 Connecting Cyclone-to-PC via an Ethernet cable
In order to connect the Cyclone to a PC directly via an Ethernet cable, you need to use what is
known as a cross-over cable. A cross-over cable, which is not provided by PEmicro, is normally
used to connect two similar devices such as a PC to a PC, or a Hub to a Hub. It is a cable that has
its receive and transmit wires crossed over so that the similar devices can effectively communicate
with one another.
With this configuration, it is still important to assign IP numbers to both the PC and the Cyclone
device. Although at first glance it may not seem necessary to assign a Gateway address in this
configuration, the Cyclone was designed to operate on a network of more than two computers, and
therefore it needs to be programmed with a Gateway address.
Assuming the desktop’s IP number to be 192.168.100.1, this is an example of the three IP
numbers that would need to be programmed into the Cyclone:
IP Number Gateway IP Subnet Mask
PC 192.168.100.1 none 255.255.255.0
CYCLONE 192.168.100.2 192.168.100.1 255.255.255.0
For more information on programming these IP numbers into the Cyclone device, please see the
following section.
10.5 Cyclone IP Setup Via LCD Menu
When the user is connecting the Cyclone via Ethernet, before the connection is established
between the Cyclone and the network the menu’s Home Screen will display the Cyclone’s IP
address as 0.0.0.0.
Once a connection has been established, the menu’s Home Screen displays the Cyclone’s IP
address and connection setting (Static or Dynamic).
The Ethernet cable can either be attached at the start of Cyclone startup or connected after setup
is complete. The connection with the network will be established when the cable is connected. If
the Ethernet cable is disconnected after setup is complete, the user should be able to simply
reconnect the cable to reestablish networking. However, depending on the setup of the DHCP
server, if the Ethernet cable is left unplugged for a considerable time the IP address may expire
and connection will have to be set up once again. This can be accomplished by restarting the
Cyclone.
10.5.1 Configure Network Settings
To configure network settings for the Cyclone, navigate to the following Menu location:
Main Menu / Configure Cyclone Settings / Configure Network Settings
The following options will be available under Configure Network Settings:
• Show Current IP Settings
• Edit Static IP Settings
• Enable/Disable Dynamic IP
• Edit Cyclone Name
10.5.1.1 Show Current IP Settings
Show Current IP Settings displays the current IP settings, including:
• Current IP Mode
• IP Number
• Mask
• Gateway

User Manual For Cyclone LC Programmers 114
• MAC Address
If you are in Static IP mode, these settings (excluding the MAC address) may be changed by
tapping on them. In this case a tap will take you to the Edit menus. If you are in Dynamic IP mode,
tapping will show a message that the Cyclone settings cannot be changed.
Dynamic vs. Static
There are two schemes for assigning IP addresses. One is the Static IP addressing mode. This
involves the user manually setting the IP address for every device on the network. In this case, it
falls to the user to ensure the IPs assigned do not conflict and are within the boundaries of the
network. The other is the Dynamic Host Configuration Protocol (DHCP). This involves setting up a
separate server to manage the IP addresses. The server is given a list of valid IP addresses for the
network. Using a predetermined set of rules, each new device that wishes to connect to the
network is given an IP address by the server. This takes the task of managing the validity and
uniqueness of IP addresses out of the user's hands and relegates it to the server. Cyclone LC
programmers are capable of using either Static IP addressing or DHCP.
Note: The current IP settings may also be viewed/edited by navigating to:
Main Menu / Status / Show Current IP Settings
10.5.1.2 Edit Static IP Settings
This allows editing of IP, Mask, and Gateway in Static IP mode. In the edit dialogs, the user must
enter a valid IP address to continue:
Format
xxx.xxx.xxx.xxx
Where:
0 <= xxx <= 255
10.5.1.3 Enable/Disable Dynamic IP
Opens a dialog to toggle the IP settings between Static and Dynamic. Once an option is selected a
message is displayed indicating that the Cyclone must be reset for this option to take effect. The
reset button on the front side of the Cyclone may be used.
10.6 Configuring Cyclone Network Settings using the Cyclone Control GUI
Before the Cyclone device transacts data on an Ethernet network, it will need to be configured with
the relevant network parameters. This configuration can be done in the "Properties" tab of the
Cyclone Control GUI.
To access the "Properties" tab, select the Cyclone from the drop-down list in the Cyclone Control
GUI and click on "Connect". The "Properties" tab will be accessible once the Cyclone is open.
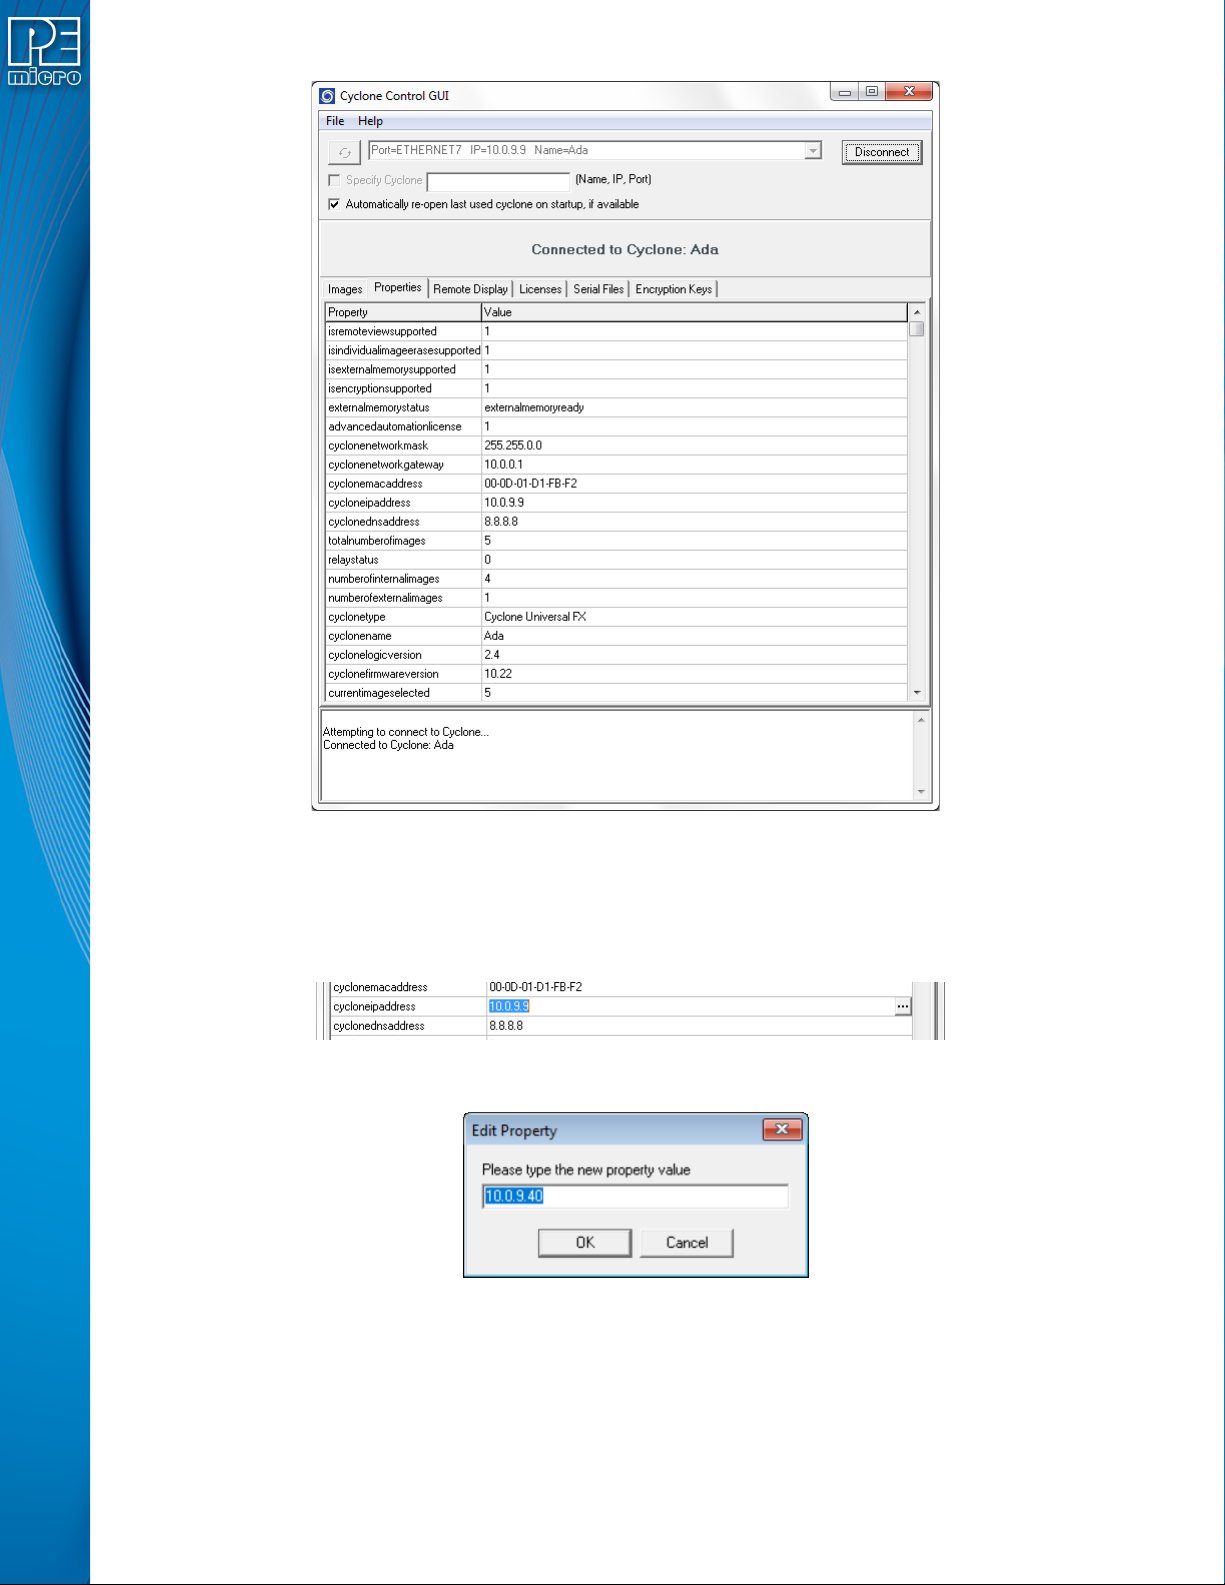
User Manual For Cyclone LC Programmers 115
Figure 10-1: Cyclone Control GUI: Properties Tab Selected
From this tab, all Cyclone and Network properties can be accessed. Some of this properties are
modifiable, including all the properties needed for network configuration. A property that can be
edited will show three dots to the right of the property when you select it by clicking on its box. You
can click on the three dots or double click on the property value to bring up the edit window.
Figure 10-2: Dots Displayed At Right When Property Selected
Figure 10-3: Edit Property Window
Once the "OK" button is pressed, the values of the property will be updated in the Cyclone and the
value of the property in the Cyclone Control GUI will be refreshed showing the new value.