CYCLONE-User-Manual.pdf - 第115页
User Manual For Cyclone LC Programmers 115 Figure 10-1: Cyclone Control GUI: Properties T ab Selected From this tab, all Cyclone and Network properties can be accessed. Some of this properties are modifiable, including a…

User Manual For Cyclone LC Programmers 114
• MAC Address
If you are in Static IP mode, these settings (excluding the MAC address) may be changed by
tapping on them. In this case a tap will take you to the Edit menus. If you are in Dynamic IP mode,
tapping will show a message that the Cyclone settings cannot be changed.
Dynamic vs. Static
There are two schemes for assigning IP addresses. One is the Static IP addressing mode. This
involves the user manually setting the IP address for every device on the network. In this case, it
falls to the user to ensure the IPs assigned do not conflict and are within the boundaries of the
network. The other is the Dynamic Host Configuration Protocol (DHCP). This involves setting up a
separate server to manage the IP addresses. The server is given a list of valid IP addresses for the
network. Using a predetermined set of rules, each new device that wishes to connect to the
network is given an IP address by the server. This takes the task of managing the validity and
uniqueness of IP addresses out of the user's hands and relegates it to the server. Cyclone LC
programmers are capable of using either Static IP addressing or DHCP.
Note: The current IP settings may also be viewed/edited by navigating to:
Main Menu / Status / Show Current IP Settings
10.5.1.2 Edit Static IP Settings
This allows editing of IP, Mask, and Gateway in Static IP mode. In the edit dialogs, the user must
enter a valid IP address to continue:
Format
xxx.xxx.xxx.xxx
Where:
0 <= xxx <= 255
10.5.1.3 Enable/Disable Dynamic IP
Opens a dialog to toggle the IP settings between Static and Dynamic. Once an option is selected a
message is displayed indicating that the Cyclone must be reset for this option to take effect. The
reset button on the front side of the Cyclone may be used.
10.6 Configuring Cyclone Network Settings using the Cyclone Control GUI
Before the Cyclone device transacts data on an Ethernet network, it will need to be configured with
the relevant network parameters. This configuration can be done in the "Properties" tab of the
Cyclone Control GUI.
To access the "Properties" tab, select the Cyclone from the drop-down list in the Cyclone Control
GUI and click on "Connect". The "Properties" tab will be accessible once the Cyclone is open.
User Manual For Cyclone LC Programmers 115
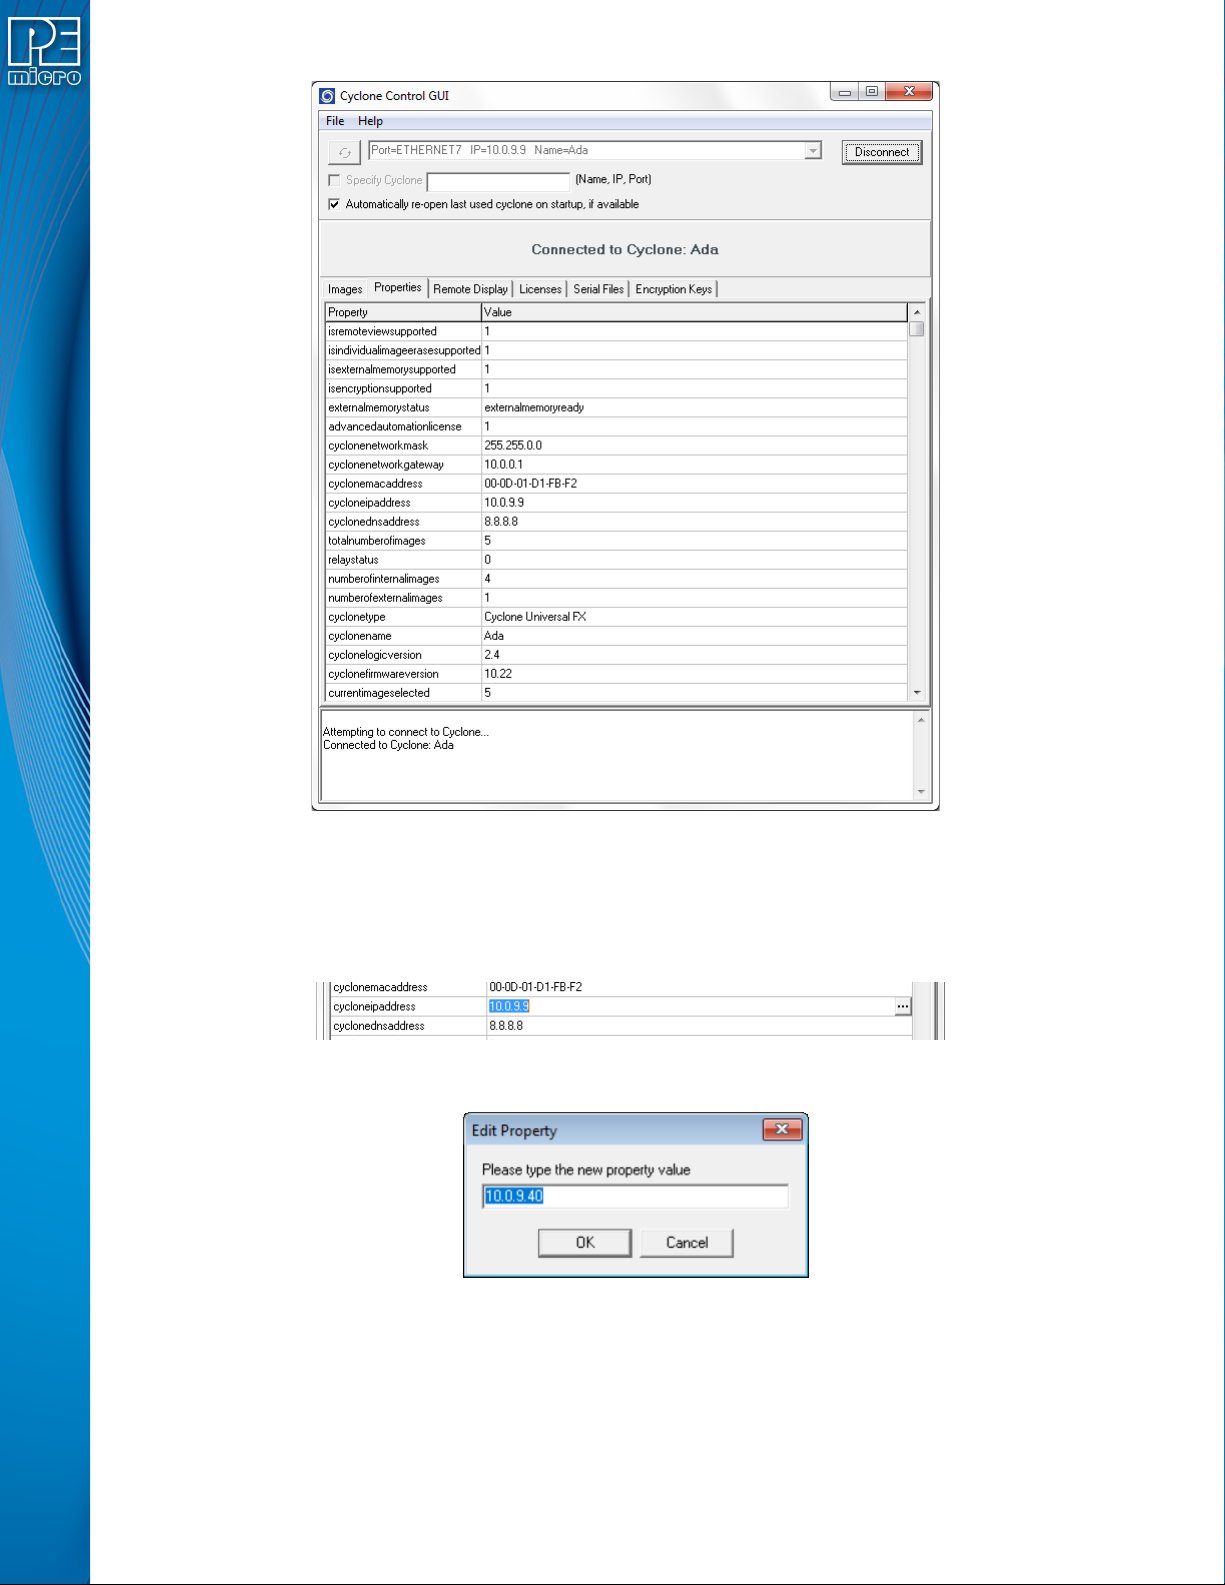
Figure 10-1: Cyclone Control GUI: Properties Tab Selected
From this tab, all Cyclone and Network properties can be accessed. Some of this properties are
modifiable, including all the properties needed for network configuration. A property that can be
edited will show three dots to the right of the property when you select it by clicking on its box. You
can click on the three dots or double click on the property value to bring up the edit window.
Figure 10-2: Dots Displayed At Right When Property Selected
Figure 10-3: Edit Property Window
Once the "OK" button is pressed, the values of the property will be updated in the Cyclone and the
value of the property in the Cyclone Control GUI will be refreshed showing the new value.

User Manual For Cyclone LC Programmers 116
11 SAP IMAGE ENCRYPTION
CYCLONE FX programmers and CYCLONE programmers with the ProCryption Security
Activation License allow users to create RSA/AES encrypted programming images that use their
own uniquely generated ImageKey. These encrypted images may only be used to program when
on Cyclones that are also pre-configured with the same ImageKey. This keeps the user securely in
control of both their IP and the programming process.
11.1 Overview
PEmicro uses a combination of industry-standard RSA and AES encryption technologies to
encrypt images. When a programming image has been encrypted it requires two different
asymmetric keys to be decrypted. The first is a user generated RSA encryption Key that was
specified when the programming image was generated. The second is a native key which comes
pre-installed in the Cyclone (and does not exist on the PC). This means that an encrypted image
may (A) only be loaded onto a Cyclone which holds a copy of a user generated ImageKey, and (B)
only be decrypted for programming while on a Cyclone which holds a copy of a user generated
ImageKey. The Cyclone Control Suite (GUI, Console, SDK) allows the user to add and delete
ImageKeys from Cyclones, much like programming images may be added or deleted. While many
users will use only a single ImageKey to encrypt all of their images, Cyclones may have many
different keys loaded.
Encrypted images are stored in the Cyclone in their encrypted form. If the ImageKey needed by a
programming image is deleted from the Cyclone, the Cyclone loses the ability to load any images
encrypted with that ImageKey or program any encrypted images encrypted with that ImageKey
that are already loaded. Adding the ImageKey back into a Cyclone gives that Cyclone access to
those stored encrypted images which require that ImageKey.
Encrypted images can safely be sent through electronic means to production facilities since they
are unusable without a Cyclone which has been pre-loaded with the appropriate ImageKey.
ImageKeys on the PC are themselves partially encrypted so that certain pieces can only by used
on a Cyclone. Even with this, they should be handled with care as they can be loaded into any
Cyclone.
11.2 Encrypting/Decrypting a Programming Image
The Cyclone Image Creation Utility can generate ImageKeys that are used to encrypt SAP images.
The steps that are necessary to generate ImageKeys, encrypt SAP images, provision Cyclones to
decrypt, and program with encrypted SAP images are detailed in Section 6.1.8 - ProCryption
Security License Features.
11.3 What is Encrypted in an eSAP File, and How
An encrypted image (eSAP) contains three distinct sections: an informational header, a
configuration section, and a stand alone programming (SAP) data section. The ImageKey encrypts
each section in different ways to control access to each portion of the eSAP file.
The three eSAP sections are:
1) Informational Header
This section includes the description of the eSAP Image, its unique ID, the ID and name of the
ImageKey used to encrypt it, and a checksum of the data. This section is not encrypted.
2) Configuration Section
This section contains a copy of the configuration settings used to generate the Image
including which algorithm was used, power settings, clock settings, script files, and paths to
the binary data files. No programming data from the user’s data files is included in this
section. This section is encrypted in such a way that if a user has the appropriate ImageKey
on the PC, they may import the configuration information from an eSAP file into the Image
Creation Utility. This is useful for seeing the settings used to generate an image, and, if the
user has all of the data files needed, generate a new programming image file with the same