a3369b.pdf - 第49页
Initial Operation 40 VTK - TR -BA- 171e - 1 - User Man u al MDS 3080 -V 6 Initial O peration 6.1 Delivery VERMES sy stems are ship ped in ca refully pack ed state. Transport da mages however c an never b e tota lly exclu…

Microdispensing Valve
VTK-TR-BA-171e-1 - User Manual MDS 3080-V
39
5.4 Special Features of the Valve
Normally Closed
In its not energized state, i.e. in absence of voltage, the valve remains in closed position, so that
the channel of the nozzle insert is blocked by the tappet tip. The liquid in such a situation
therefore cannot flow.
With Bayonet Fluid Box
Thanks to the bayonet system, you can remove the fluid box easily from the valve. There are no
screws. This allows for a very quick exchange of nozzle fixation nut and nozzle insert or of the
tappet for cleaning or maintenance purposes. Afterwards you have to carry out the adjust, in
order to establish a convenient position of the nozzle insert with respect to the tappet. This way a
reproducible process remains ensured.
Highest Flexibility
Due to the modular design of the series, nozzle units and fluid boxes can be exchanged easily.
This allows at any time for a quick adaption of the system configuration to new applications. A
comprehensive choice of accessories is also available for special circumstances.
These modifications can be performed in no time, avoiding downtimes for the process.
Functionality Independent of the Position
The functionality of the valves does not depend on the fitting position, considerably simplifying
the integration into an existing process.
User-friendly Design
The control unit does not give rise to compatibility problems with respect to the other
components of a complex process structure. Service is possible by keypad or, thanks to the
integrated RS-232C, by remote PC.
Secure Wiring
The valves are equipped with high-quality Lemo connectors. Those can be connected and
disconnected easily, but hold secure against any accidental opening.
Comprehensive Material Selection
Only the best materials are used for the production of Vermes Microdispensing valves.
• All parts in contact with the transported medium consist of high-alloy special steel, rust- and
acid-resisting, or modifications of high-duty polymers of the PE (Polyethylene), PEEK
(Polyetheretherketone) and PTFE (Polytetrafluoroethylene) family.
• Sealings can be made of different materials. You can find notes regarding heat resistance and
chemical resistance in paragraph 9.2, page 130 and paragraph 9.3, page 131.
• For nozzle inserts, special steel, stainless steel and ceramics options are permanently in store,
allowing for perfect tailoring of the configuration to the needs of the particular application.
E.g. do we recommend using mounting bodies and tightening screws of stainless steel for
very low viscosity media.
Initial Operation
40
VTK-TR-BA-171e-1 - User Manual MDS 3080-V
6 Initial Operation
6.1 Delivery
VERMES systems are shipped in carefully packed state. Transport damages however can never be
totally excluded, and deadlines stated in insurance contracts should not be exceeded.
6.1.1 Unpacking
After receiving the merchandise:
– Check the package visually for any kind of damage.
If yes:
Detected damages must be notified to the carrier. As soon as the complaint has been confirmed
in writing, contact the responsible forwarder and inform VERMES Microdispensing.
If no damage is detected:
– Open the package.
– Remove any contained subcomponents and parts of the microdispensing system from the
package and check the delivery for completeness.
6.1.2 Content
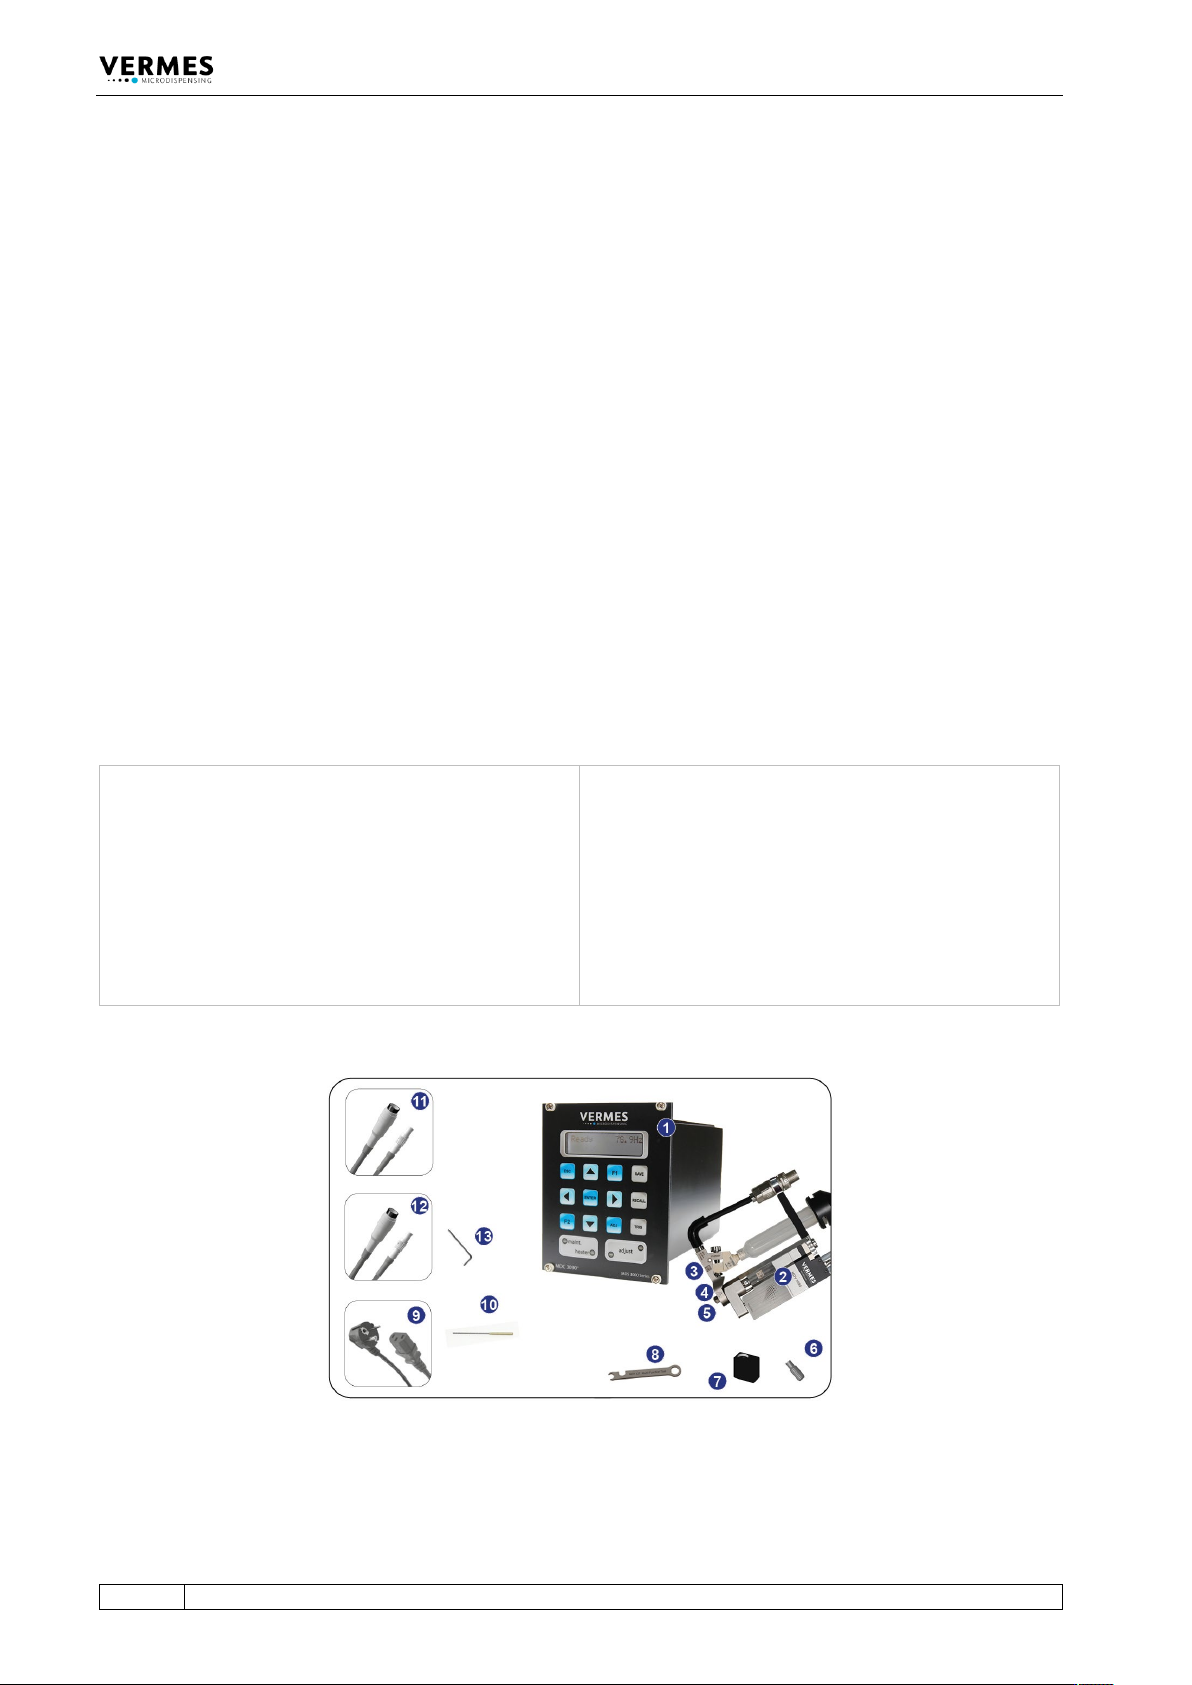
According to the purchase order, the following components may be included; some of them are
already preassembled:
1 Control unit MDC
2 MicroDispensing Valve MDV
3 Fluid box*
4 Nozzle unit*
5 Nozzle insert*
6 MDT 303 - Nozzle Insert
Changing Tool
7 Tappet guard
8 MDT 327 – Multi-Function Tool
9 Mains cable (black)
10 MDT 323 - Nozzle Insert –
Squeezing Out Tool TA
11 Actuator cable (red)*
12 Sensor cable (yellow)*
13 MDT 329 – L-Shape Hexagon Key
2 mm
*These parts are included only, if ordered explicitly.
Fig. 14: Content
Initial Operation
VTK-TR-BA-171e-1 - User Manual MDS 3080-V
41
Options Recommended options
Different models of fluid boxes
Different fluid box connectors
Nozzle heating
Cleaning set
MDT 301 - Universal Tool
MDT 324 – Nozzle Insert Cleaning Holder
If the intended application needs particular accessories (e.g. seals made of special material),
consult our Technical Support at once (see Page 7). Do not start the system in incomplete state.
6.2 First Assembling of the Valve
This chapter describes how to ready your microdispensing system for the first dispensing session.
Always make sure all screw couplings sit tight (torque values in paragraph 3.3.11, page 19).
INFORMATION
Some parts preassembled
Some elements of the equipment are usually delivered in preassembled state. In those cases, you
can omit the respective steps.
Proceed as follows:
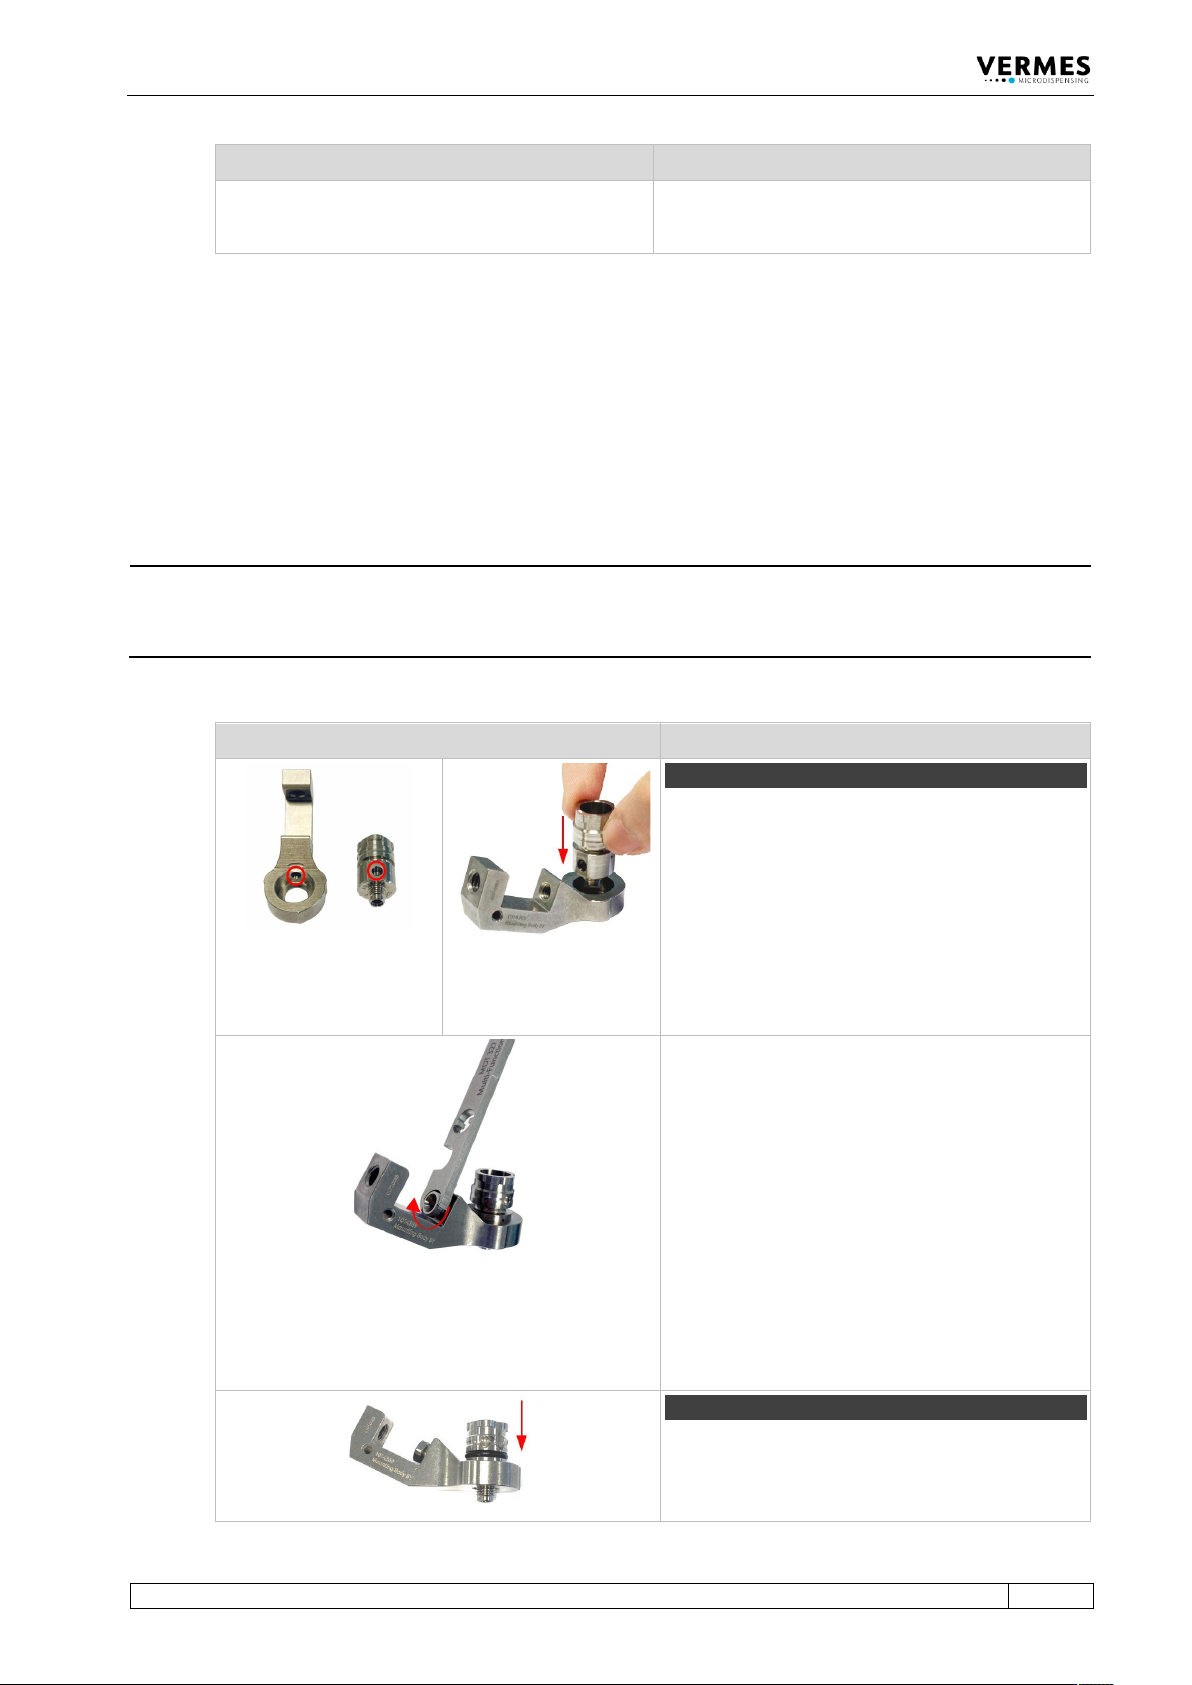
Picture Explanation
Step 1 (fluid box body)
Information!
This step will be optional, if you re-assemble the
valve later, since usually you would not remove
the Connector BY from the mounting body.
Place the fluid box body on the receptacle of the
mounting body. Align the bore on the fluid box
body with the bore on the mounting body (see
circles in the first picture). The fluid box body will
sit in the mounting body.
Push the Connector BY through the mounting
body into the bore of the fluid box body. Screw
the Connector BY tight (clockwise) by using an
MDT 327 (for newer revisions of the Connector BY
you can also use a hexagon key 2.5 or the MDT
306 - Torque Wrench Tool VM with the Bit
Hexagon Key 2.5). Torques are depending on the
material of the mounting body (stainless steel 120
– 140 cN.m, PEEK 70 – 80 cN.m).
Important Note!
Do not press the fluid box body while fastening
the Connector BY. Otherwise, the Connector BY
cannot correctly grip into the fluid box body.
Step 2 (O-ring)
Pull the O-Ring-BY over the fluid box body.