a3369b.pdf - 第87页
Operation 78 VTK - TR -BA- 171e - 1 - User Man u al MDS 3080 -V Prep ara tion f or the Adjus t Turn t he adjust screw completely in t he dir ection “op en” (see arrow on th e valve) . Screw t he nozzle fixati on nut abso…
Operation
VTK-TR-BA-171e-1 - User Manual MDS 3080-V
77
7.14 Dispensing with a Heater
With a heater, you can control the dynamical viscosity of the fluid to be dispensed. For some
liquids, dispensing without heating is impossible. Heating may also be required to ensure a
constant process temperature, or when the dispensing has to take place above room
temperature.
The Microdispensing System MDS 3080-V can be optionally equipped either with the nozzle
heater MDH-48-BY (order no. 1014231) or with the nozzle heater MDH-48-BY-BH (order no.
1015224). For this heater you need an external control unit, for example the Multifunctional
controller MFC 3000 (order no. 1014981), which can also control cooling valves, or the MHC 48-1
(order no. 1014107). You can find detailed information about these control units in their
respective user manuals.
IMPORTANT NOTE
T
urn ON channel at MFC before starting MDC
In case you use an MFC to control a cooling valve, you have to turn ON the respective channel at
the MFC, before you switch on the MDC.
INFORMATION
MDC 3090-V cannot control MDH-48-BY/MDH-48-BY-BH
With the control unit MDC 3090-V you cannot control a heater of the MDH-48-BY Series.
Completely ignore the submenu “Heater” of the MDC and the serial commands for heaters.
CAUTION
H
igh temperatures, danger of burns
The nozzle heater can reach temperatures of up to 180 °C. Do not touch this area during
operation, since there is the danger of severe burns. Afterwards only touch it once it has cooled
down and use heat resistant gloves.
7.14.1 The Adjust with Heater
The adjust is necessary to position the nozzle insert to the tappet before beginning with the
dispensing process itself. Please perform the adjust for every initial startup and after every
disassembly of the nozzle fixation nut. The adjust is especially important to avoid any leakage
during dispensing (see also paragraph 6.5, page 52).
IMPORTANT NOTE
Heating and adjust
In case your application uses a nozzle heater, you have to activate the heater before you start the
adjust. Make sure to wait long enough for the heater to reach stable temperature, since the
adjust could lead to an incorrect result otherwise.
Wear heat-resistant gloves while working with the valve!
IMPORTANT NOTE
Ad
just only with cleaned system
Make sure the system is always cleaned before you start an adjust. The presence of dirt particles
jammed between the tappet surface and the nozzle insert would compromise the results.
Operation
78
VTK-TR-BA-171e-1 - User Manual MDS 3080-V
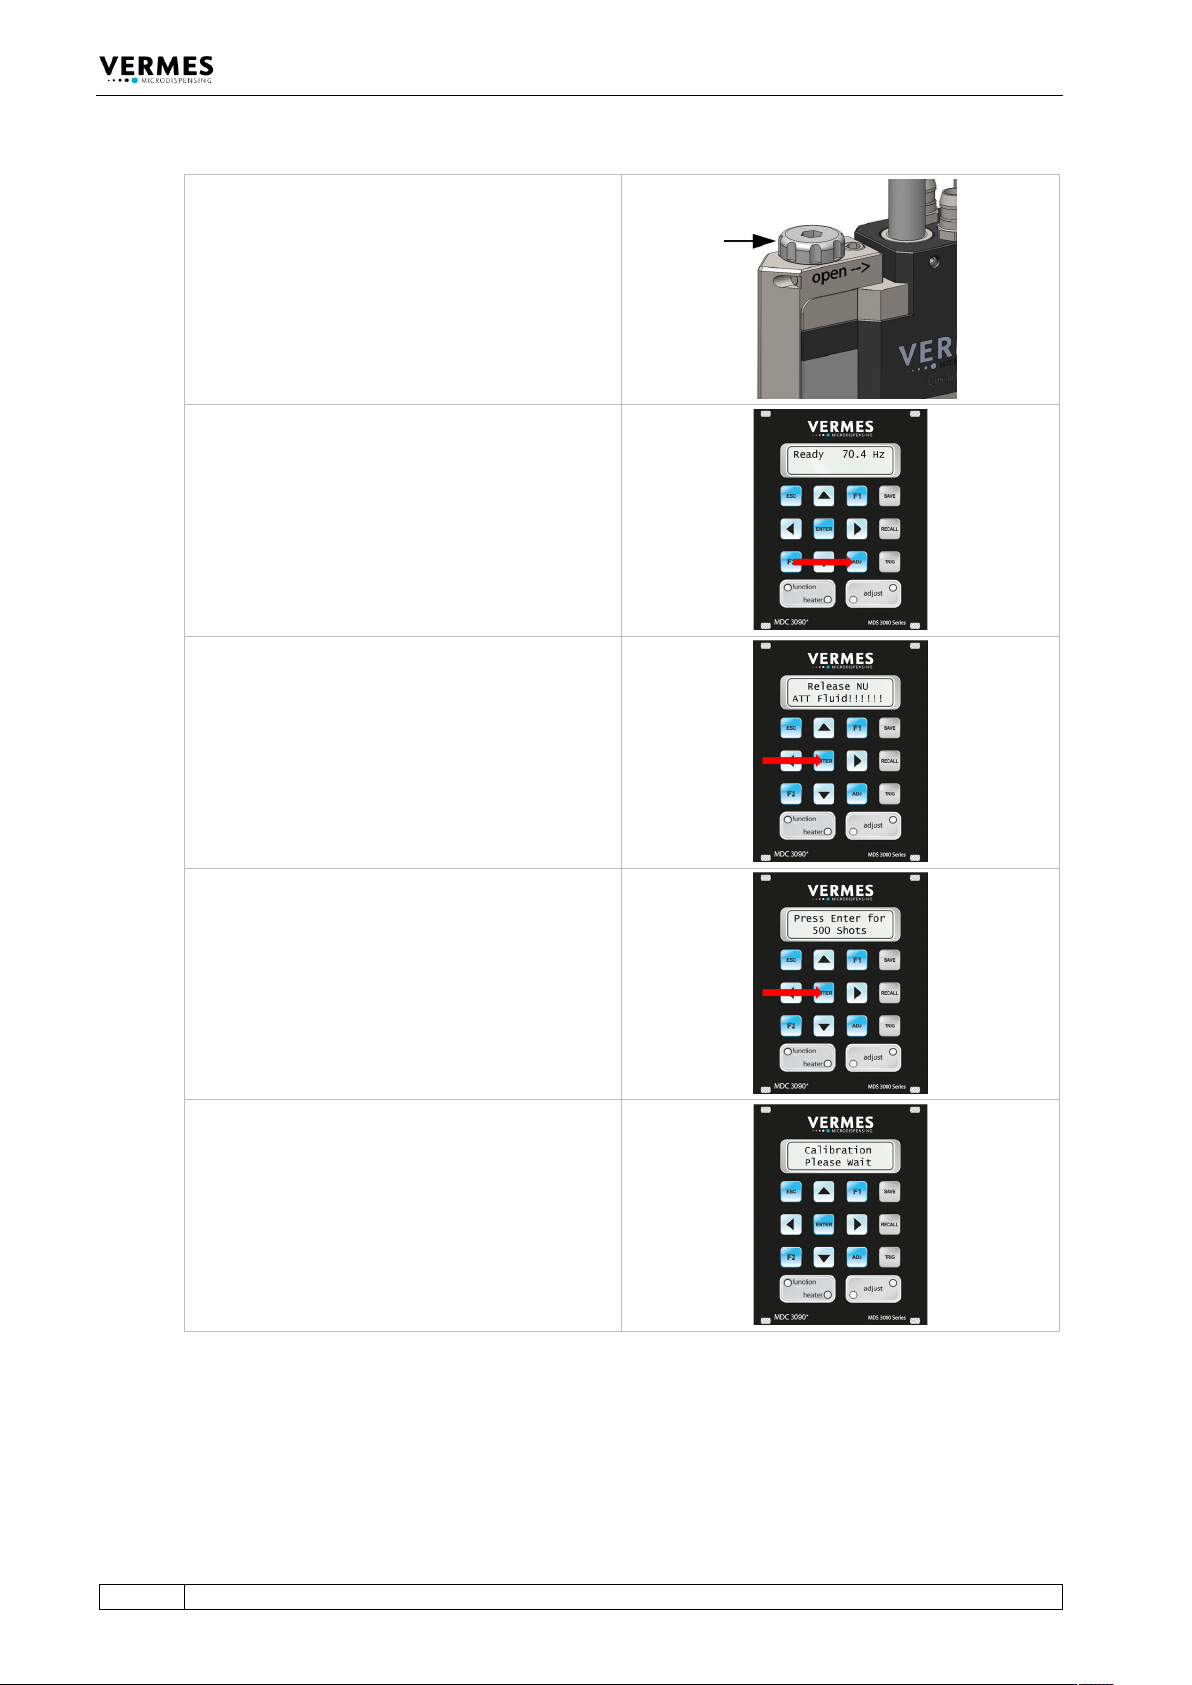
Preparation for the Adjust
Turn the adjust screw completely in the direction
“open” (see arrow on the valve).
Screw the nozzle fixation nut absolutely tight
(torque for screwing it tight at least 150 cN.m).
Turn on the heater and bring the heater to the
desired temperature. Wait a few moments for the
system to settle in this temperature.
Step 1 (Starting the adjust)
Start the adjust by pressing the [adj] -key on the
keypad of the control unit.
The message “Release NU ATT Fluid!!!!!!” appears in
the display (NU = Nozzle Unit).
Confirm it by pressing the [enter]-key.
The display shows the message “500 Shots –
Please Wait”. These shots help to prepare the valve
for the adjust.
Confirm it by pressing the [enter]-key.
The display shows “Calibration Please Wait”. This
can take a few moments. Please wait.
If the quality of the valve is okay, you will reach the
next step without pressing [enter].
Operation
VTK-TR-BA-171e-1 - User Manual MDS 3080-V
79
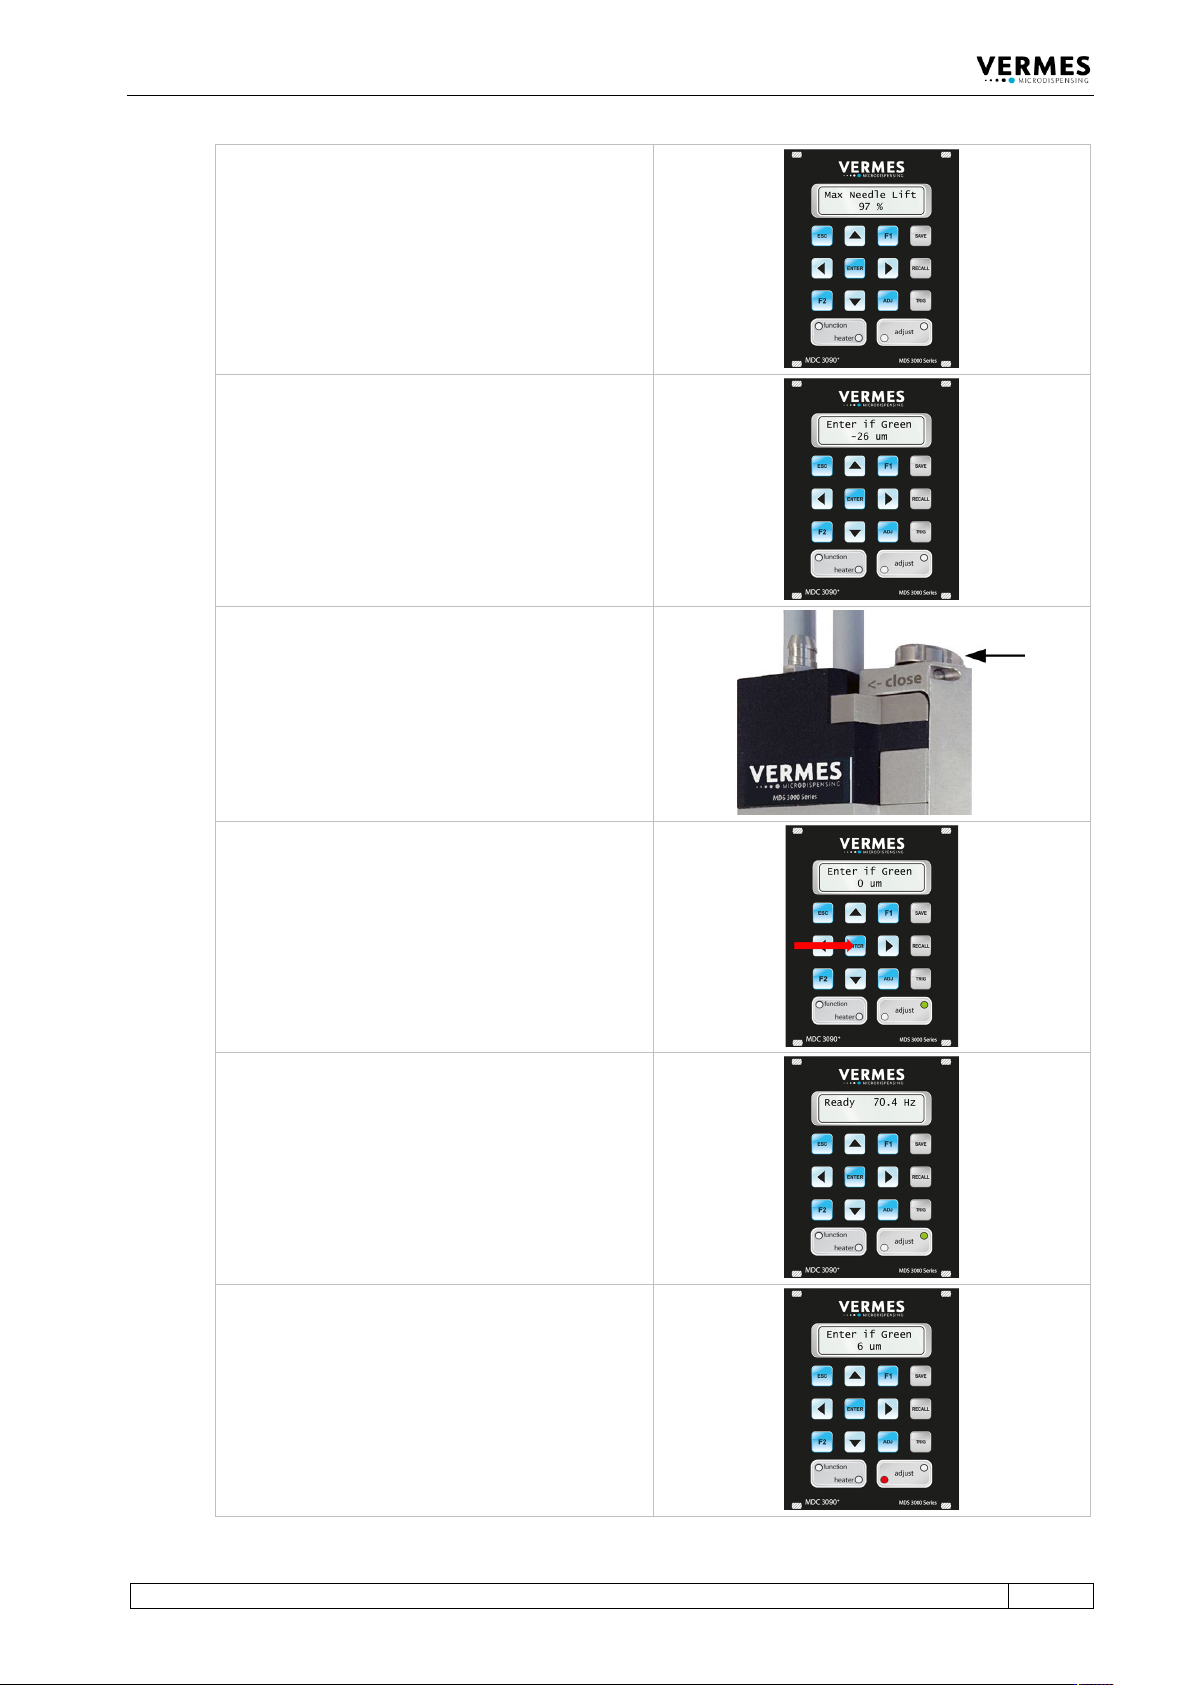
Information!
If the performance of the valve is unsatisfactory. In
the display, the message “Max Needle Lift” is
shown together with a percentage value in the
display. Once the message changes to “Press
Enter”, press the [enter]-key. In this case, you
should send the valve to VERMES Microdispensing
GmbH for maintenance.
Step 2 (turn in the adjust screw)
The display shows the starting value of the adjust.
Now turn the adjust screw with the help of tool
MDT 327 slowly in the direction “close”, until the
green adjust LED is ON. The adjust is possible
between 0 µm and 4 µm. (In fixed adjust mode, the
adjust is possible between 0 µm and 50 µm.)
Step 3 (Find adjust value and confirm it)
Press the [enter]-key, if the green adjust LED is ON.
Once you have completed the adjust successfully,
the display returns to the message “3090+ xx Hz”.
You are again in the main menu of the MDC. The
system is now ready to be filled with the
dispensing medium.
Information!
If you screw in the adjust screw too far (5 µm or
more shown), then the red adjust LED will be ON.
Screw back a little bit. An adjust can only be
confirmed as successful with [enter], while the
green adjust LED is ON.