00197446-02_UM_JTF_S_JTF-M_ X-Serie_S_de_en.pdf - 第160页
Tasks for SIPLACE JTF-S, SIPLACE JTF-M Configuration of SIPLACE JTF-S, S IPLACE JTF-M in SIPLACE Pro 5.3 .3 Configuration of the Station – Station Tree View 160 JEDEC Tray Feeder 5.3.3 5 . 3 . 3 C o n f ig u r a t io n o…

Tasks for SIPLACE JTF-S, SIPLACE JTF-M
5.3.2 JEDEC Tray Description – Tray Tree View Configuration of SIPLACE JTF-S, SIPLACE JTF-M in SIPLACE Pro
JEDEC Tray Feeder 159
5.3.2
5.3.2 JEDEC Tray Description – Tray Tree View
JEDEC Tray Description – Tray Tree View
► Define one JEDEC tray with dimensions that comply with the JEDEC tray standard.
► For the dimensions, refer to the data sheet of the manufacturer.
► After defining a JEDEC tray you must assign it to a feeder. Select the relevant SIPLACE JTF feeder
type.
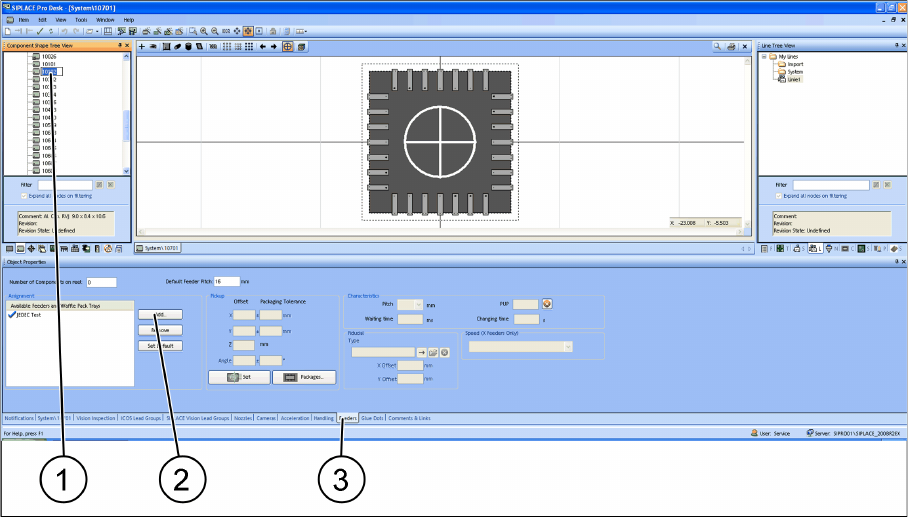
► Select the Feeder tab (1).
► Select Add to add a feeder or Remove to remove a feeder (2).
► Select the relevant SIPLACE JTF feeder(s) (multiple selection is possible) and confirm with OK. As-
signed SIPLACE JTF feeders (3) are displayed in the Assignment window.
NOTICE
JEDEC tray standard
In order to be used in a SIPLACE JTF-S, SIPLACE JTF-M feeder, the dimensions must comply
exactly with the JEDEC tray standard. In the example, a JEDEC tray with the name JEDEC
Test was defined.
Tasks for SIPLACE JTF-S, SIPLACE JTF-M
Configuration of SIPLACE JTF-S, SIPLACE JTF-M in SIPLACE Pro 5.3.3 Configuration of the Station – Station Tree View
160 JEDEC Tray Feeder
5.3.3
5.3.3 Configuration of the Station – Station Tree View
Configuration of the Station – Station Tree View
Not every station can be configured for the use of a SIPLACE JTF-S, SIPLACE JTF-M feeder.
The following stations with station software 707.0 or higher support the SIPLACE JTF-S, SIPLACE JTF-
M:
▪SIPLACE SX
▪ SIPLACE SX V2
▪ SIPLACE X2 S
▪ SIPLACE X3 S
▪ SIPLACE X4 S
▪ SIPLACE X4i S
5.3.4
5.3.4 Assignment of JEDEC Tray to the Component Shape – Component Shape Tree View
Assignment of JEDEC Tray to the Component Shape – Component Shape Tree View
To be able to place a component with the SIPLACE JTF-S, SIPLACE JTF-M later on, you must assign
a JEDEC tray to the component shape.
► (1) Select the component shape.
► (3) Select the Feeders tab.
► (2) Select Add to add the JEDEC tray.
► Select an appropriate JEDEC tray from the list. The selected JEDEC tray is displayed under Assign-
ment.
Tasks for SIPLACE JTF-S, SIPLACE JTF-M
5.3.5 Configuration of the Setup – Setup Tree View Configuration of SIPLACE JTF-S, SIPLACE JTF-M in SIPLACE Pro
JEDEC Tray Feeder 161
5.3.5
5.3.5 Configuration of the Setup – Setup Tree View
Configuration of the Setup – Setup Tree View
5.3.5.1
5.3.5.1 Head Configurations for SIPLACE SX1, SX2, SIPLACE X-Series S and SIPLACE X4i S
Head Configurations for SIPLACE SX1, SX2, SIPLACE X-Series S and SIPLACE X4i S
The SIPLACE JTF-S, SIPLACE JTF-M feeders may only be set up on gantries with the following heads:
At both locations, location 1 and 2 for SIPLACE SX1 and SIPLACE SX2, location 2 and 3 for SIPLACE
X-Series S and SIPLACE X4i S:
1. CPP_H (no CPP_L allowed)
2. Twin VHF
3. HFH
You can perform the table configuration if one of these heads is configured.
5.3.5.2
5.3.5.2 Table Configuration
Table Configuration
After you have configured one of the heads mentioned in "5.3.5.1 Head Configurations for SIPLACE
SX1, SX2, SIPLACE X-Series S and SIPLACE X4i S" [ ➙ 161], select the necessary table type that is
the prerequisite for setting up a JTF-S, JTF-M.
The table types are:
▪ SIPLACE SX1 and SIPLACE SX2 : MTF table 60 X
▪ SIPLACE X-Series S : MTF table 40 X
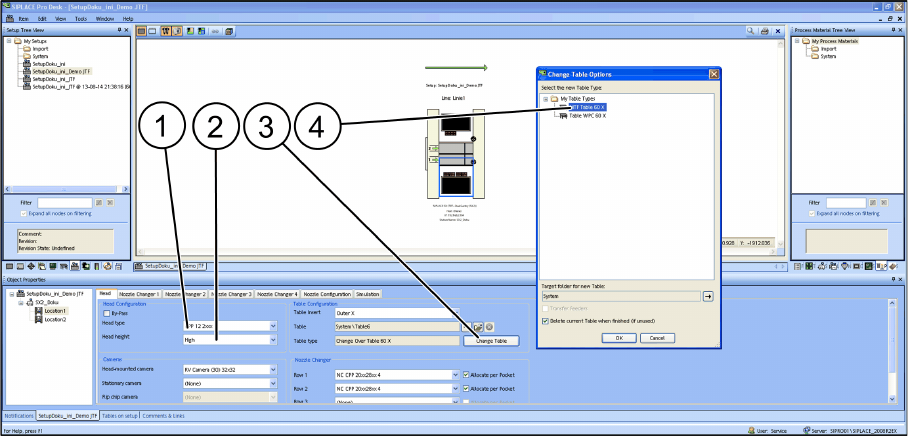
SIPLACE Pro - Example with table configurations on SIPLACE SX1/SX2
1. Head configuration: CPP 12 2xxx (as example) (1)
► Head height: Select HIGH (2) for the CPP 12 2xxx.
1. Table configuration Change Table (3)
► Confirm each selected table type (4)and confirm with OK.
After the relevant table type has been selected, the options in the Camera and Nozzle Changer fields
are automatically disabled. For design reasons, these configuration options are no longer available after
the table type has been selected.
All cameras and nozzle changer configurations that are selectable are displayed as active.