CP40 service manual.pdf - 第82页
1. Head Part (CP-40) NO Symptom Possible Cause Error Code Action Instruction 25 Pick Up Error Bad Blow Rate Adjust or Replace Vacuum Generator Level. 1-3-8 26 Head is set High. Set Head Height. - 27 No Head Vacuum Volume…
1. Head Part
(CP-40)
NO Symptom Possible Cause Error Code Action
Instruction
1
Image Error
Bad Waveform of Align Image
Clean Align Glass. 1-3-6
2 Adjust Align Magnification. 1-3-3
3 Replace Align. 1-3-2
4 AlignSet-upError Replace Align I/F Board. 1-3-1
5 Align File is not Downloaded. Replace Align Board.
6 Align Reflection Plate is not Attached. Attach Reflection Plate.
7
Aligner Board Connector Bolt is not Tightened
Properly.
Tighten Connector Bolt Properly.
8 ALIGNER INITIALIZE Error Replace Align Board. 1-3-1
9 ALIGNER SCORE IS TOO LOW Error Check for Cable Connection.
10 HEAD LAHD Error Replace Aligner Board. 1-3-1
11 Aligner is not Powered on. Correct Connector of Board.
12
Homing Error
Bad Head Home Repair Bad Connection of Head Connector Pin.
13 LAHD Error When Activating Home Replace Align Cable.
14 ALIGNER INITIALIZE Error When Homing Replace Aligner Board. 1-3-1
15 Error on X-Axial Servo Drive after Power-on Replace X-Axial Servo Drive.
16
Motor Operation
Error
Head Theta Axis is not Moved. Replace I/F Board.
17 Motor Alarm When Checking Head Runout Replace Align Board. 1-3-1
18 Speed of Head Theta Axis is Slow. Replace Head Axis Board.
19 Bad Backlash of R1,R2,R3 Motor Set Drive Dip S/W.
20 No.3 Theta Rotates only to Either Direction. Replace I/F Board.
21 Noise is heard when Z-Axis Running. Correct Parameter Value.
22
Ready Switch is Down When Z-Axis Running.
Replace Z-Axial Servo Drive.
23 Reconnect Connector Pin of Head Encoder Cable.
24 Z-Axis Motor is not Powered on. Replace Z-Axis Driver.
1-2 Trouble Diagnosis
1. Head Part
(CP-40)
NO Symptom Possible Cause Error Code Action
Instruction
25
Pick Up Error
Bad Blow Rate Adjust or Replace Vacuum Generator Level. 1-3-8
26 Head is set High. Set Head Height. -
27 No Head Vacuum Volume Adjust or Replace Vacuum Generator Level. 1-3-8
28 Excessive Head Vacuum Volume Adjust or Replace Vacuum Generator Level. 1-3-8
29 Excessive Foreign Materials Inside Head Filter Remove Foreign Materials from Head Filter. -
30 Head Image Test is not Performed Properly. Set up Head Aligner. 1-3-3
31 Damage to Spring of Head Ass'y Z-Axis Replace Spring of Head Ass'y Z-Axis. -
32 Head R-Axis Malfunction
Check and Replace Head R-Axial Motor
Connector.
33
Data is indicated as "0" When Head Vacuum is
"ON".
Replace Vacuum Generator. 1-3-4
34
Difference between Head Vacuum Volumes is over
50.
Replace Vacuum Generator. 1-3-4
35 Head Vacuum Volume is under 560. Adjust Head I/F Board VR1. 1-3-5
1-2. Trouble Diagnosis
1. Head Part
(CP-40)
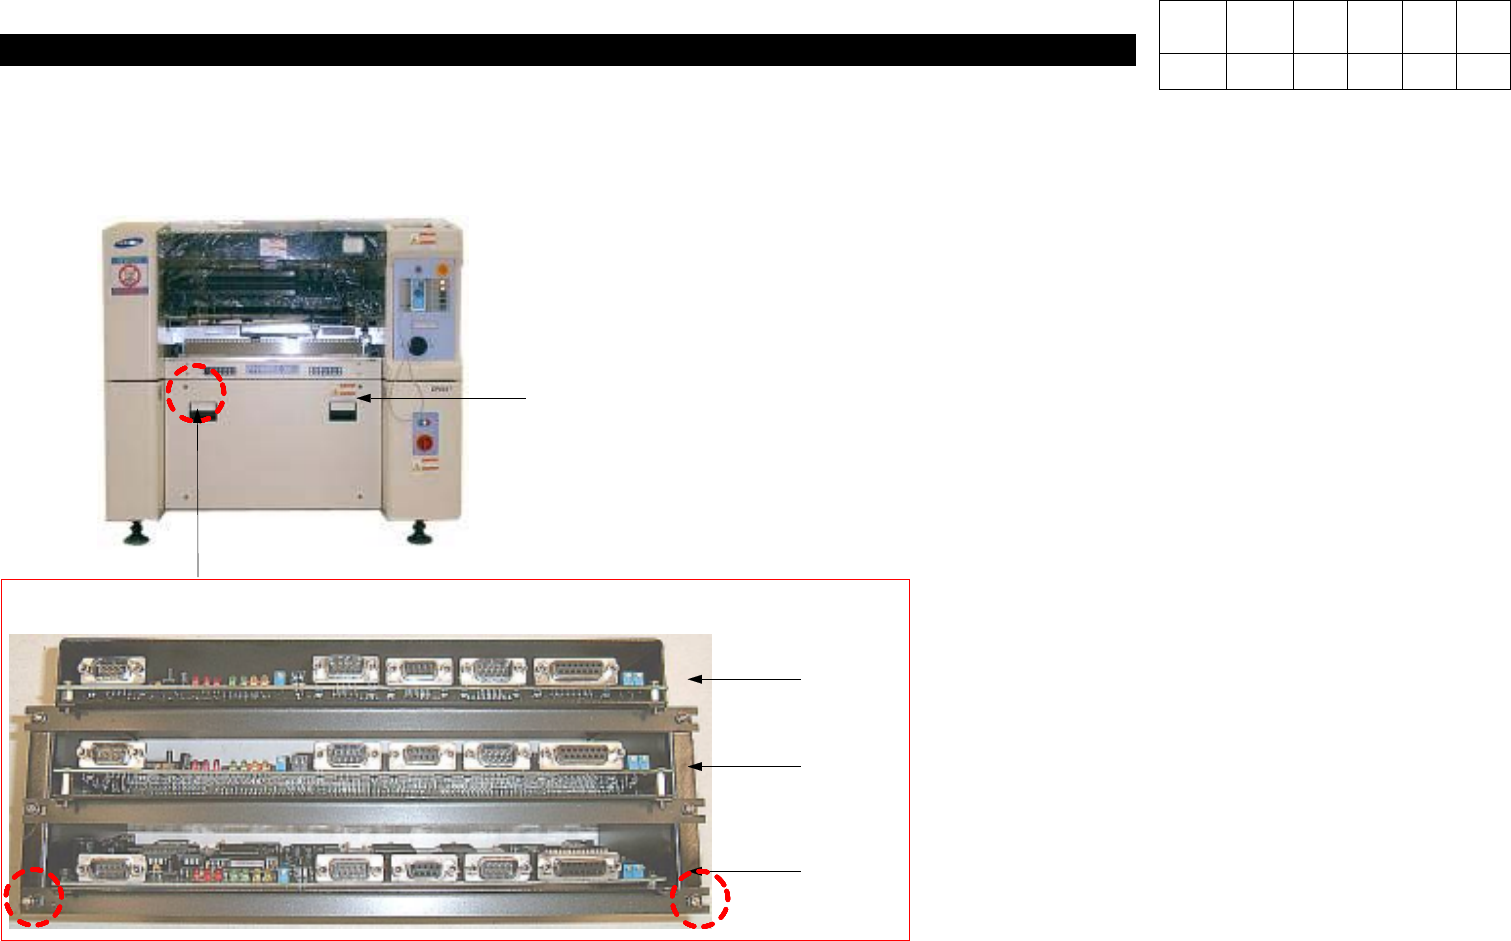
1-3-1. Align Board Replacement
1) Using a Cross-head Screwdriver, Loosen 4
Toras Bolts on the Front Cover.
2) Loosen both the Left-hand and the
Right-hand M3*8 Spherical Head Bolts of
Bracket in the Left Upper.
3) While Grasping the Front End of Faulty
Align Board with Both Hands, Pull them.
# Since Head 1, Head 2 and Head 3 are
located in order from the Top, Disconnect
Only Faulty Align Board(For Assembly,
Perform Reverse Procedures of
Disassembly).
Toras Bolt*4ea
Align Board
Head 1
Head 2
Head 3
M3*8SphericalHead
Version Date WA QA CA Note
00 Nov04 O O O