ALFeeder_E.pdf - 第63页
2. Preaparation for operation 3-17 Chapter 3 Setting up ► Set position of preset holder (YRM20 is excluded) • When the tape reels for ZS/SS feeders are set to the upper reel holders, the positions of lower reel holder ne…
2. Preaparation for operation
3-16
Chapter 3 Setting up
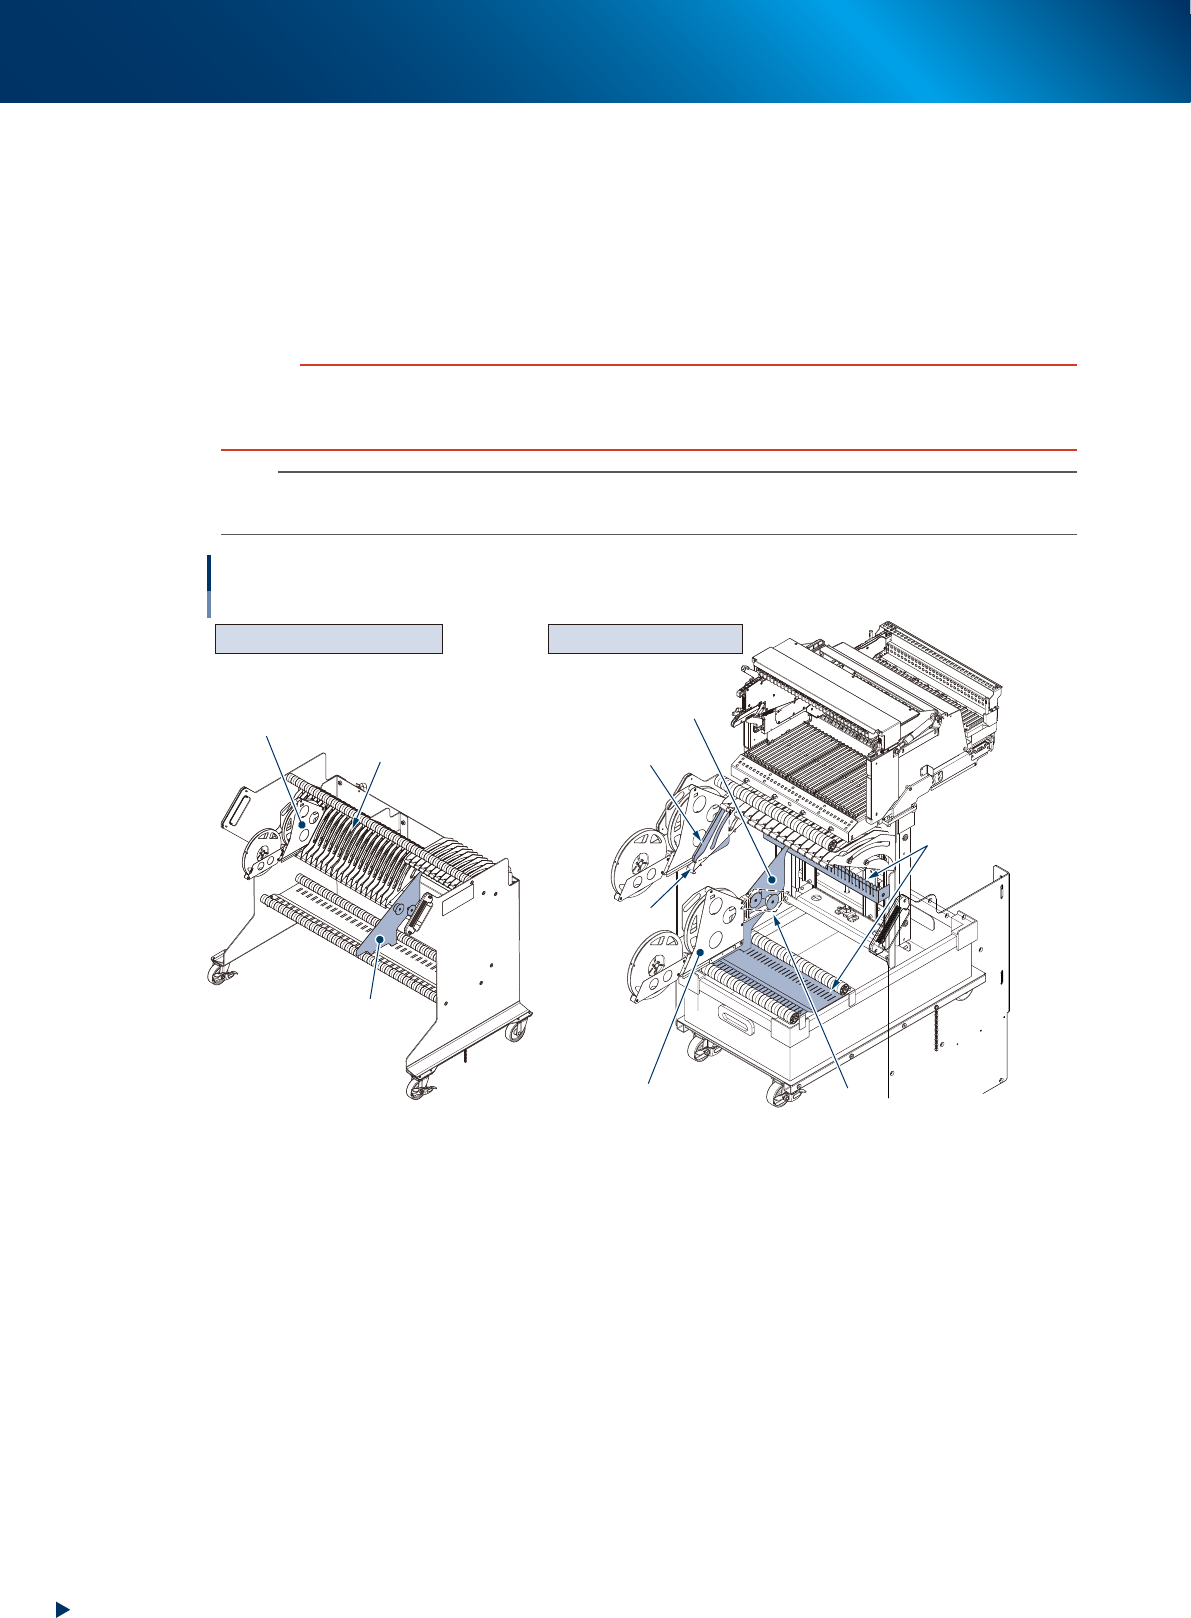
2.1.2 Feeder exchange carriage and reel holder for feeder bank
The tape reel for Auto loading feeder is stored in a preset holder.
►
Precautions for each series
• The preset holders can be attached to upper side of feeder exchange carriage for YSM series
(standard type). The retrofit for feeder exchange carriage is required when attaching preset holder
on the lower row.
• The procedure for attaching preset holder to feeder exchange carriage for YS series is slightly
different from that for YSM series.
c
CAUTION
For YSM20R, only when the Auto loading feeder full-load is available for the calmp unit of both feeder exchange carriage
and the machine, 17 or more tape reel can be attached. However, the YSM20R with the reel holder for feeder bank has no
limitation on loading Auto loading feeders even for standard type.
n
NOTE
Auto loading feeder full-load capacity on feeder exchange carriage for YSM20 standard type is 16. Setting more than 16
Auto loading feeders may result in abnormal clamp. It may extremely adverse to pickup position.
Attaching preset holder
Example: YSM20 series
Reel holder pad
Reel holder
Boss
Reel holder
Preset holder
Preset holder
Partition
Partition
Retrofit kit
Upper row: Partition bracket
Lower row: Plate
70-reel holder for feeder bank Feeder exchange carriage
63324-KLU-40
►
Preset holder
Available for both upper/lower rows of feeder exchange carriage. Preset holder is a reel holder for
Auto loading feeder that reels can be preset.
►
Reel holder pad
It is attached to the reel holder (carriage side). The preset holder can be set steadily with the pad. It
also prevents component tape intrusion. The pad is a magnet-typed and can be attached to reel holder
(carriage side) easily. The reel holder pads are required even when attaching preset holder only to the
upper row of carriage.
►
Partition (YRM20 is excluded)
Using a preset holder for lower row of carriage requires a partition (a preset holder attachment). This
partition has dedicated boss (round part) for hanging a preset holder.
The feeder exchange carriage for YRM20 does not require this partition as it supports using a preset
holder for lower row at its standard specification.
►
Retrofit kit (for feeder exchange carriage only, YRM20 is excluded))
The standard type feeder exchange carriage does not have the required partition bracket and plate to
attach the partition to lower row. Retrofit is required.
2. Preaparation for operation
3-17
Chapter 3 Setting up
►
Set position of preset holder (YRM20 is excluded)
• When the tape reels for ZS/SS feeders are set to the upper reel holders, the positions of lower reel
holder need to be changed.
• When a feeder uses 13 inch or larger reeo, a preset holder cannot be attached to the lower reel
holders
n
NOTE
As to attaching YRM20 reel holder to lower row, it can basically be attached anywhere as the set position of preset holder
is not limited. Attach them where does not affect to tape flow.
►
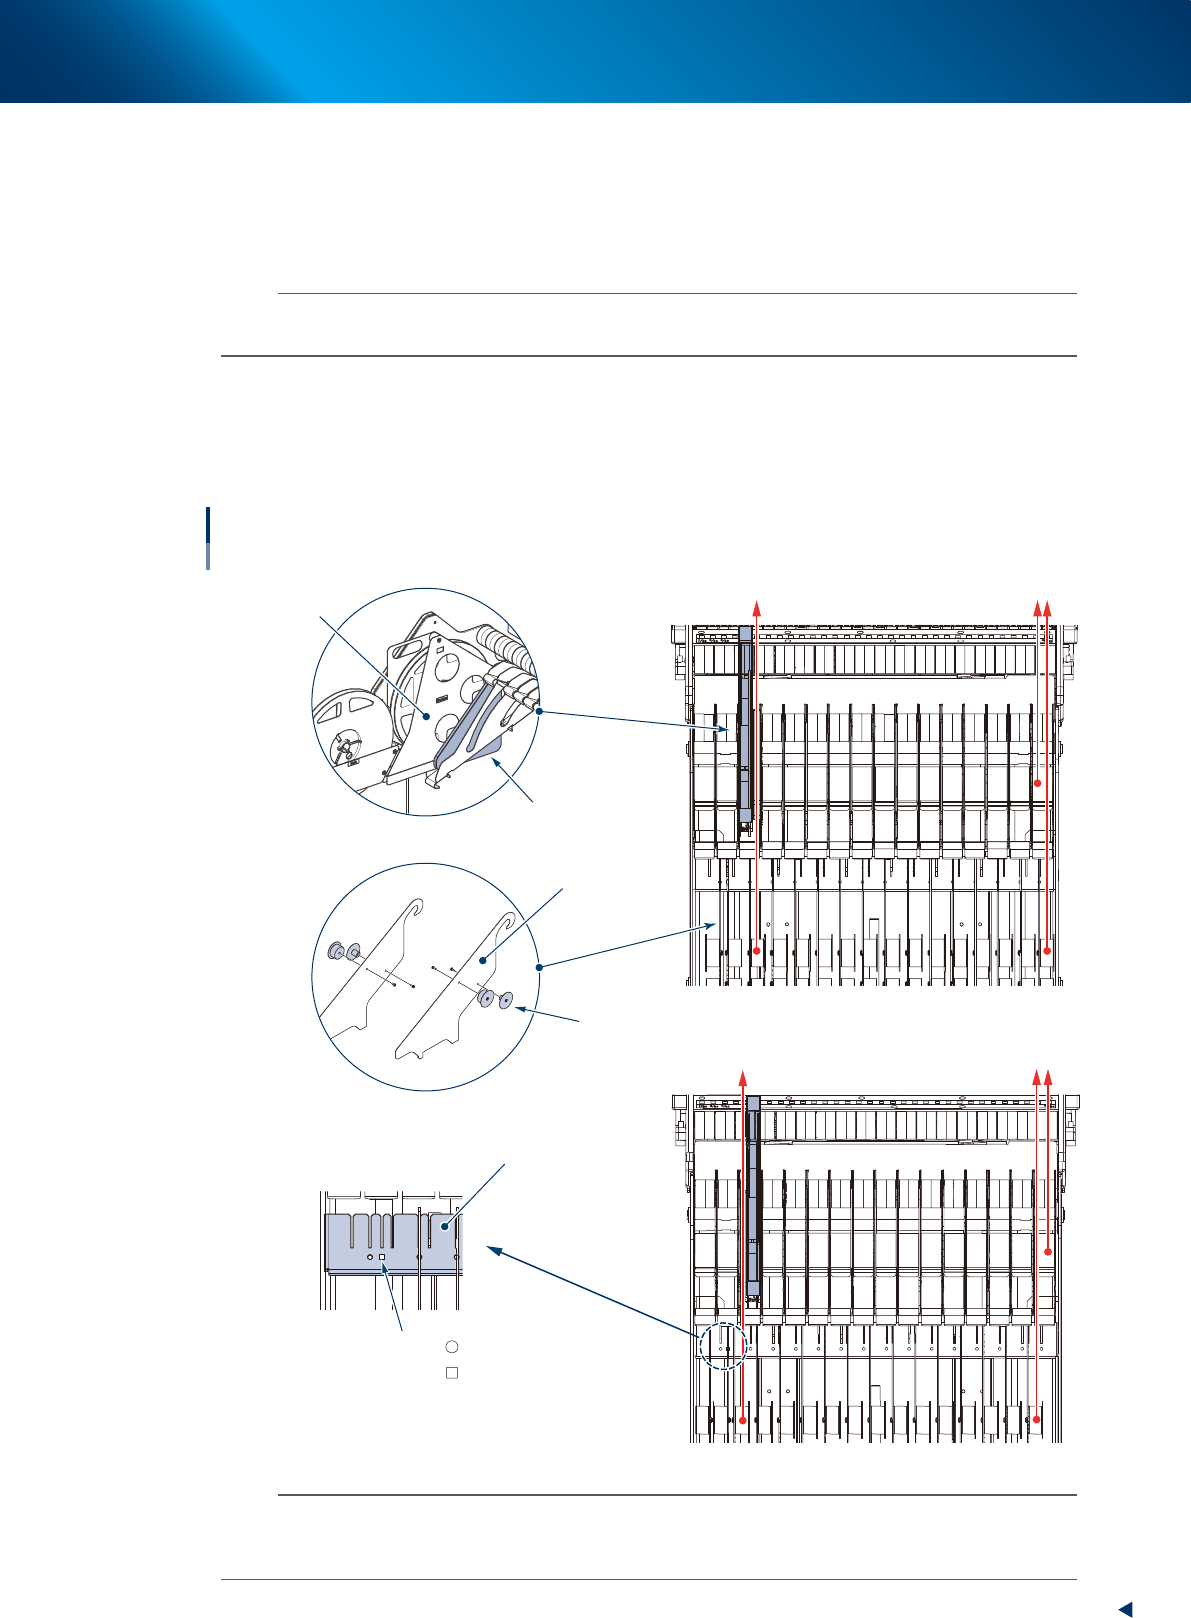
Partition setting procedure
1. If a preset holder is attached to upper row of carriage, check that it is left-sided or right-sided.
2. Check the mark on partition bracket. Set the partition for the tape path (red arrow below) to be
vertical.
Set position of partition
Left side/Right side
Reel holder pad
Preset holder
Partition
Boss
Example: Setting preset holder left side
Example: Setting preset holder right side
Partition bracket
Setting position of partition
Changing attachment position of boss
Mark : Left side
: Left or right side
No Mark : Right side
63327-KLU-30
n
NOTE
Setting preset holder left side: Set the boss on the left-most and square
mark partitions oppositely.
Setting preset holder right side: Set the boss on the left-most partition oppositely.
Moreover, the square mark (for left and right side) is not applied to the machine with reel holder for feeder bank.
2. Preaparation for operation
3-18
Chapter 3 Setting up
2.2 Setting up component tape
2.2.1 Setting up component tape without IT Option
This section describes the procedure of setting the component tape without any optional software (IT
option).
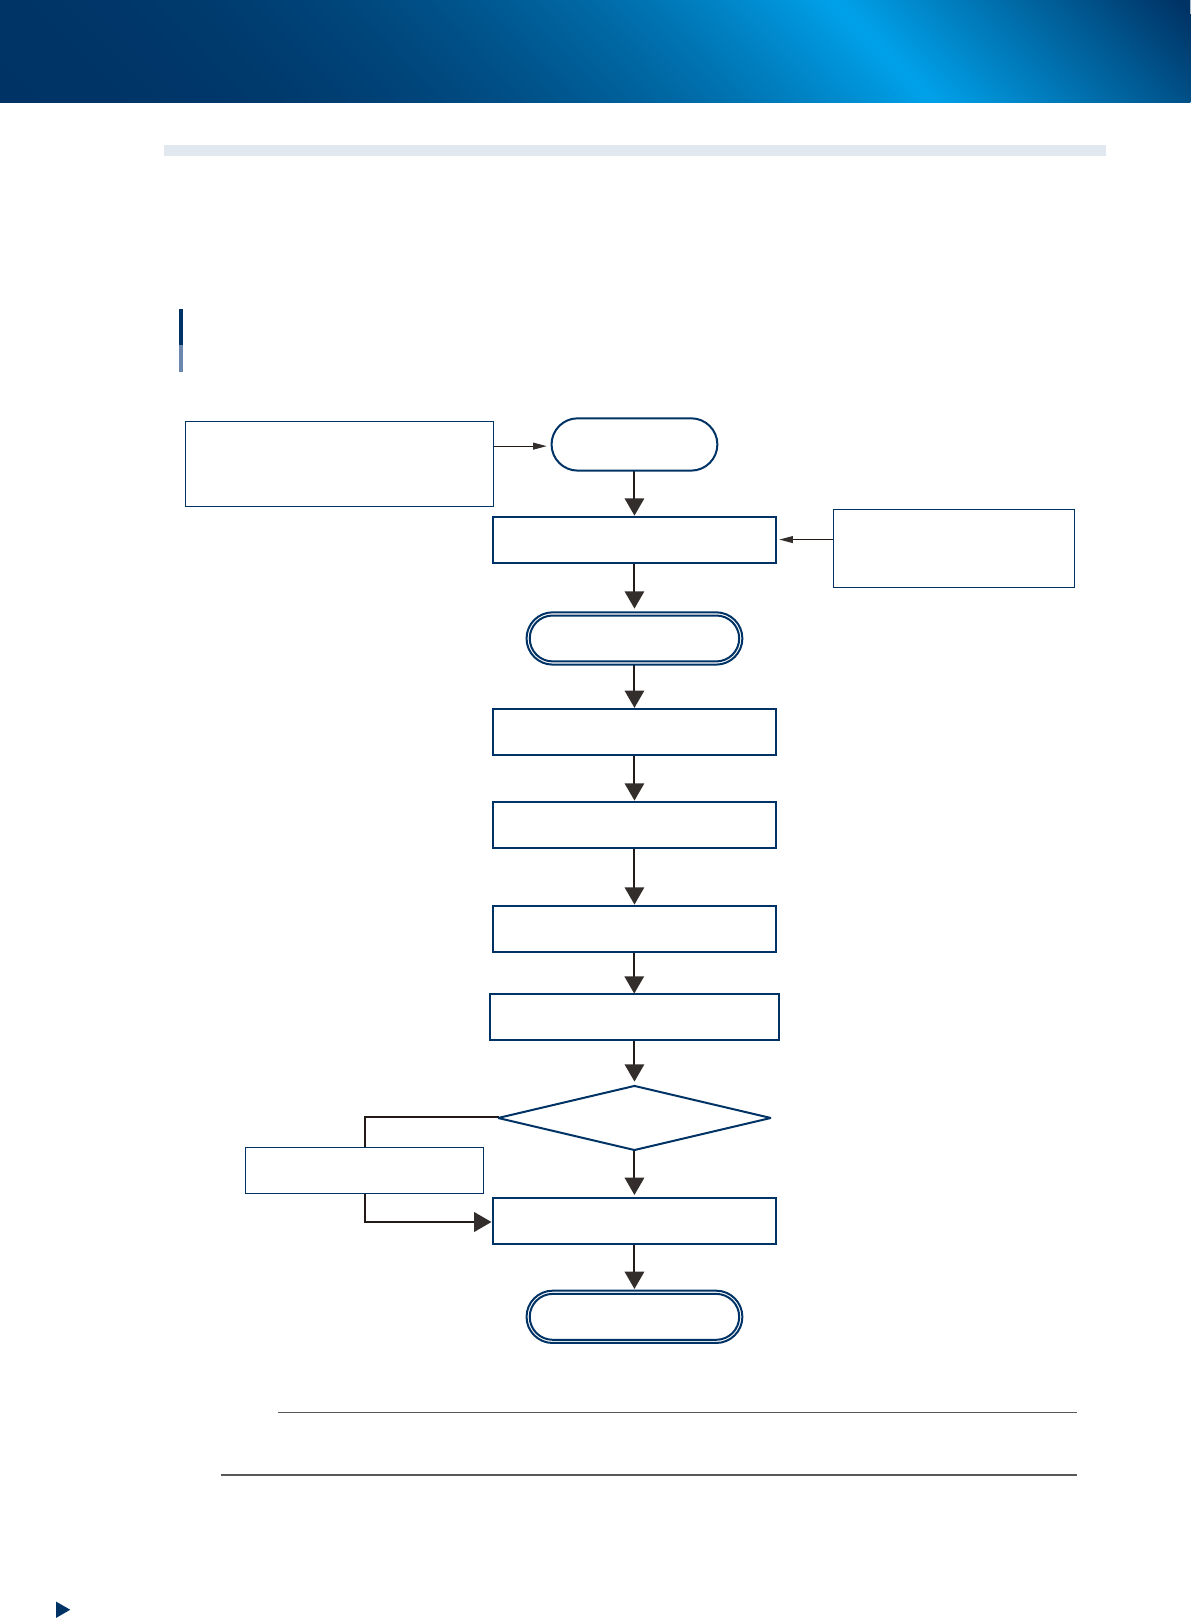
Flowchart of setting up component tape
Without IT Option
Preparation
Prepare component tape
Set the Auto loading feeder
Auto Loading Feeder capability list
Auto Loading Feeder Optimizer
Setup Assignment
Y.FacT (P-TOOL)
Cut/Fold top of component tape
Start setting
Set component tape newly or
supply component tape
Newly
Check the [Monitor] - [Production]
screen or the [Setup Assignment]
screen
Set component tape
Set preset holder
Set component tape newly or
supply component tape
Start operation
No
Yes
Newly set ?
Set component tape to be added
to loading position
Move down component tape
in operation from loading unit
63301-KLU-30
n
NOTE
The flowchart above is the setting component tape without IT Option. The procedure or instruction screen may differ if using
IT Option.