ALFeeder_E.pdf - 第99页
3. Maintenance / Replacing procedure 4-11 Chapter 4 Maintenance and parts replacement 3.4 Connecting section for feeder bank 3.4.1 Replacing under rail 1 Deta ch under r ail. 1. R emove 2 s crews mounting under rail w it…
3. Maintenance / Replacing procedure
4-10
Chapter 4 Maintenance and parts replacement
3.3 Front block
c
CAUTION
It is required to adjust pickup position (Y-direction) after replacing front block. In this case, use separately sold tune-up
station (option).
3.3.1 Replacing front block
1
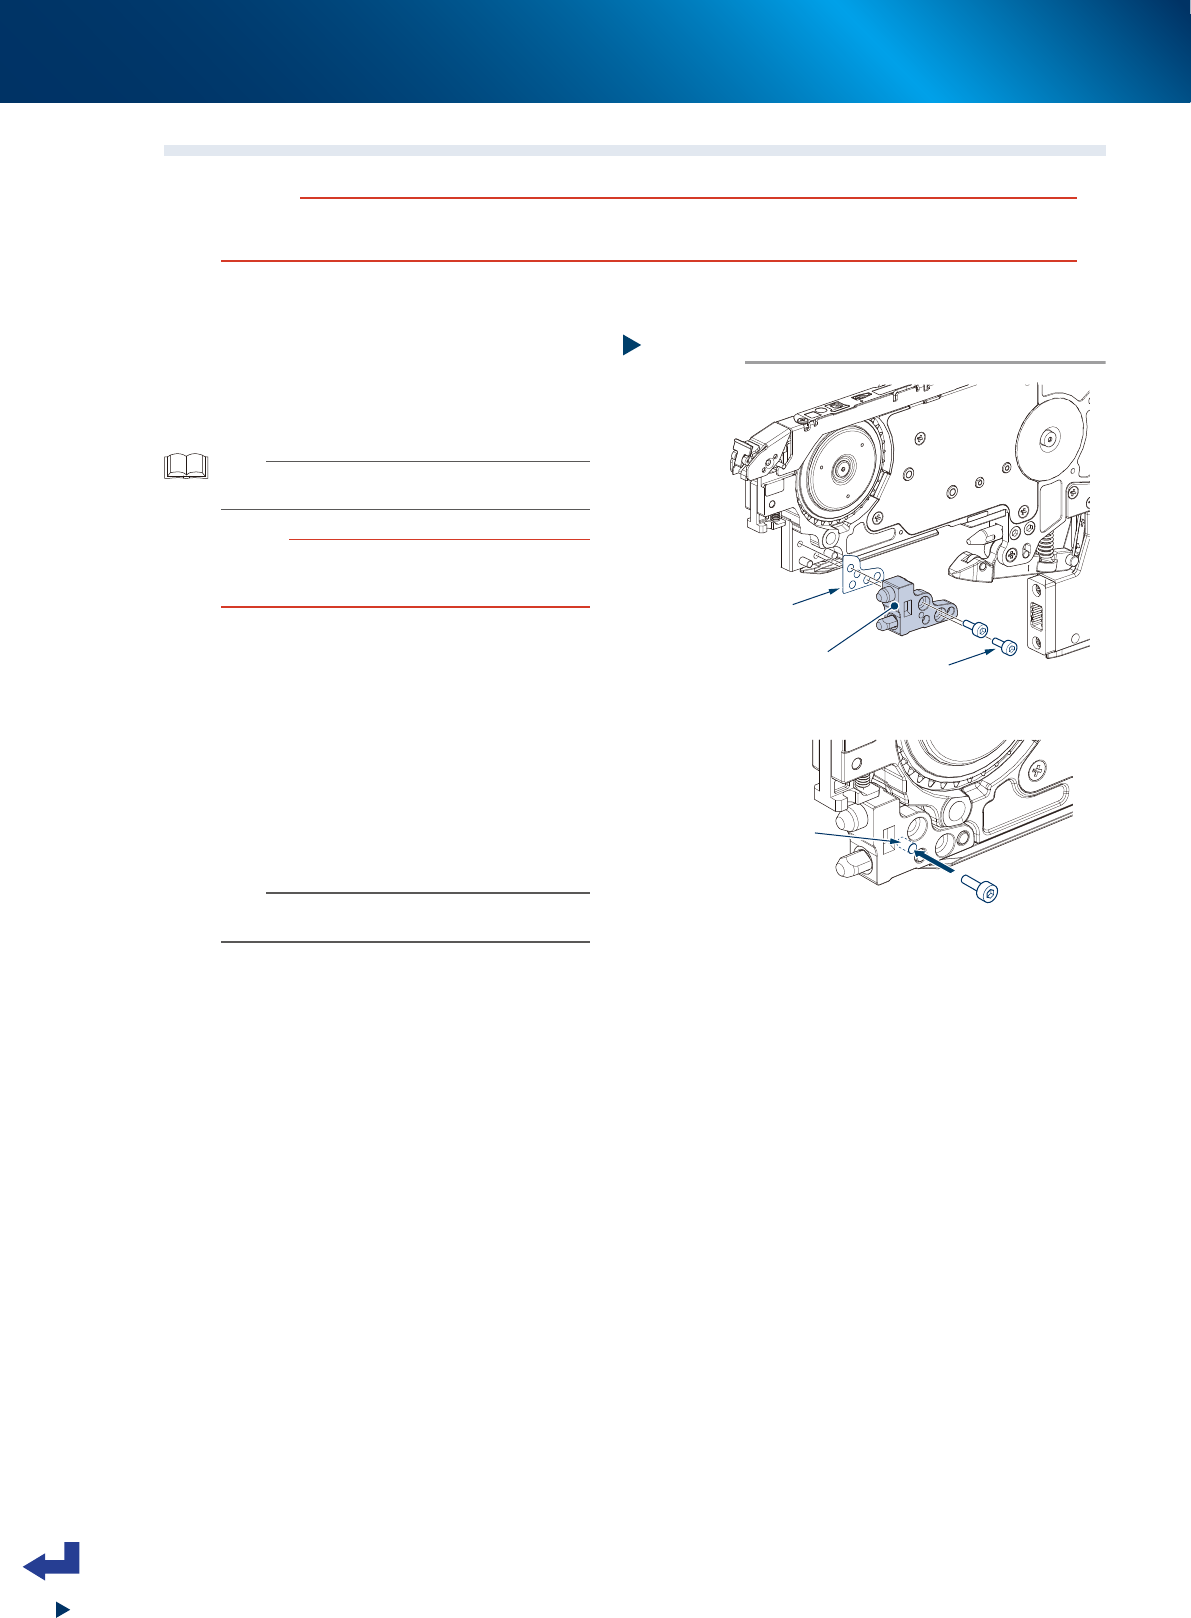
Detach front block.
1. Remove 2 screws mounting front block with
hex wrench (2.5).
2. Detach front block.
TIP
If unable to detach front block, Screw in M3 x 6 or larger
bolt into M3 extraction hole to pull front block straight out.
c
CAUTION
One or more shims may be present between front block
and feeder body. In this case, make sure not
to losing shims.
2
Attach front block.
1. Return shims to original position if they have
been replaced or detached.
2. Attach front block by tightening 2 mounting
bolts with hex wrench (2.5).
• Tightening torque: 200 N·cm
3
Check pickup position.
Check pickup position in Y-direction with
tune-up station (option).
n
NOTE
When adjusting pickup position, follow instructions of
tune-up station (option).
Step 1
Detaching front block
Front block
When unable to detach front block
M3 x 6 or larger
Screw in this hole.
Shim
Mounting bolt
63408-KLU-30
3. Maintenance / Replacing procedure
4-11
Chapter 4 Maintenance and parts replacement
3.4 Connecting section for feeder bank
3.4.1 Replacing under rail
1
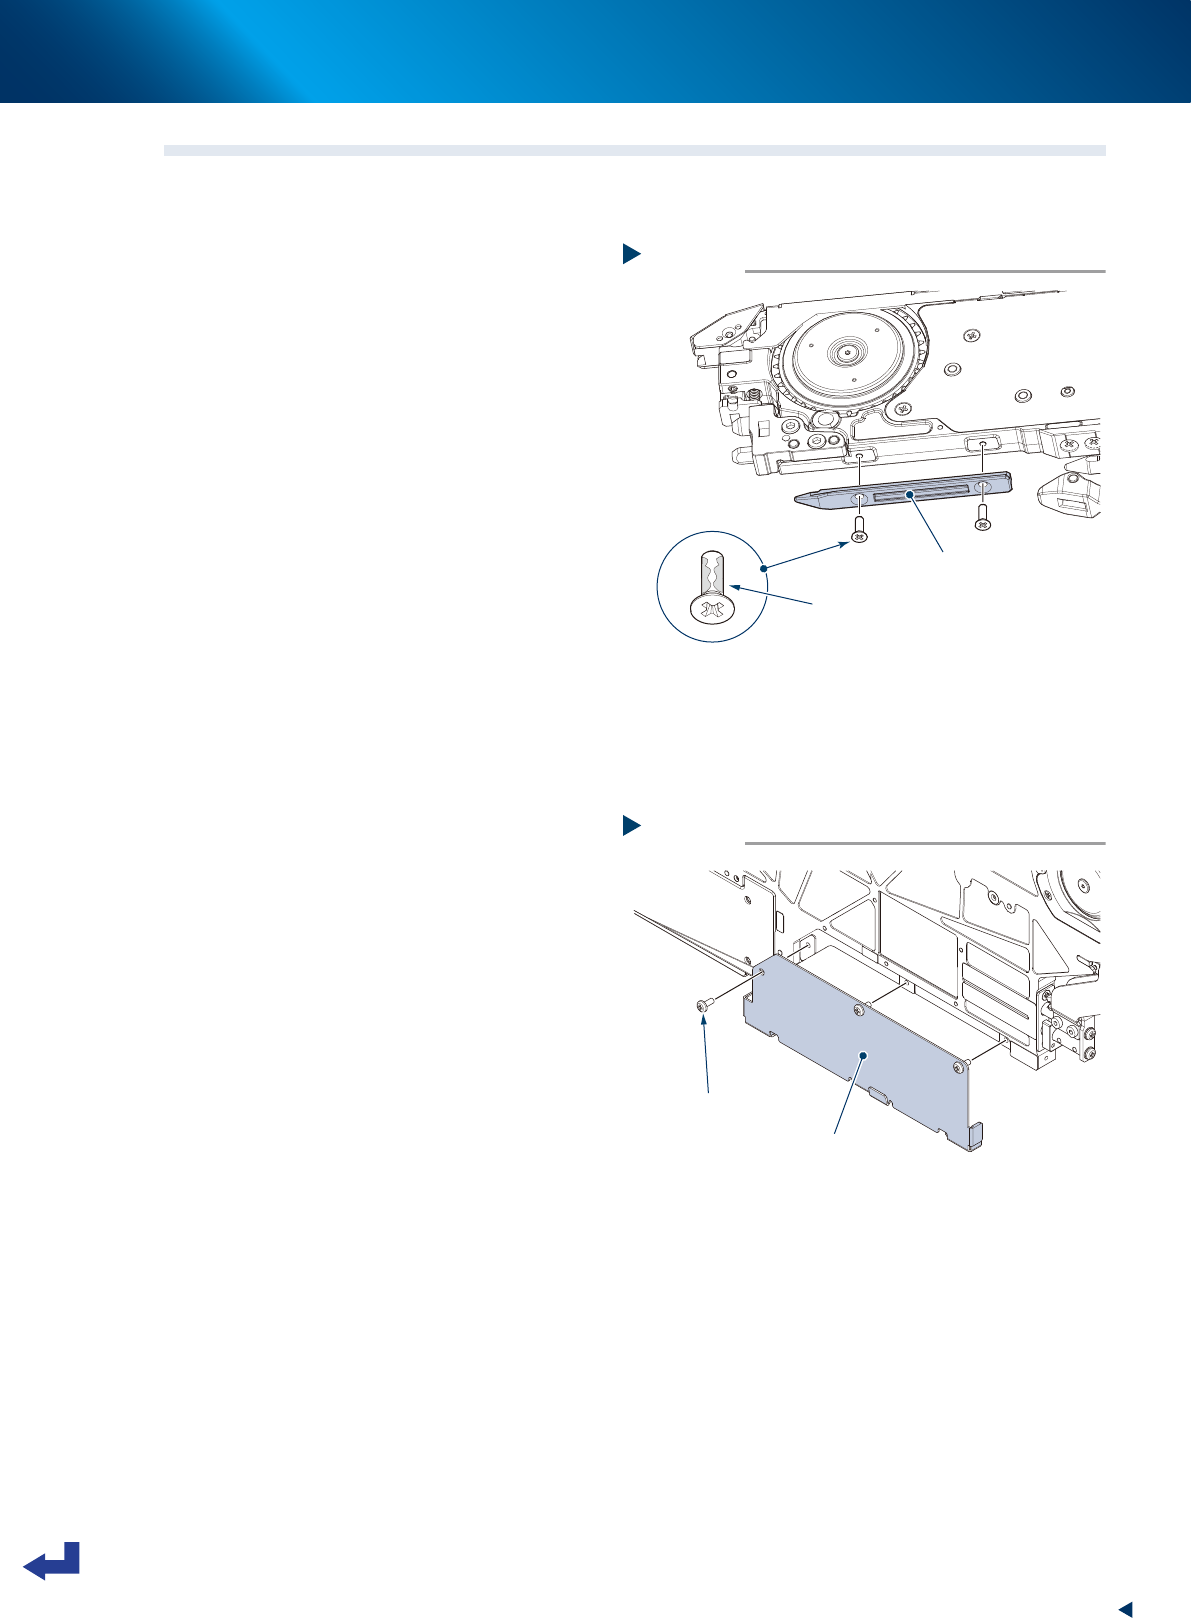
Detach under rail.
1. Remove 2 screws mounting under rail with
Phillips screwdriver.
2. Detach under rail.
2
Attach under rail.
1. Apply thread lock (LOCTITE 241) to 2
screws.
2. Mount new under rail by tightening 2 screws
with Phillips screwdriver.
• Tightening torque: 30 N·cm
3.4.2 Replacing reel holder bracket
1
Detach reel holder bracket.
Detach reel holder bracket by removing 3
screws with Phillips screwdriver.
2
Attach new reel holder bracket .
Attach new reel holder bracket by tightening 3
screws with Phillips screwdriver.
• Tightening torque: 40 N·cm
Step 1, 2
Replacing under rail
Under rail
Mounting screw
Apply thread lock (LOCTITE 241).
63410-KLU-30
Step 1, 2
Replacing reel holder bracket
Reel holder bracket
Screw
63411-KLU-30
3. Maintenance / Replacing procedure
4-12
Chapter 4 Maintenance and parts replacement
3.5 Clamp section
3.5.1 Replacing clamp lever assembly
1
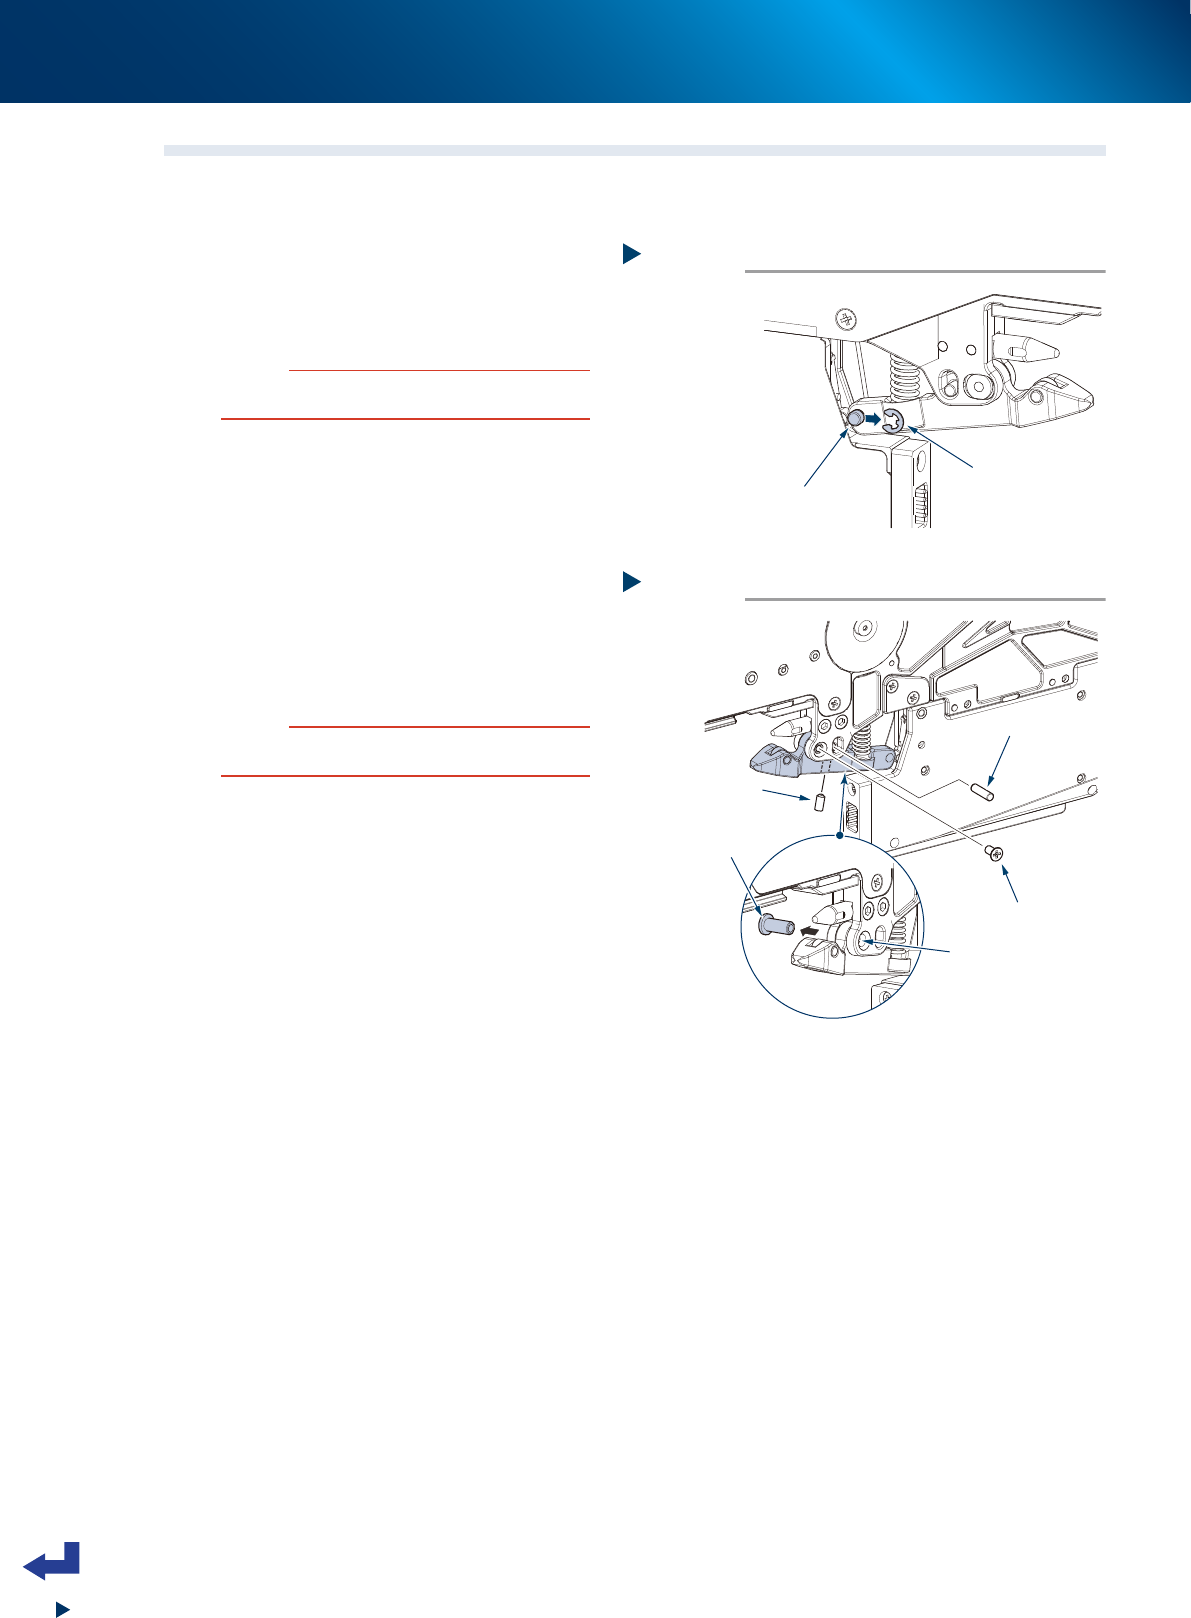
Detach shaft for unclamp wire.
1. Detach E-ring for unclamp wire with
flat-head precision screwdriver.
2. Detach shaft for unclamp wire.
c
CAUTION
• Make sure not to lose E-ring when detaching it.
• Do not use any E-ring other than specified.
2
Detach clamp pin.
1. Remove 1 screw mounting clamp lever
assembly with Phillips screwdriver.
2. Push out clamp pin by inserting hex wrench,
etc. in screw hole.
3
Detach torque limiter pin.
Loosen 1 setscrew with hex wrench (1.5) and
pull out torque limiter pin.
4
Detach clamp lever assembly.
c
CAUTION
Make sure not to lose spring when detaching clamp lever
assembly.
5
Attach clamp lever assembly.
Attach clamp lever assembly to be replaced in
reverse order of Step 1 to Step 3.
Step 1
Detaching E-ring
E-ring
Shaft for unclamp wire
63412-KLU-30
Step 2, 3
Detaching clamp lever assembly
Torque limiter pin
Clamp pin
Push out clamp pin
with hex wrench, etc.
Screw
Setscrew
63413-KLU-30