ALFeeder_E.pdf - 第96页
3. Maintenance / Replacing procedure 4-8 Chapter 4 Maintenance and parts replacement 3.2 Maintaining tape guide assembly 3.2.1 Cleaning tape path/Replacing leaf spring n NOTE See "3.1 .1 Cleaning" for detaching…
3. Maintenance / Replacing procedure
4-7
Chapter 4 Maintenance and parts replacement
3.1.2 Replacing tape guide assembly
The replacement of tape guide assembly is required upon deforming the body of tape guide or damaging the
blade section.
c
CAUTION
Do not disassemble tape guide. The original accuracy is not ensured by reassemblying tape guide.
c
CAUTION
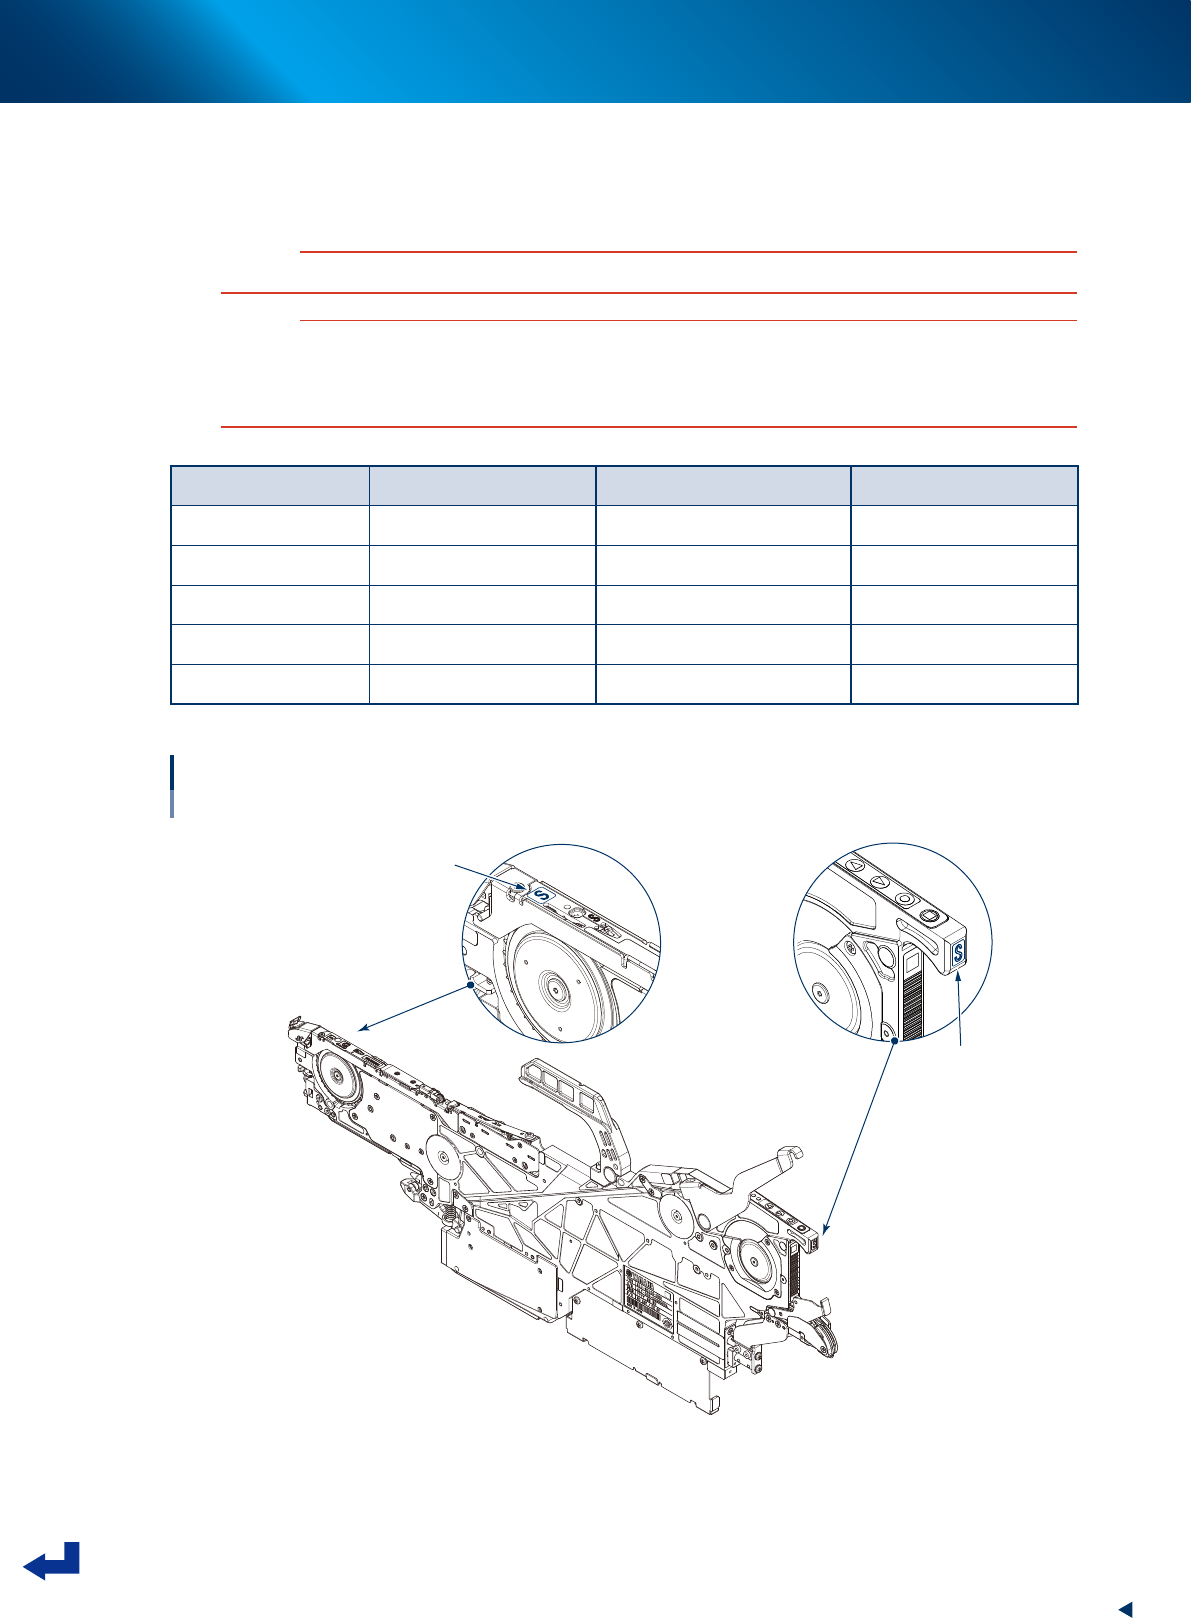
5 sizes of tape guides are provided, according to the available component syze.
Make sure to check the type engraved on tape guide and displayed on operation panel to avoid mis attachment. If
attaching incorrect type tape guide assembly, Auto loading feeder will not operate correctly. See "1.1 Part names and
functions" in chapter 1.
Available component size: Unit is mm. Figures in ( ) are sizes in inches.
Size display/Engraving Available component size Name Part number
2S 0603 (0201)* / 1005 (0402) Tape guide assembly (2S) KLU-MC1M1-40X
S 1005 (0402) Tape guide assembly (S) KLU-MC1M1-00X
M 1608 (0603) Tape guide assembly (M) KLU-MC1M1-10X
L 2012 (0805) Tape guide assembly (L) KLU-MC1M1-20X
LL 3216 (1206) Tape guide assembly (LL) KLU-MC1M1-30X
*0603(0201) size supports only magnetic components.
Checking feeder type
Type display
Operation panel
Type display
Tape guide
Type display
63100-KLU-40
3. Maintenance / Replacing procedure
4-8
Chapter 4 Maintenance and parts replacement
3.2 Maintaining tape guide assembly
3.2.1 Cleaning tape path/Replacing leaf spring
n
NOTE
See "3.1.1 Cleaning" for detaching/attaching tape guide.
1
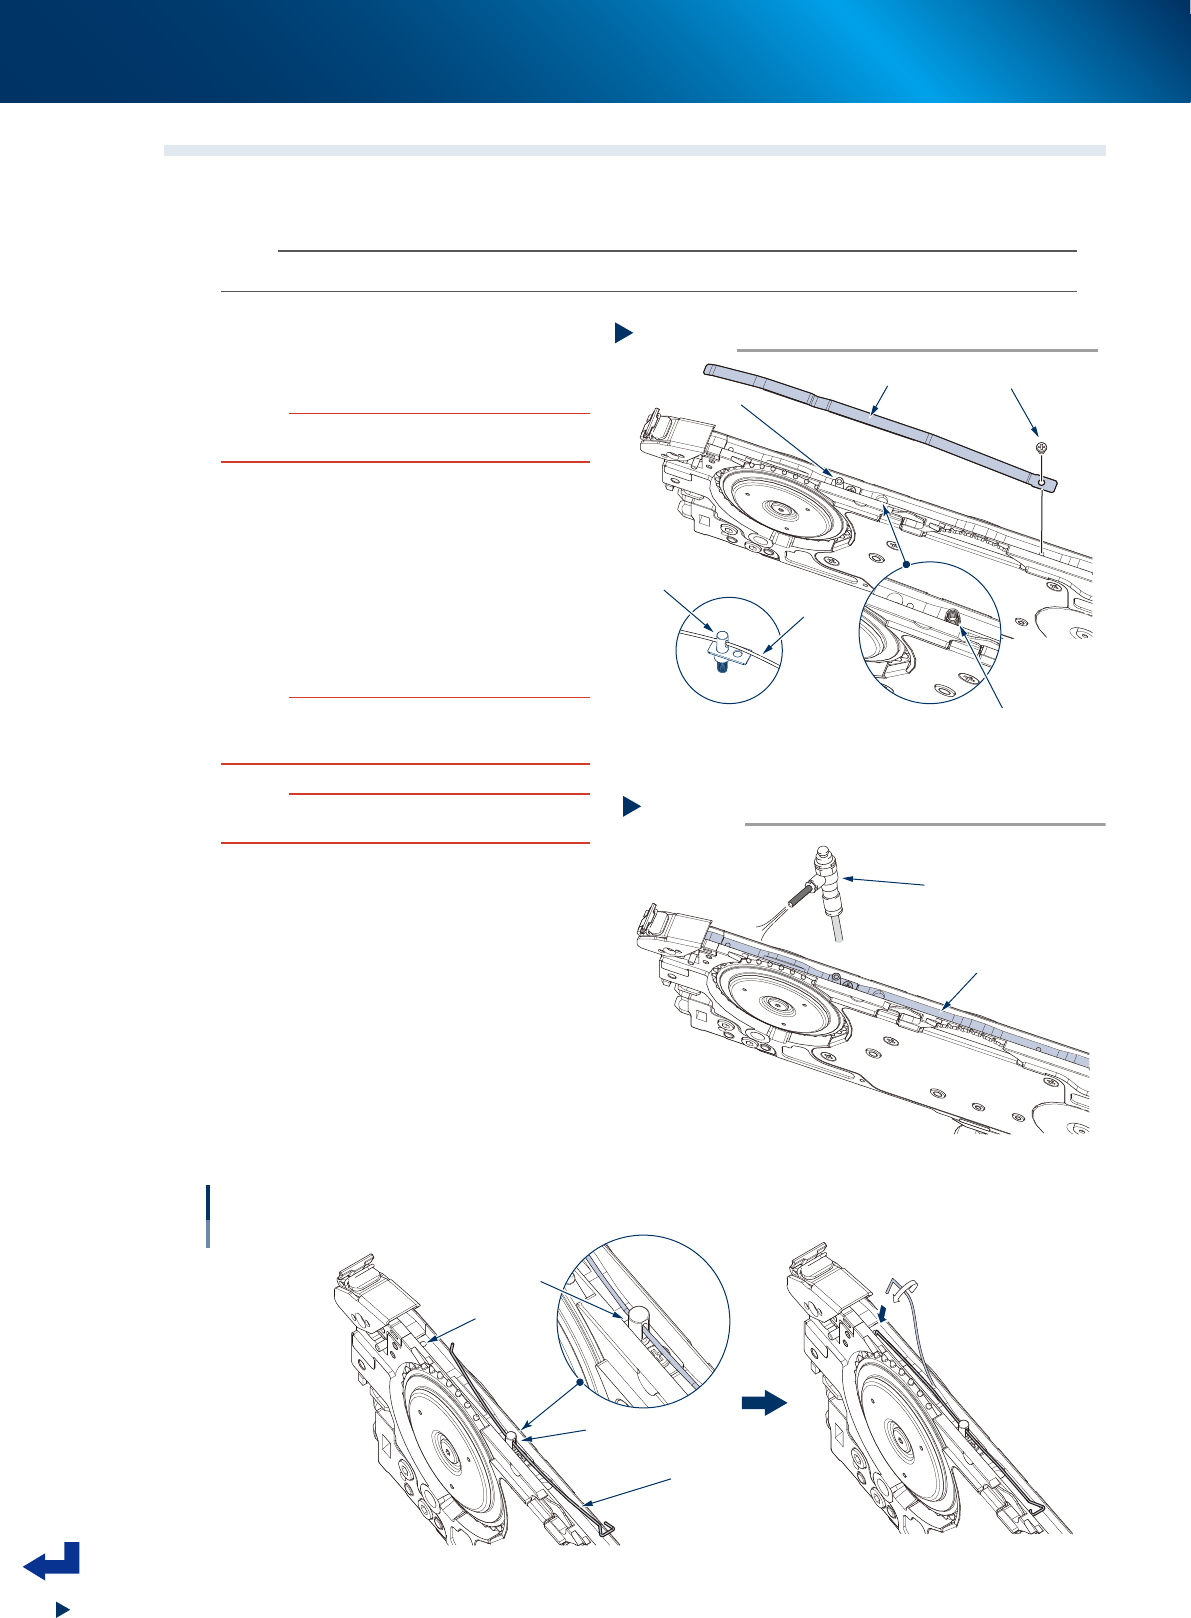
Detach leaf spring.
Loosen mounting screw with Phillips precision
screwdriver to detach leaf spring.
c
CAUTION
Pusher for LL (spring) is pressed with leaf spring only.
Make sure not to lose it when detaching leaf spring.
2
Clean tape path.
Remove dust in tape path (groove where leaf
spring has been detached) with air blow tool or
vacuum tool.
3
Attach leaf spring.
Tighten mounting screw with Phillips precision
screwdriver to attach leaf spring.
c
CAUTION
Mount leaf spring on the center of tape path as much as
possible. If it is one-sided or protruded onto side of tape
path frame, the function is not given fully.
c
CAUTION
Do not use deformed leaf spring. Reusing leaf spring
reshaped manually is not recommended.
4
Return tape guide to original position.
See "3.1.1 Cleaning" to return the tape guide
to the original position.
►
Wire spring
Insert wire spring top into mounting hole while
twisting after inserting through the pusher hole, as
illustrated below.
Attaching wire spring
For 2S type
Insert wire spring
through pusher hole
Twist wire spring
180 degrees and insert
into mounting hole
Pusher with hole
Wire spring
Mounting hole
63427-KLU-00
Step 2
Cleaning tape path
Air blow tool or vacuum tool
Tape path
63424-KLU-30
Replacing leaf spring
Step 1
Pusher (for S/M/L)
Spring (pusher for LL)
Pusher (for 2S, with hole)
Leaf spring
Mounting screw
Wire spring
63423-KLU-40
3. Maintenance / Replacing procedure
4-9
Chapter 4 Maintenance and parts replacement
3.2.2 Replacing pusher assembly
1
Detach tape guide and leaf spring.
See "3.2.1 Cleaning tape path/Replacing leaf
spring" and detach tape guide and leaf spring.
n
NOTE
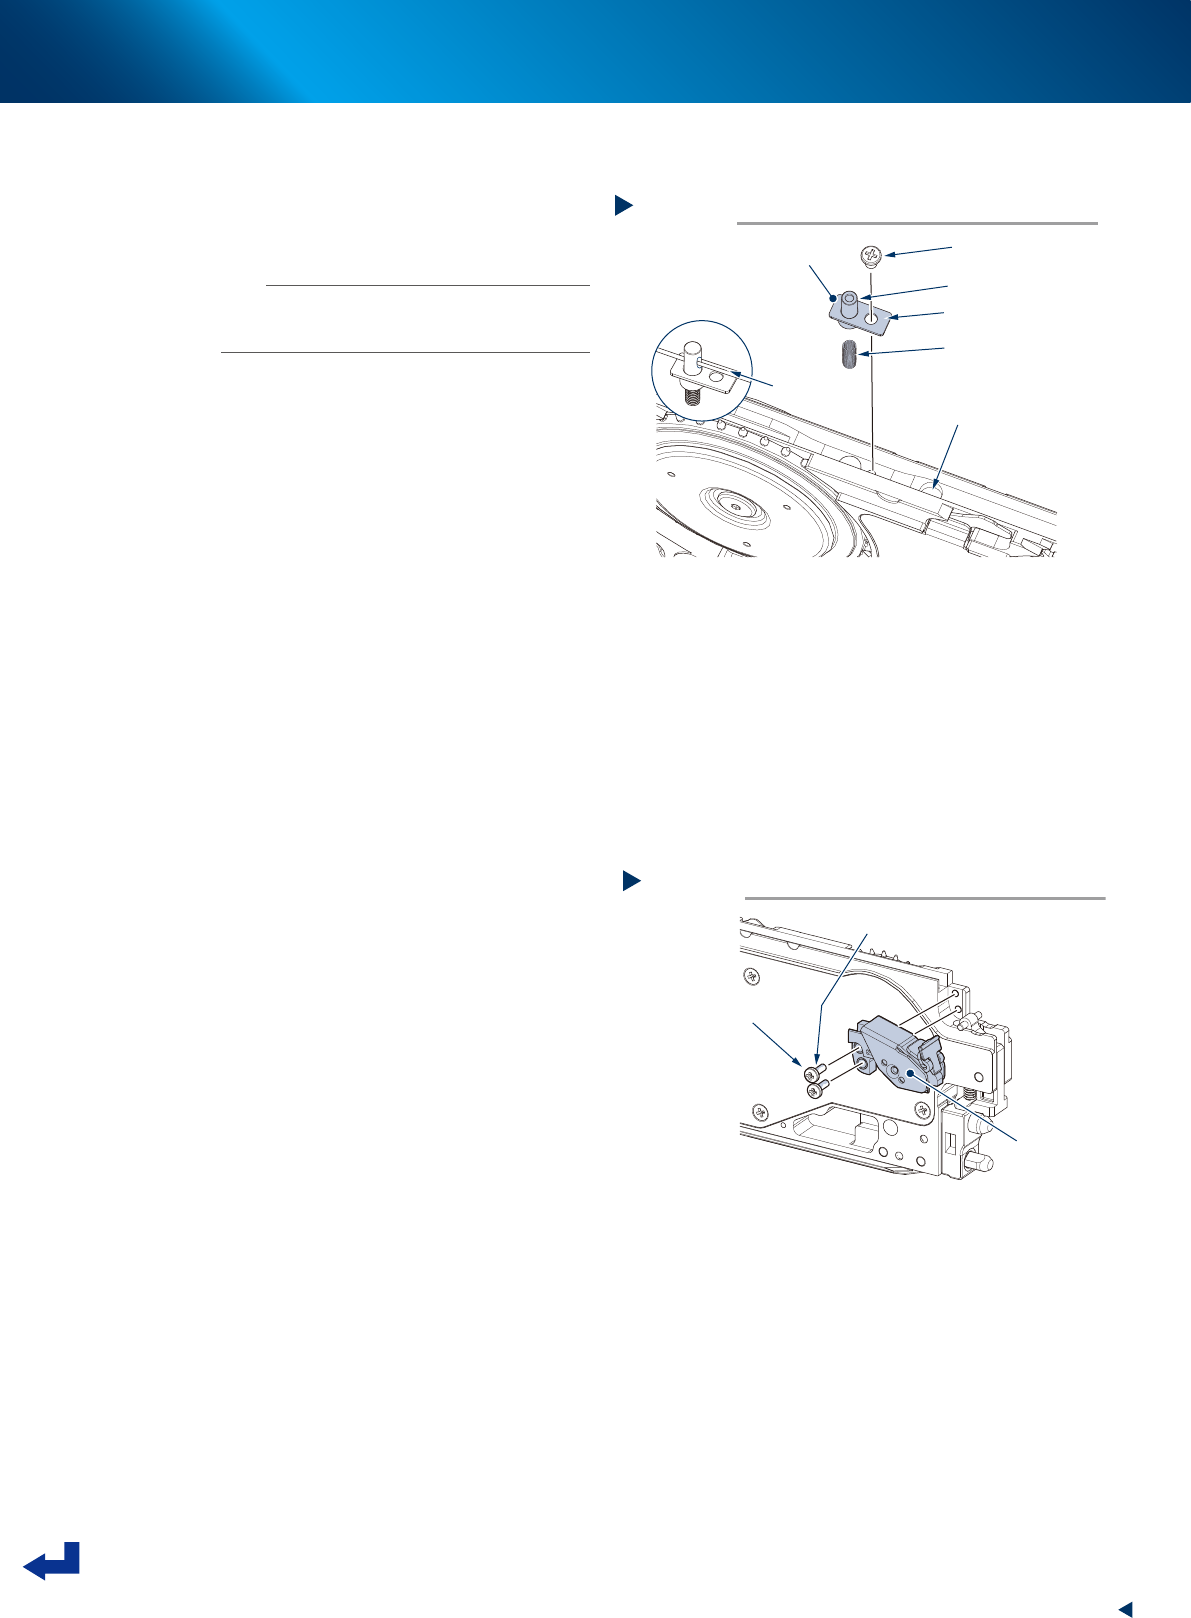
Pusher assembly (for S/M/L) includes 1 to 3 in the figure
on the right. Pusher (for LL) consists of a single spring. It
can be replaced simply by detaching leaf spring.
2
Replace pusher assembly.
1. Loosen a screw mounting pusher holder with
Phillips precision screwdriver.
2. Detach pusher assembly.
3. Attach new pusher assembly.
3
Return tape guide and leaf spring to
original positions.
3.2.3 Replacing discharge assembly
1
Detach tape guide.
See "3.1.1 Cleaning" and detach tape guide.
2
Replace discharge assembly.
1. Remove 2 screws mounting discharge
assembly with Phillips screwdriver.
2. Replace discharge assembly with new one.
3. Apply thread lock (LOCTITE 241) lightly to
mounting screws.
• Tightening torque: 30 N·cm
63426-KLU-30
3
Return tape guide to original position.
Step 2
Replacing discharge assembly
Discharge
assembly
Mounting screws
Apply thread lock (LOCTITE 241)
63426-KLU-30
Detaching pusher assembly
Step 2
Pusher assembly (for M/L)
Pusher assembly (for 2S)
Set position of spring
(pusher for LL)
Mounting screw
2. Pusher holder
1. Pusher
3. Spring
Wire spring
63425-KLU-40