ALFeeder_E.pdf - 第93页
3. Maintenance / Replacing procedure 4-5 Chapter 4 Maintenance and parts replacement 3. Maintenance / Replacing procedure 3.1 T ape guide c CAUTION Do not disassemble tape guide. The original accuracy is not ensured by r…
2. Preparation for maintenance
4-4
Chapter 4 Maintenance and parts replacement
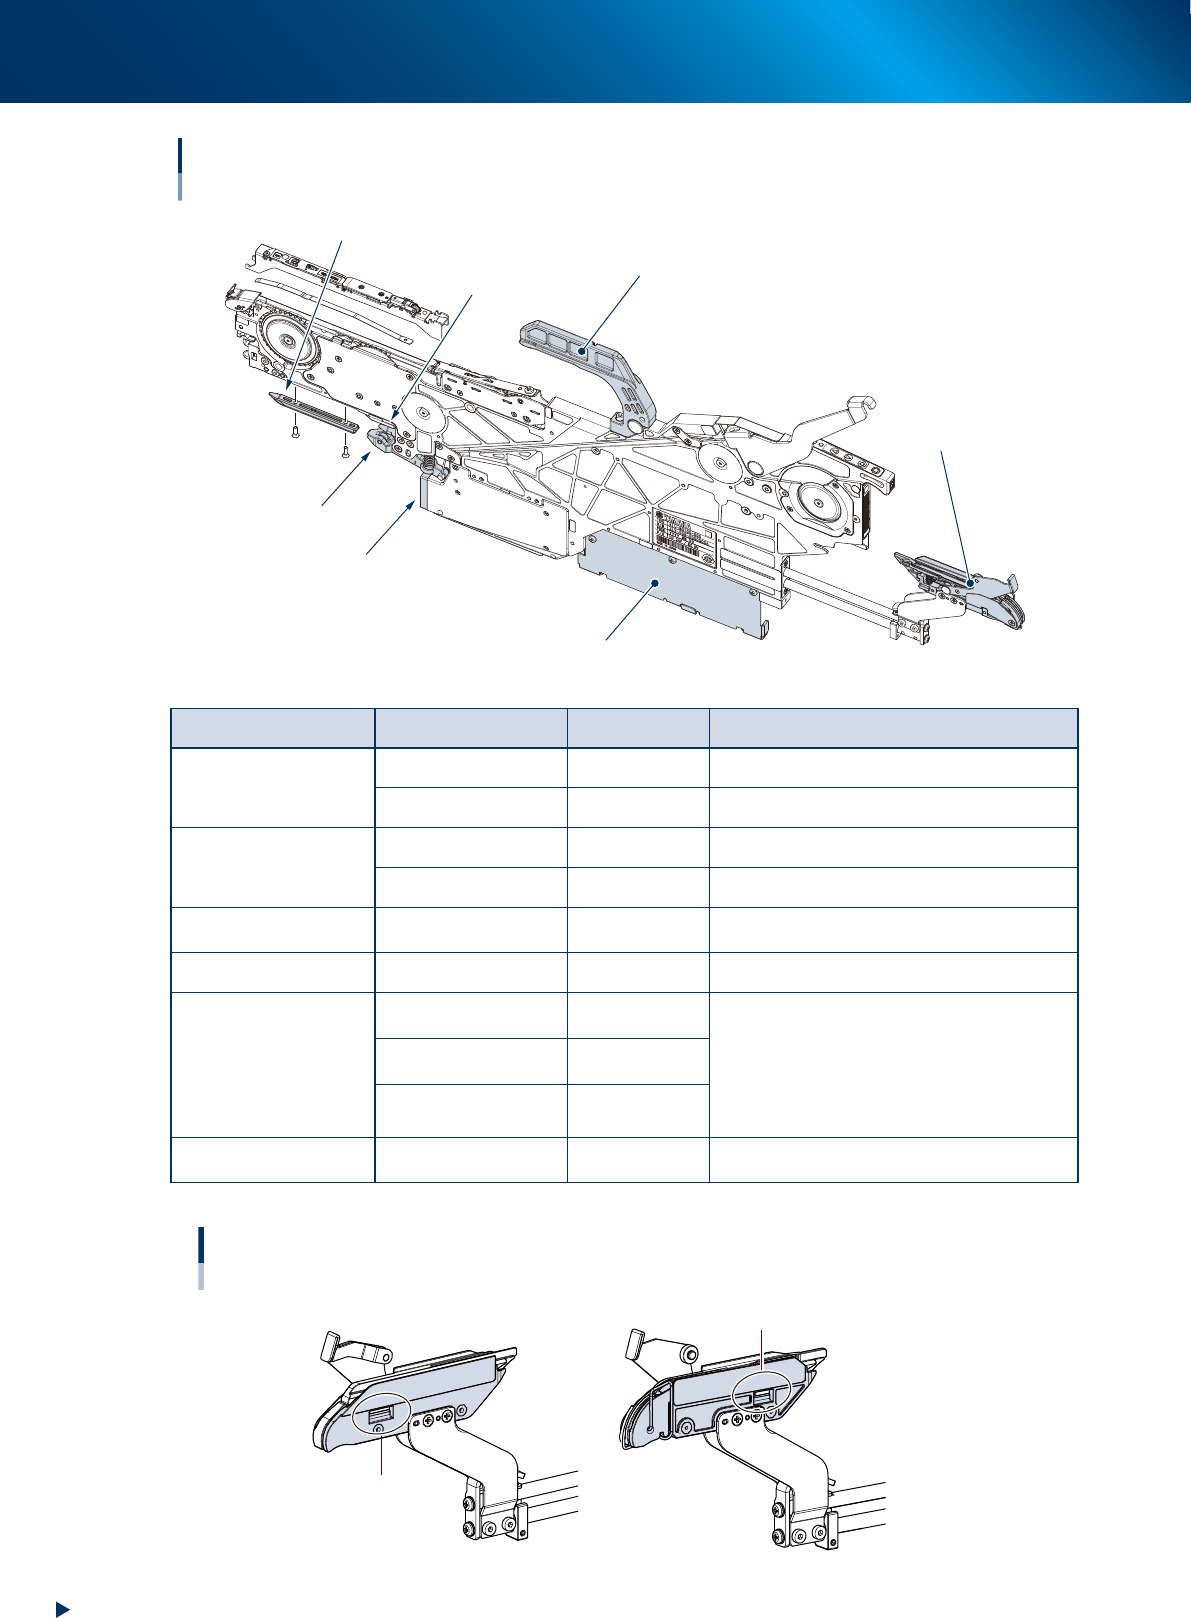
Replaceable parts 2
Clamp unit (left/right)
Handle
Reel holder bracket
Under rail
Tail pin
Board connector
Clamp lever
63407-KLU-00
Section Description Part No. Remark
Connecting section for
feeder bank
Under rail KHJ-MC104-00X
Reel holder bracket KLU-MC1F3-00X
Clamp section
Clamp lever KLJ-MC18H-00X
Tail pin KHJ-MC105-00X
Electrical connecting
section
Board connector KHJ-MC1A9-00X
Operation section Handle KLJ-MC181-01X
Loading unit
Set of clamp unit
(left/right)
KLU-MC19Y-00X
These are new type models of clamp unit parts
(revised).
These clamp units are not compatible with former
ones.
They require to be replaced both left/right parts at
the same time when former type clamp units are
damaged.
Clamp unit
(single for left side)
KLU-MC191-01X
Clamp unit
(single for right side)
KLU-MC194-01X
Preset holder section Sliding stopper KLS-M13CE-00X
Replace when damaged (after approx. 20
thousands motions.)
►
Clamp unit: comparing former and new
Clamp unit
Engaging section of left and right parts
Former clamp unit
New clamp unit (revised)
Engaging section of left and right parts
63434-KLU-00
3. Maintenance / Replacing procedure
4-5
Chapter 4 Maintenance and parts replacement
3. Maintenance / Replacing procedure
3.1 Tape guide
c
CAUTION
Do not disassemble tape guide. The original accuracy is not ensured by reassembling tape guide.
3.1.1 Cleaning
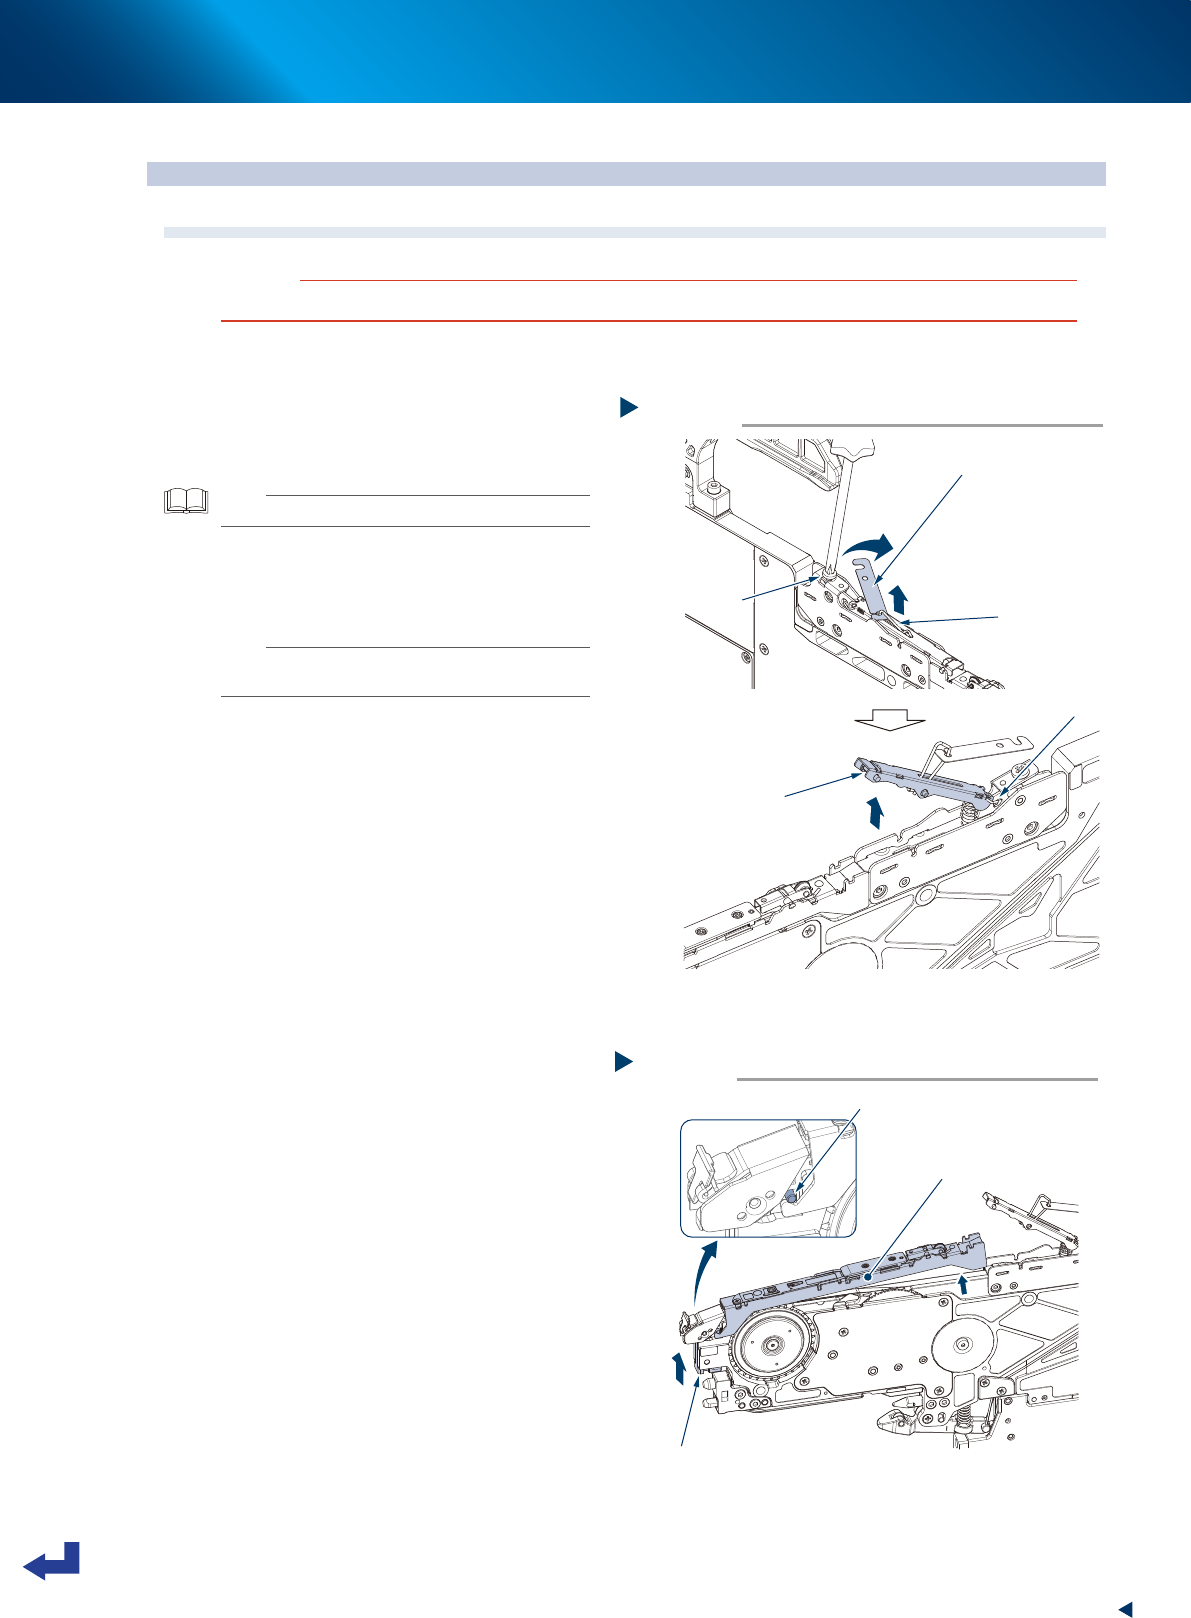
1
Detach tape guide rear lever.
1. Loosen a screw mounting lever plate with
Phillips screwdriver.
TIP
It is not necessary to remove a mounting screw.
2. Move lever plate to arrow's direction in the
figure on the right.
3. Raise up lever pin to pull up tape guide rear
lever.
n
NOTE
As tape guide rear lever is connected to Auto loading
feeder body with clip, it cannot be detached.
2
Unlock front lever.
1. Push up front lever to loosen a pin locking
tape guide.
2. Detach tape guide from Auto loading feeder
body.
Step 1
Detaching tape guide rear lever
Lever pin
Lever plate
Mounting screw
Tape guide rear lever
Lift up.
Clip
63402-KLU-30
Unlocking front lever
Step 2
Front lever
Tape guide
Pin
63403-KLU-40
3. Maintenance / Replacing procedure
4-6
Chapter 4 Maintenance and parts replacement
3
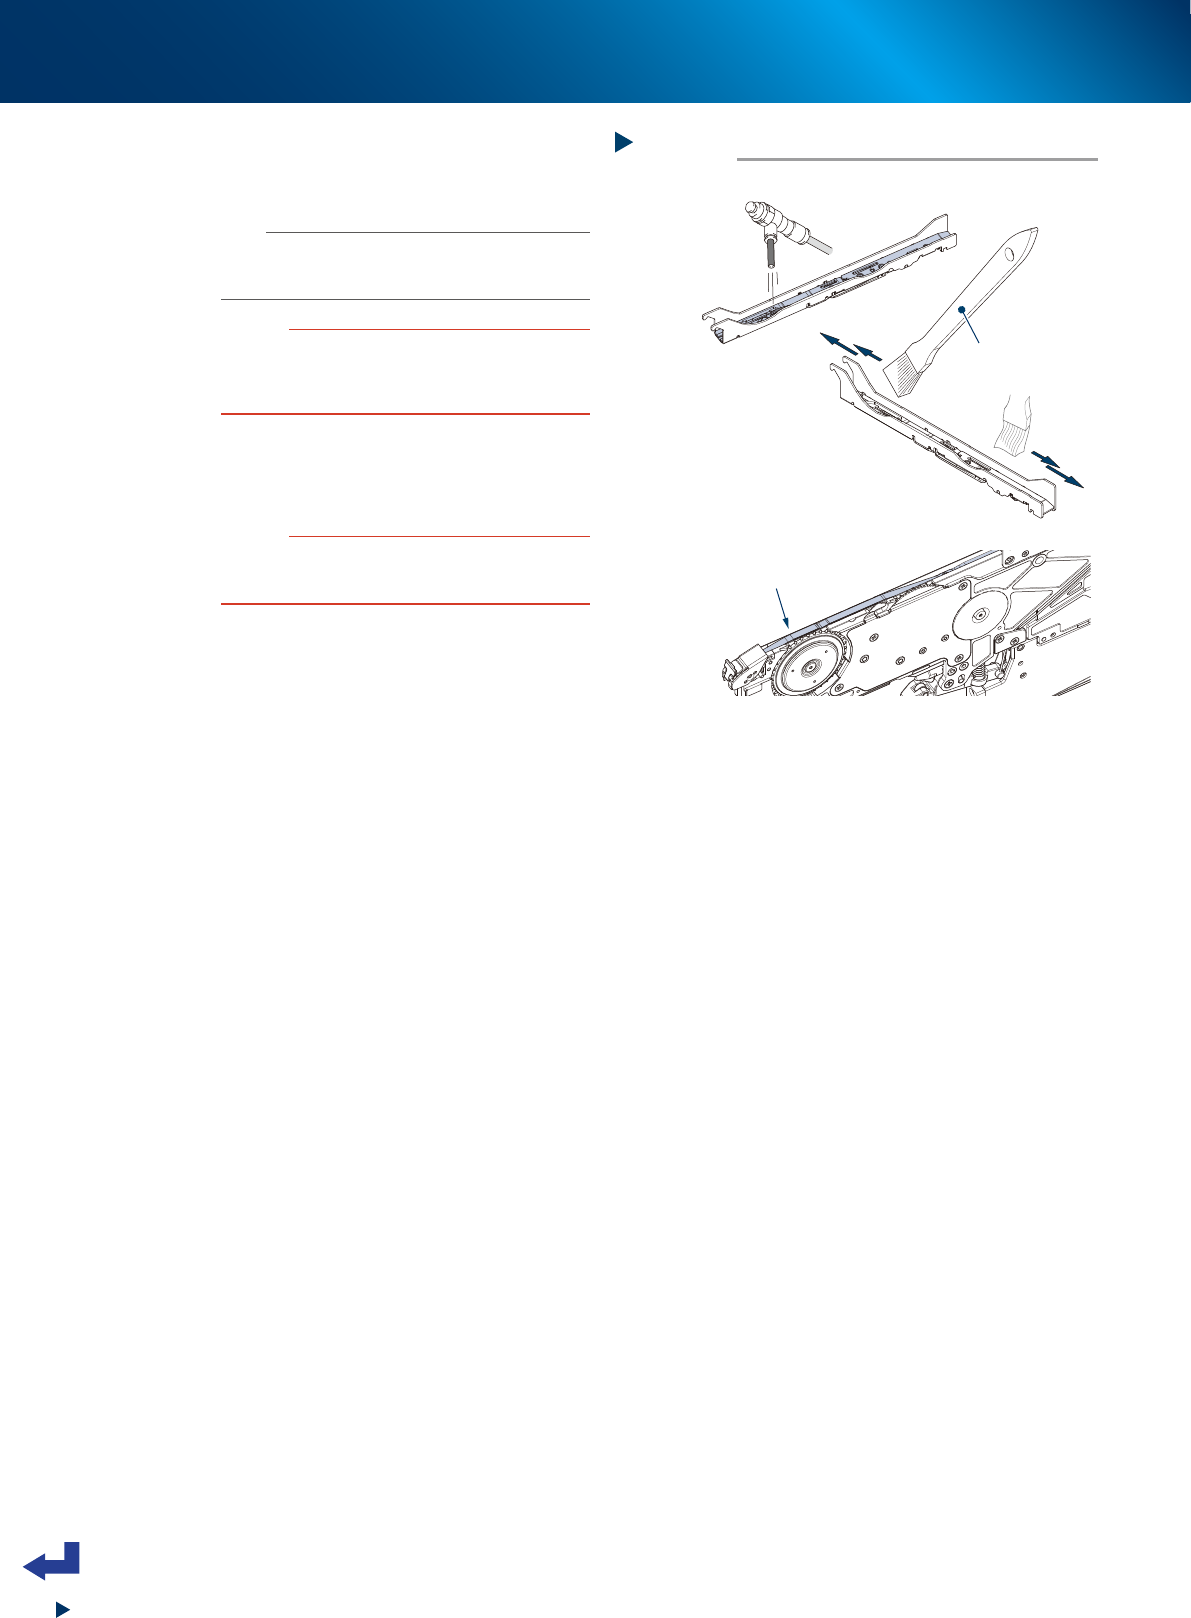
Clean tape guide.
Clean groove of tape guide and tape path with
air blow tool or the similar.
n
NOTE
When groove of tape guide and tape path cannot be
clean with air blow, clean them with tape guide brush
(option).
c
CAUTION
Do not use solvent or alcohol for cleaning tape guide.
Doing so may result in functional failure.
Touching leaf spring in tape path with bare hand may
discolors the leaf spring.
4
Return tape guide to original position.
Attach tape guide in reverse order of
detaching.
c
CAUTION
Take care when cleaning multiple tape guides.
When attaching them, check the tape guide type (2S/S/
M/L/LL) and return to the same size feeder.
Step 3
Cleaning tape guide and tape path
Air blow tool or the similar
Leaf spring
Tape guide brush
(option)
Tape path
63404-KLU-30