MR8740T_Quick guide_eng_20191016H.pdf - 第46页
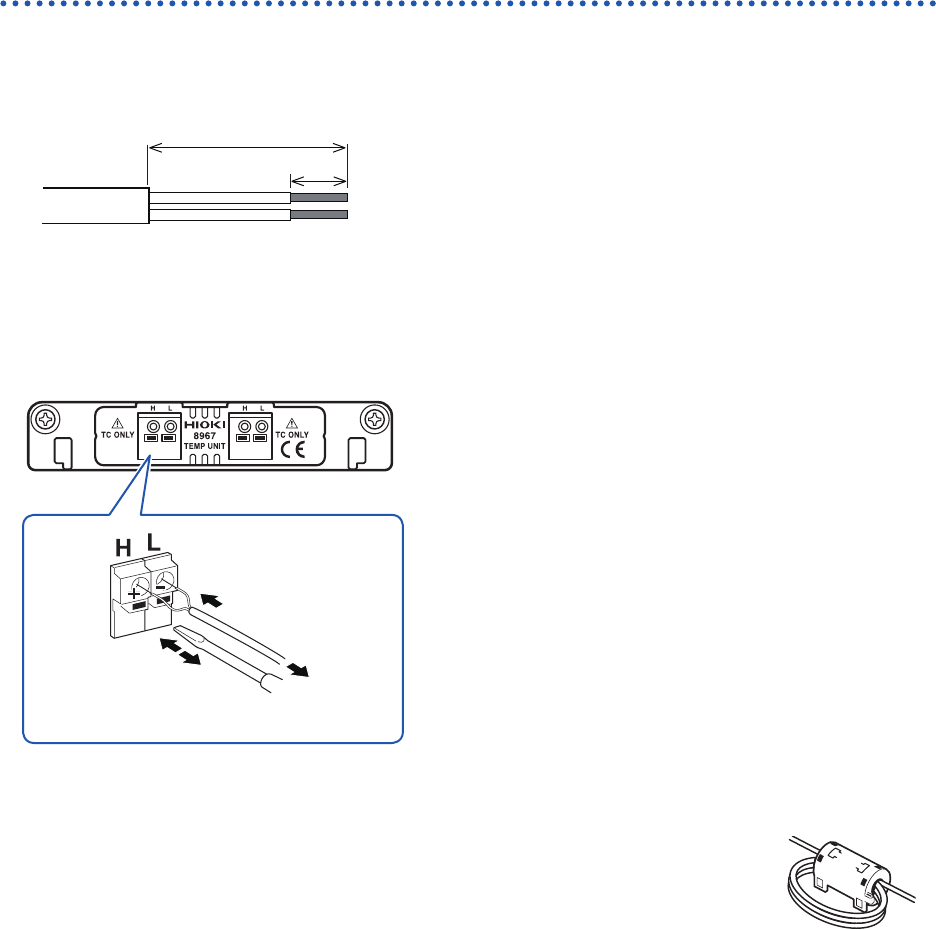
40 Attaching Connection Cords Thermocouple (T emperature) Connect thermocouples to Model 8967 T emp Unit. Required items: Thermocouple and at-blade screwdriver (2.6-mm-width blade) Outer insulation Inner insulation 10 m…
39
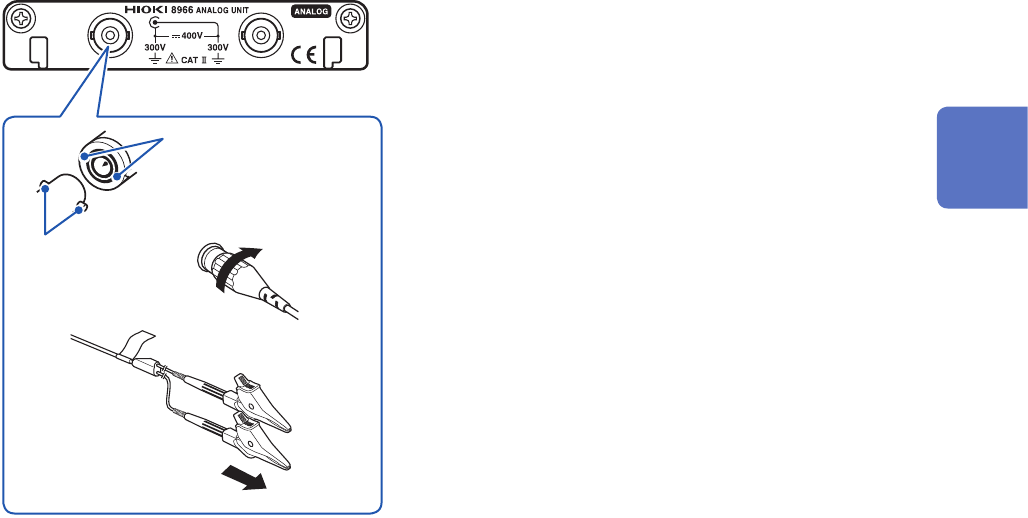
Attaching Connection Cords
How to connect a cord
Example: Model 8966 Analog Unit
BNC connector slots
Locking studs of
module connector
Locking studs
1
Lock
2
3
1
Align the slots in the BNC connector of a
connection cord with the locking studs of a
BNC connector on the module, and insert the
connector.
2
Turn the BNC connector of the connection cord
clockwise until it locks.
3
Connect the connection cord clips to a
measuring object.
How to disconnect the cord
Turn the BNC male connector of the connection cable
counterclockwise, and then pull out the connector.
2
Preparing for Measurement
40
Attaching Connection Cords
Thermocouple (Temperature)
Connect thermocouples to Model 8967 Temp Unit.
Required items: Thermocouple and at-blade screwdriver (2.6-mm-width blade)
Outer
insulation
Inner insulation
10 mm
Thermocouple
element wires
25 mm
Recommended cable
Compatible wire: Thermocouple element wires with a diameter
of 0.4 mm to 1.2 mm
Standard insulation stripping length: About 10 mm
Strip the insulation of the thermocouple wires as shown on the
left.
How to connect the thermocouple
Model 8967 Temp Unit
Thermocouple
3
1
4
2
1
Depress a button on the terminal block on the
module with the at-blade screwdriver.
2
While depressing the button with the at-blade
screwdriver, insert each thermocouple wire into
the appropriate terminal hole
3
Release the button.
The thermocouple is connected.
4
Attach the thermocouple on a measuring
object.
How to disconnect the thermocouple
While depressing the button, pull the thermocouple wire.
• If noise inuences surrounding equipment, pass the thermocouple element
wires through the center hole of the ferrite clamp-on choke (comes with
Model 8967 Temp Unit) several times successively from the same end.
• If a thermocouple three meters long or longer is connected, the measurement
may be inuenced by the EMC environment that includes external noise.
• For K type and E type thermocouples, the physical phenomenon, short-range ordering can
probably cause incorrect temperature measurement in the range of 250°C to 600°C. Contact a
thermocouple manufacturer to choose proper thermocouples.
41
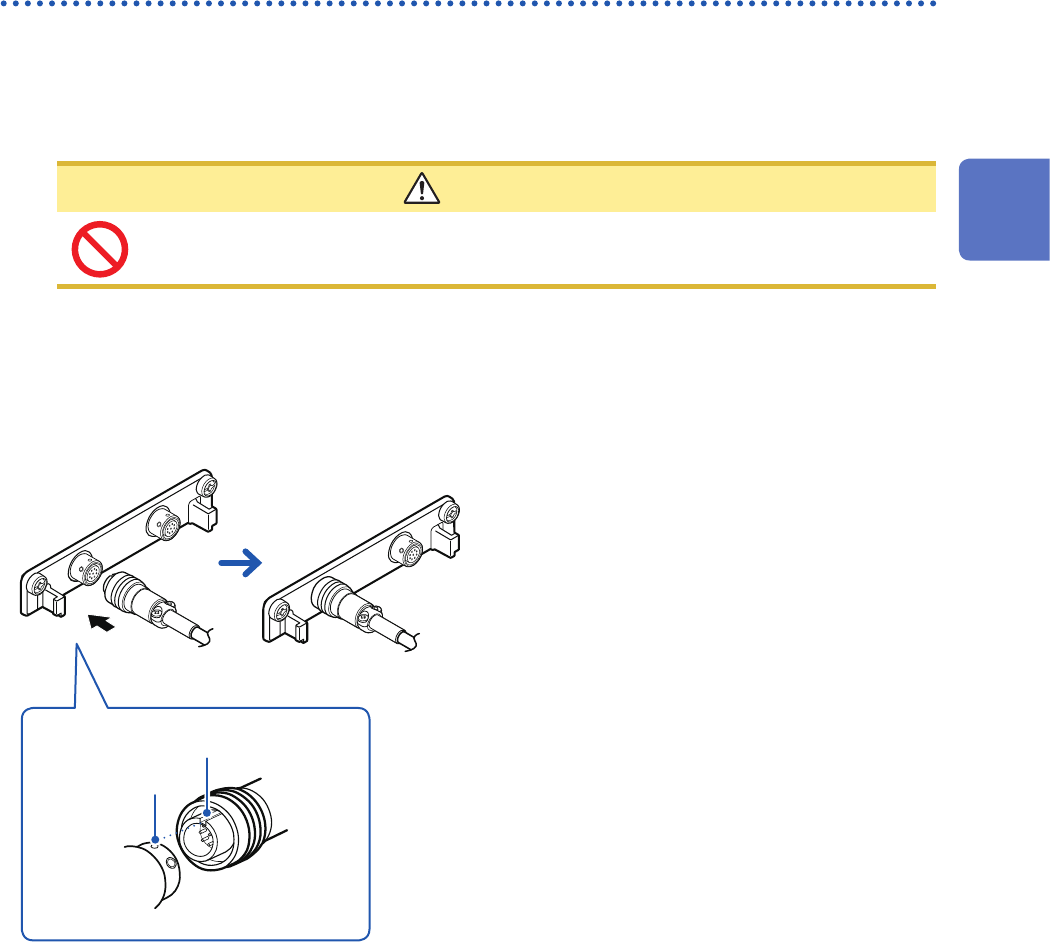
Attaching Connection Cords
Strain gauge transducer
Connect a strain gauge transducer*
1
to Model U8969 Strain Unit via Model L9769 Conversion
Cable*
2
.
*1: Hioki does not offer any strain gauge transducers.
*2: Model L9769 Conversion Cable is an accessory of Model U8969 Strain Unit.
CAUTION
To prevent damage due to in a break in a conversion cable, do not excessively bend,
pull, or twist the cables and joints between the cables and connectors.
Required items: Strain gauge transducer and Model L9769 Conversion Cable
How to connect the transducer
Model U8969 Strain Unit
Slot of the plug
Indentation of
the connector
1 2
Model L9769 Conversion Cable
1
Align the plug slot of Model L9769
with the outward indentation of Model
U8969, and then insert the plug into the
connector on Model U8969.
2
Insert the plug until it locks.
3
Connect Model L9769 to the strain gauge
transducer.
4
Connect the strain gauge transducer to a
measuring object.
How to disconnect the conversion cable
Gently pull the collar of the plug, which releases
the lock, and disconnect the cable.
2
Preparing for Measurement