MR8740T_Quick guide_eng_20191016H.pdf - 第68页
62 Setting the Clock 2.7 Setting the Clock Set the date, time, and time zone. The instrument has the automatic calendar with leap year correction and 24-hour clock. Measurement start times (trigger times) and times when …

61
Supplying Power to the Instrument
Turning off the instrument
IMPORTANT
When the instrument is turned off, data recorded in the internal memory is deleted. To retain the
recorded data, save the data to an external storage device before turning off the instrument.
Refer to “3.6 Saving Data Consisting of Items Selected” (p. 76).
1
Save the acquired data if needed.
2
Press the start button.
Click [OK] to turn off the instrument according to the message.
Alternatively, pressing the start button again turns off the instrument. After the instrument has been turned on
again, the settings congured before the instrument was turned off are loaded.
Conrm that the instrument is turned off before setting the main power switch to off.
IMPORTANT
Do not set the main power switch on the rear to off while Windows
®
is running. Doing so may
cause the instrument to start properly.
2
Preparing for Measurement
62
Setting the Clock
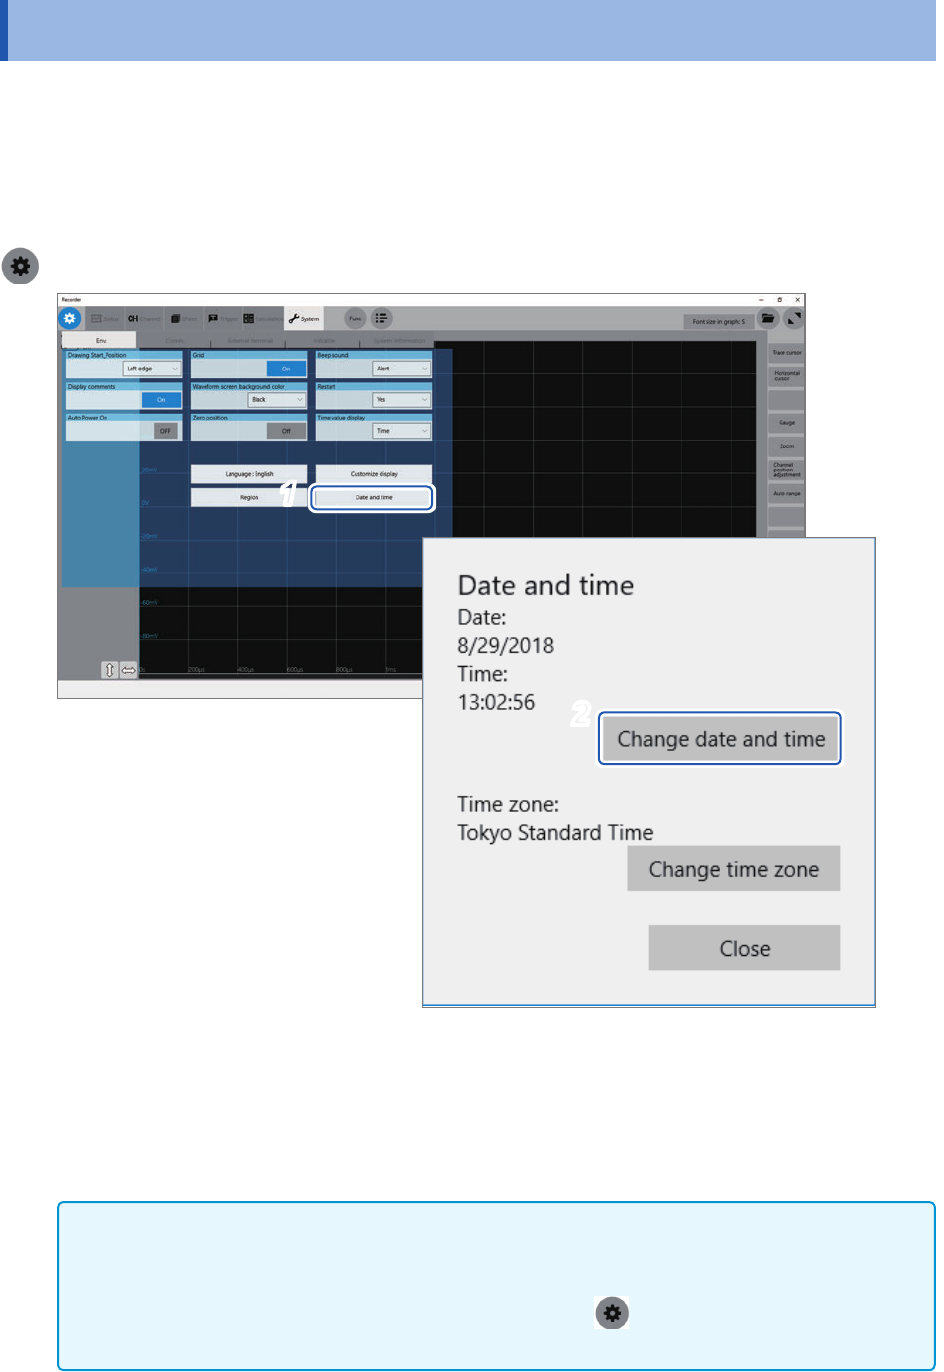
2.7 Setting the Clock
Set the date, time, and time zone. The instrument has the automatic calendar with leap year
correction and 24-hour clock.
Measurement start times (trigger times) and times when les were stored are recorded using the
absolute time set in the instrument. Make sure that the clock shows correct day and time before
using the instrument.
> [System] > [Env.]
1
2
2
1
Click [Date and time].
The [Date and time] dialog box will appear.
2
Click [Change date and time].
3
Set the date and time and then click [OK].
IMPORTANT
Do not change any Windows
®
setting unless otherwise indicated in this document.
Doing so may cause unstable behavior of the system.
The instrument regulates the clock internally. Always select
> [System] > [Env.], and then
click [Date and time] to set the clock. In any another way, the clock could not be set.
63
Regulating the Zero Position (Zero-Adjustment)
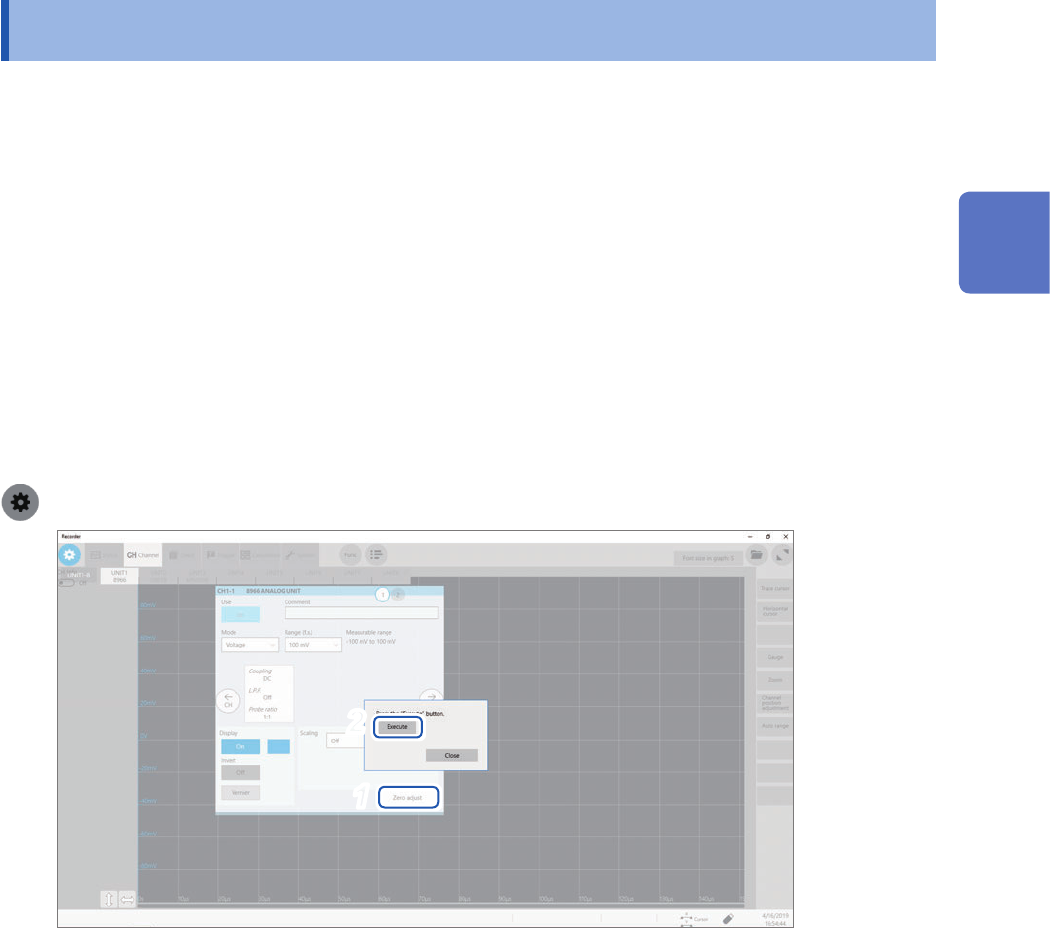
2.8 Regulating the Zero Position (Zero-Adjustment)
Executing zero-adjustment regulates the zero positions of all channels in each module on the
reference potential of the instrument. Zero-adjustment involves all ranges of all channels.
Before executing zero-adjustment
• Warm up the instrument for about 30 minutes after the power-on to stabilize the internal
temperature of the modules, and then execute zero-adjustment.
• Execute zero-adjustment with no signals inputted. Zero-adjustment may not correctly be executed
with a signal inputted.
• Note that you cannot execute zero-adjustment during measurement.
• No key operation is acceptable during zero-adjustment.
• The time required for the zero-adjustment varies depending on types and the number of modules
installed in the instrument (in some cases, it takes more than 10 seconds).
To execute zero-adjustment
> [Channel] > each module (UNIT)
2
1
1
Click [Zero adjust].
2
Click [Execute].
The instrument performs zero-adjustment.
The instrument also calibrates Model MR8990 Digital Voltmeter Unit.
Zero-adjustment is invalid for Model U8969 Strain Unit. Regulate the zero position using the auto-balance.
Refer to “Model U8969 Strain Unit” (p. 107).
Refer to “Settings of the Model U8969 Strain Unit” in “3.6 Conguring Module-Specic Settings” of the
Instruction Manual.
2
Preparing for Measurement