MR8740T_user_manual_eng_20191016H.pdf - 第201页
196 Sending Data to a Computer With the FTP Client Function Congure the access user setting Congure this setting to use the FTP client with the instrument. (See step 4 “Enter your login name and password in the [Login]…
195
Sending Data to a Computer With the FTP Client Function
8
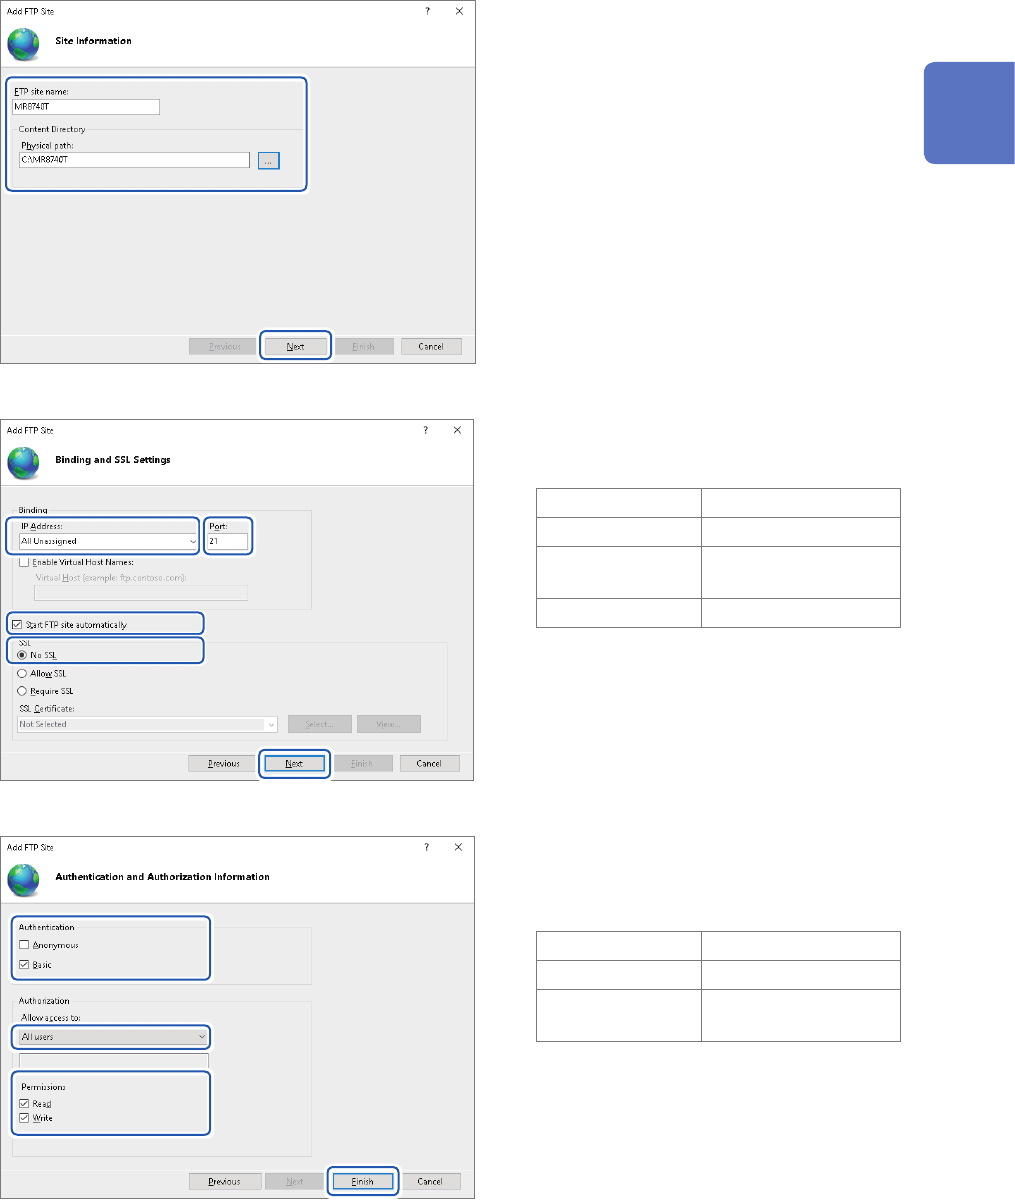
Enter site information.
Example:
[FTP site name]: [MR8740T]
[Content Directory]:
Choose a directory in which data from the
FTP client will be saved.
Click [Next].
9
Congure the [Binding] and [SSL]
settings as follows:
[IP Address] [All Unassigned]
[Port] [21]
[Start FTP site
automatically]
Select
[SSL] [No SSL]
Click [Next].
10
Congure the [Authentication and
Authorization Information] settings
as follows:
[Authentication] Select [Basic].
[Authorization] [All users]
[Permissions]
Choose both [Read]
and [Write].
Click [Finish].
11
Connecting the Instrument to Computers
196
Sending Data to a Computer With the FTP Client Function
Congure the access user setting
Congure this setting to use the FTP client with the instrument. (See step 4 “Enter your login name
and password in the [Login] and [Password] boxes, respectively” on p. 197.)
You can use the FTP with a user name and password you specied.
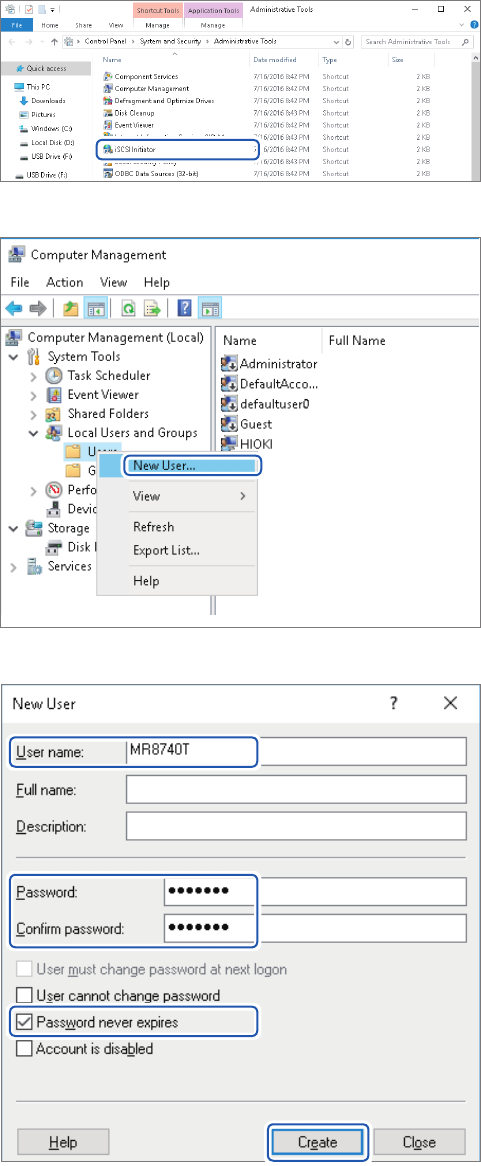
11
Choose [Computer Management]
in [Administrative Tools]
mentioned in step
5
(p. 194).
12
Right-click [Users] under [Local
Users and Groups], then choose
[New User].
13
Enter your user name, password,
and the same password entered
in the [User name], [Password],
and [Conrm password] boxes,
respectively, then select the
[Password never expires] check
box.
14
Click [Create].

197
Sending Data to a Computer With the FTP Client Function
Conguring the FTP client setting with the instrument
> [System] > [Comm.]
1
Click [FTP Client].
The setting dialog box will appear.
2
3
4
5
6
7
2
Click the [Server] box and the [Port] button in turn.
Click the boxes to open the touch key or the numeric input dialog box.
Enter a computer name or an IP address in the [Server] box. In the [Port] box, enter a port number with which
the FTP server is operating if the number is not the standard number of 21.
3
Enter a directory name in the [Directory] box.
Choose a directory of the FTP server you would like to save data into.
4
Enter a login name and password to use for logging in to the FTP server in the [Login] and
[Password] box, respectively.
Enter the user name and password specied for the FTP server of the computer.
Refer to “Congure the access user setting” (p. 196).
5
Click the [PASV Mode].button to choose a PASV mode setting.
To establish communications in PASV mode, set it to [On].
6
Click any of the buttons in the [Adding] area, and choose an identier.
Click the buttons to add identiers to the le name.
• No identiers are added when you select a le to be sent on the le screen. Files with the same name are
overwritten.
• When you have congured the setting to append numerical calculation results to existing les (when you set
the [Calculation result] button to [On] or choose [Append] in the [File] box), no identiers representing
time of day are added.
• Moreover, if a le with the same name exists, the instrument tries to append the le.
• No button in the [Adding] area is enabled, a le with the same name is overwritten when it exists. Note that
all les with the same name will be overwritten if [Date&Time] is disabled with the continuous measurement
setting and some others.
7
Click the [UTF-8] button to choose an UFT-8 support setting.
11
Connecting the Instrument to Computers