MR8740T_user_manual_eng_20191016H.pdf - 第95页
90 Saving Data Freely selecting data items to be saved and save les (save icon) T o save a le immediately by clicking the save icon, you need to specify items to be saved beforehand. Y ou can save the following types o…
89
Saving Data
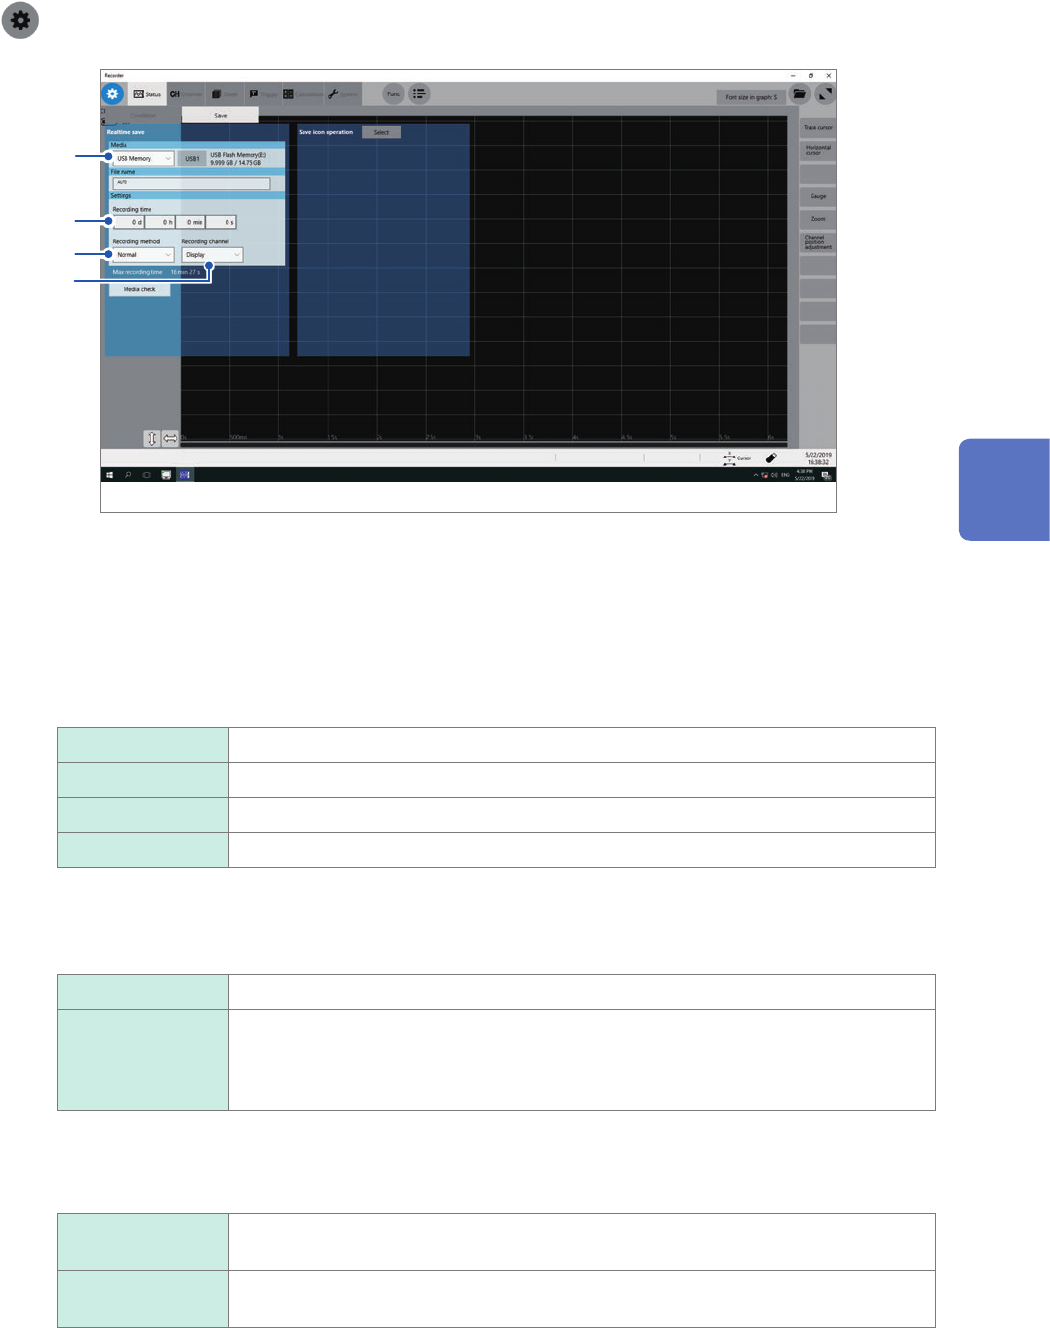
> [Status] > [Save]
2
3
4
5
1
Congure the real-time save and sampling rate settings on the [Condition] screen
Refer to “1.2 Setting Measurement Conditions” (p. 5).
2
Click the [Media] box, and then choose a destination to save from the list.
3
Click the [Recording time] box, and then enter a recording time.
d 0 to 10000 (days)
h 0 to 23 (hours)
min 0 to 59 (minutes)
s 0 to 59 (seconds)
4
Click the [Method] box, and then from the list, choose a saving way if a space of a storage
device is insufcient.
Normal
Stops the real-time save and measurement if the storage device is full.
Delete Deletes older les and saves les in real time if the storage device is full (waveform
les only).
The instrument deletes les only created after the measurement has started. It does
not delete previously existing les.
Setting [Media] to [FTP] forces this setting into [Normal].
5
Click the [Channel] box, and then choose an option for channels to be recorded.
Display The instrument records data acquired across channels with the waveform display set
to [On].
All
Records data acquired across all measured channels. The instrument also records
data acquired across channels with the waveform display set to [Off].
6
Check settings that include the input channel settings, and then click the start icon.
The instrument saves data onto a storage device in real time during measurement.
4
Saving/Loading Data and Managing Files
90
Saving Data
Freely selecting data items to be saved and save les (save icon)
To save a le immediately by clicking the save icon, you need to specify items to be saved
beforehand.
You can save the following types of data: (Setting data, waveform data, screenshot, and numerical
calculation results)
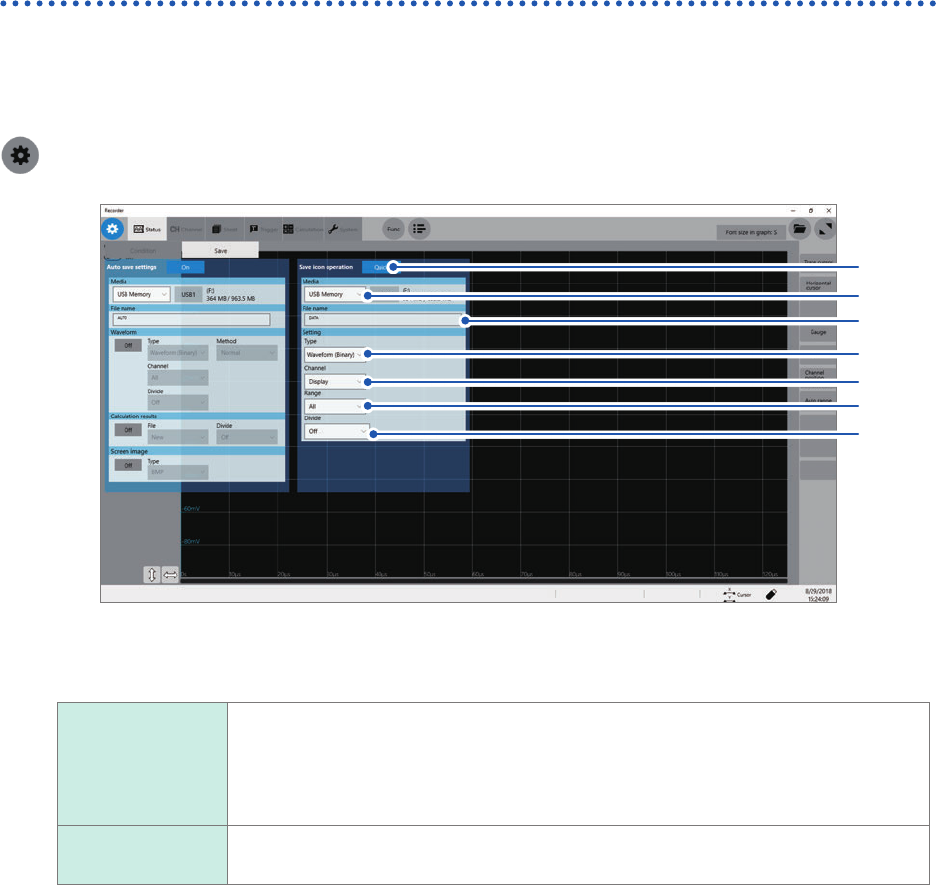
> [Status] > [Save]
1
3
2
4
6
5
7
1
Click the [Save icon operation] button, and then choose a save method adopted when you
click the save icon.
Select
Displays the dialog box to allow you to choose items to be saved and saves them. You
can specify the subsequent settings in the dialog box that appears when you click the
save icon at the start of measurement. This operation cannot be executed if another
dialog box is open.
Refer to “Selective save” (p. 83).
Quick save Immediately saves data consisting of pre-specied items.
Refer to “Quick save” (p. 83).
2
Click the [Media] box, and then choose a destination to save from the list (Refer to p. 84).
3
Click the [File name] box, and then enter a le name.
• Number of characters for a le name: Up to 100 characters
• The maximum length of a le name that includes its path: Up to 255 characters

91
Saving Data
4
Click the [Type] box, and then choose a save format of data from the list.
Waveform
(Binary)
Saves waveform data in binary format.
Choose this option to reload the waveforms into the instrument.
Waveform (Text) Saves waveform data in text format.
Choose this option to load the waveforms with a computer.
Waveform (Float) Saves waveform data in binary format (32-bit oating point).
Choose this option to load the waveforms with a computer.
Screenshot Saves screenshots.
You can display the saved data on a computer with image viewing software.
Numerical
calculation result
Saves numerical calculation results.
Waveform
(Binary)
Saves data of all blocks in binary format.
(When the memory division set to [On])
Waveform (Text) Saves data of all blocks in text format.
(When the memory division set to [On])
Setting Saves the present measurement conditions.
5
Click the [Channel] box, and then choose an option for channels to be saved.
When [Type] is set to [Waveform (Binary)] or [Waveform (Text)]
All Saves measured data of all channels.
Saves the data acquired across the channels with the display setting set to [Off].
Display
Saves data of all sheets with the display setting set to [On].
6
Click the [Range] box, and then choose an option for save range from the list.
When [Type] is set to [Waveform (Binary)] or [Waveform (Text)]
All
Saves all data written in the memory.
A_B Saves the data in the range between trace cursor [A] and trace cursor [B].
C_D Saves the data in the range between trace cursor [C] and trace cursor [D].
The instrument saves data acquired across the channels displayed on the screen.
When no trace cursors are set, the instrument saves data or the whole range even if you choose [A_B] or [C_D].
7
Click the [Divide] box, and then from the list, choose a size of each le.
When [Type] is set to [Waveform (Binary)]
Off
Saves a le without dividing it.
16 MB Choose this option to divide a large le into several les and save them. A le is
divided into several les each of which has the specied size. The instrument creates
a folder with the specied name, divides a le into several les, and then saves them
in the folder.
32 MB
The instrument automatically creates a folder, and then creates waveform les and an index le (extension:
.IDX) in the folder. Loading the IDX le allows the waveform les to be loaded in a batch.
When using the memory division function, you cannot use the division save function.
When [Type] is set to [Waveform (Text)].
Off
Saves a le without dividing it.
60,000 Data
The instrument divides a le into several les each of which contains the specied
number of data points.
1,000,000 Data
When using the memory division function, you cannot use the division save function.
Refer to “Memory Dividing Function” (p. 173).
4
Saving/Loading Data and Managing Files