MR8740T_user_manual_eng_20191016H.pdf - 第205页
200 Sending Email messages Conguring the email contents settings 1 2 3 4 1 Click [Body] . 2 Click the [Title] box, and then enter a mail title. 3 Click the [Body] box, and then enter an email body . 4 Click the [Maximum…
199
Sending Email messages
Conguring the basic setting for sending email messages
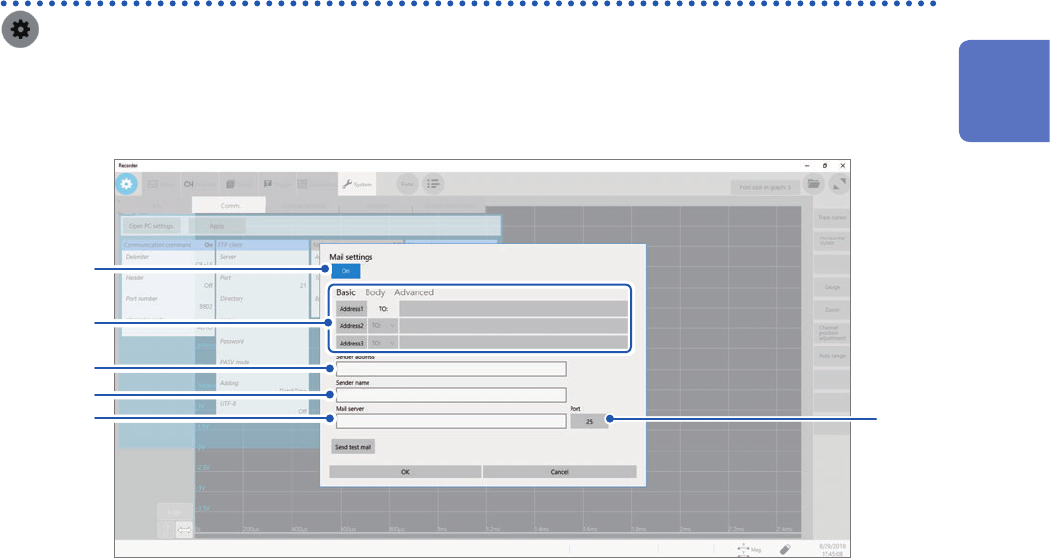
> [System] > [Comm.]
1
Click [Mail setting].
The setting dialog box will appear.
8
2
3, 4
5
6
7
2
Click the [Mail settings] button to set it to [On].
3
Click [Basic].
4
Click [Address1] to choose it, and then enter an email address in the blank box.
To send email messages to multiple destinations, enter other email addresses in the [Address2] and
[Address3] boxes in the same manner.
Choose a recipient type ([To] or [Bcc]) for [Address2] and [Address3].
5
Enter a sender address in [Sender address].
6
Click the [Sender name] box, and then enter a name so that the recipients identify email
messages received from the instrument.
7
Click the [Server] and [Port] boxes in turn, and then enter a computer name or computer
address, respectively.
8
(When the SMTP server is operating with the number other than the standard number, 25.)
Click [Port] button, and then enter a port number.
11
Connecting the Instrument to Computers

200
Sending Email messages
Conguring the email contents settings
1
2
3
4
1
Click [Body].
2
Click the [Title] box, and then enter a mail title.
3
Click the [Body] box, and then enter an email body.
4
Click the [Maximum attachment size] button, and then enter the maximum attachment size.
1
to 2048
Specify the maximum le size so that no large-size data is sent to the mail server. If a waveform data size
automatically saved is larger than the specied size, the instrument does not send email messages.
• Data with the specied le size or less may also not be sent due to server restrictions.
• Data is converted (encoded by Base64, compressed, and encrypted) for attachment; however, the maximum
le size is determined by the size before conversion. Thus, the actually sent data may be larger (about 1.3
times) than the size limitation.

201
Sending Email messages
Conguring the authentication, compression, and encryption settings
for email messages to be sent
1
2
4
5
3
6
1
Click [Advanced].
2
Click the [Encrypt attached le] box, and then choose an attachment setting from the list.
Off
Attaches les in original format.
ZIP Attaches ZIP-compressed les.
ZIP+AES Attaches les in encrypted ZIP format. The instrument does not compress les.
3
(To encrypt attachments)
Enter an encryption password in the [Password] box.
Number of characters: up to 16
4
(When an email authentication is required)
Click the [Authentication ] box, and then choose a authentication protocol from the list.
Off
Sends mails with no user authentication.
POP Sends mails using POP (APOP) before SMTP.
SMTP Sends mails using SMTP (supports CRAM-MD5, PLAIN, and LOGIN).
5
Congure the authorization information settings.
• When you use the POP authentication
Click the [POP server] box and the [Port] button in turn, and then enter a POP server name and its port
number, respectively.
When the [POP server] is left blank, the instrument uses the gure entered in the [Mail server] box.
Click the [Account] and [Password] boxes in turn, and then enter an authentication user name and
password, respectively.
• When you use the SMTP authentication
Click the [POP server] box and the [Port] button in turn, and then enter a POP server name and its port
number, respectively.
Click the [Account] and [Password] boxes in turn, and then enter an authentication user name and
password, respectively.
11
Connecting the Instrument to Computers