MR8740T_user_manual_eng_20191016H.pdf - 第88页
83 Saving Data 4.2 Saving Data Saving types and setting procedure Three ways are available to save data. The [Save] screen The [Save] screen Dialog box T o manually save data by clicking the save icon (p. 90) T o immedia…

82
Data That Can Be Saved and Loaded
4.1 Data That Can Be Saved and Loaded
Files that exceed 2 GB cannot be saved.
Data saved with another instrument cannot be loaded onto the instrument.
:
Enable, ‒
:
Disable
File type
File
format
File extension and
description
Saving
Loading
Loading
on a
computer
Auto Manual
Setting data*
1
Binary .SET
Setting data
(measurement
conditions)
–
–
Waveform data*
2
The data of whole
waveforms or a part
of waveforms within
the range between
the trace cursors
(acquired in the
instrument)
Binary
MEM Binary data
‒ *
3
FLT
Waveform data in
oating-point format
– –
Text
CSV,
TXT
*
6
Text data
–
Waveform
managing data*
4
(Division save)
(Index le) IDX
Index data of the
division save
–
Screenshot,
waveform image
BMP*
5
BMP Image data
–
PNG*
5
PNG
Image data (PNG
format)
–
JPEG*
5
JPEG
Image data (JPEG
format)
–
Numerical
calculation result
Text
CSV,
TXT
*
6
Text data
–
*1: The instrument automatically loads data at the time of startup. (p. 84)
*2: To load data with the instrument: Save the data in binary format. Waveform data and a part of
measurement settings data are saved.
Save the data in binary format. Waveform data and a part of
measurement settings data are saved.
To load data with a computer: Save the data in text format. (p. 83)
To save a part of waveforms: Specify a saving range with trace cursors. (p. 20)
*3: Data can be loaded with Wave Viewer (Wv).
*4: To load divided waveform data, load the index data (IDX).
*5: BMP format: This is one of the standard Windows
®
image le format. Various graphics programs can
open these les.
PNG format: Internationally standardized image le format conforming to ISO/IEC15948
JPEG format: Internationally standardized image format conforming to ISO/IEC10918
*6: When you choose a separator other than [Comma ,] in [Region], les are saved with the .TXT extension.
(p. 179)
83
Saving Data
4.2 Saving Data
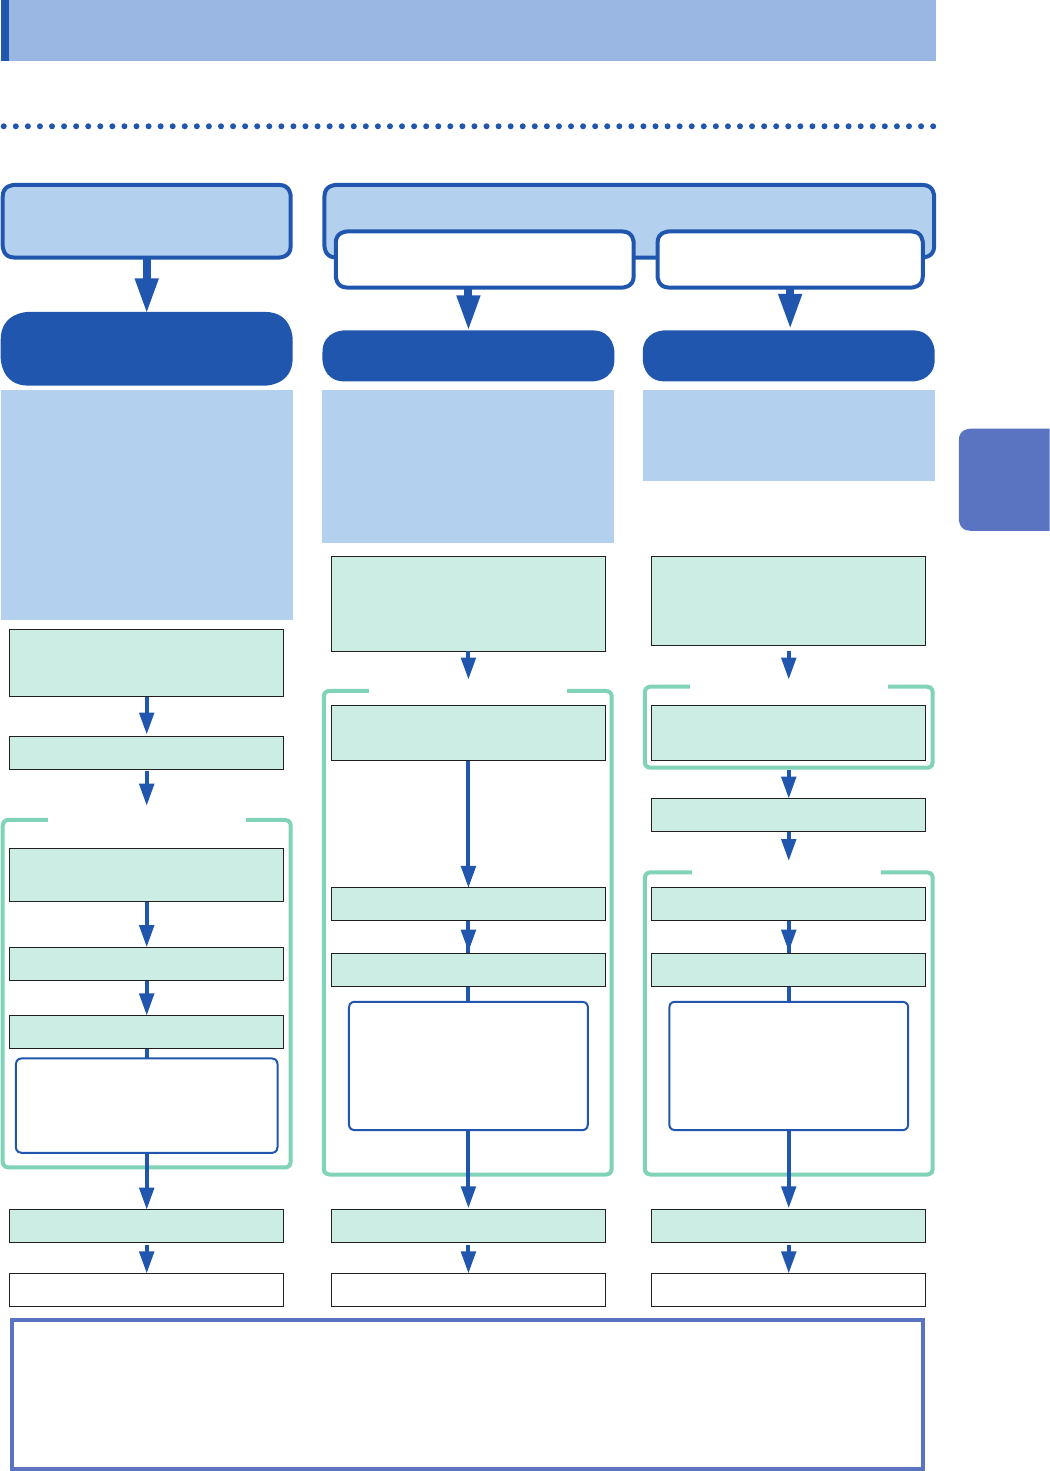
Saving types and setting procedure
Three ways are available to save data.
The [Save] screen The [Save] screen
Dialog box
To manually save data by clicking the save icon (p. 90)
To immediately save data
when you click the icon
To save data after
choosing items
Auto-save
Real-time save
Choose a destination to save
and a save type before starting a
measurement. (p. 84)
Auto-save:
The instrument automatically saves
data every time it has acquired the
measured data with the recording
length.
Real-time save:
Automatically saves data during
the measurement.
Set measurement conditions.
[Status] > [Save]
Measures waveforms.
Automatically saves data.
• Waveform data
• Numerical calculation result
(Auto-save only)
• Screenshot (Auto-save only)
Quick save
This function enables you to
repeatedly save waveforms and to
quickly save waveforms while you
are monitoring them. To save a le
immediately by clicking the save
icon, you need to specify the items
to be saved beforehand.
(p. 90)
After installation and
connection, turn on the
instrument.
Insert a storage device.
Choose a destination to save.
Click the save icon.
Saves data.
Data that can be saved:
• Waveform data
• Screenshot
• Numerical calculation result
• Setting
Selective save
(Default setting)
Clicking the save icon enables you
to specify data items, and then
saves the data.
After installation and
connection, turn on the
instrument.
Insert a storage device.
Assign [Select] to the save
icon.
Choose a destination to save.
Click the save icon.
Select [Execute].
Saves data.
Data that can be saved:
• Waveform data
• Screenshot
• Numerical calculation result
• Setting
Check the following before saving data:
• Have you already inserted and initialized a storage device?
Refer to “Formatting storage devices” in “2.5 Preparing Storage Devices (Recording Media)” in Quick Start
Manual.
• Is the save destination specied correctly?
• When the auto-save is used, is [Auto save settings] set to [On]?
Choose a save type.
Choose a save type. Choose a save type.
Assign [Select] to the save
icon.
Set the auto-save / real-time
save to [On].
After installation and
connection, turn on the
instrument.
To automatically save data
during measurement (p. 84)
Choose a destination to save.
4
Saving/Loading Data and Managing Files
84
Saving Data
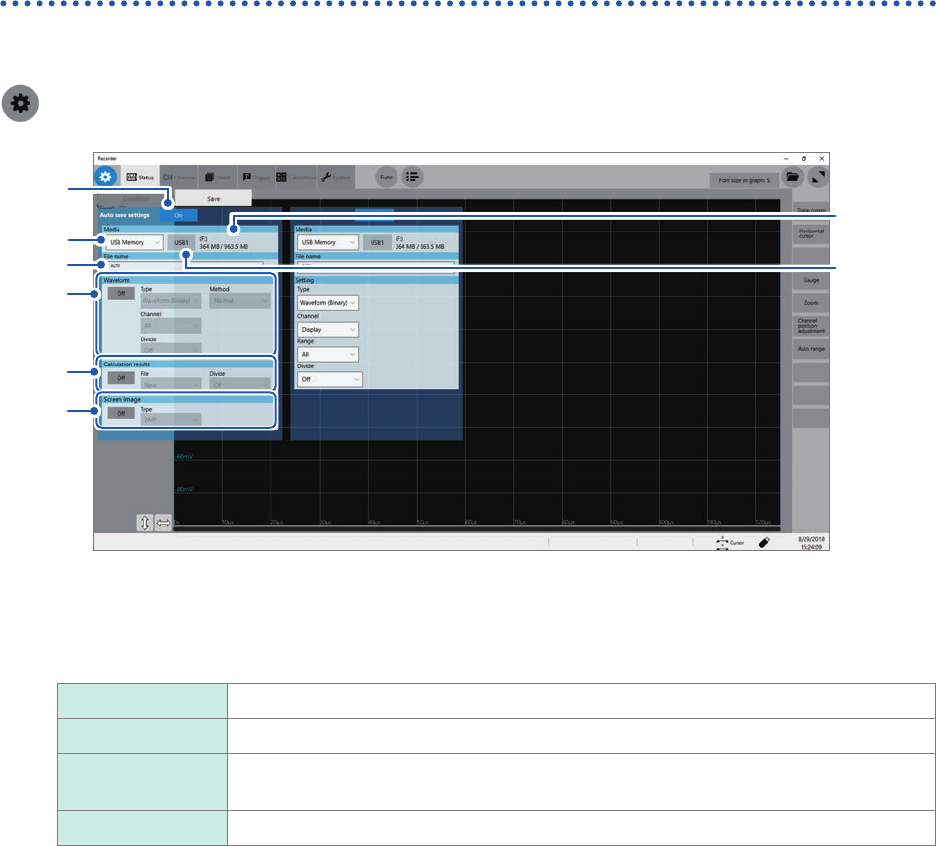
Automatically saving waveform data
The instrument automatically saves data every time it has acquired the measured data with the
recording length. Specify a save destination and items to be saved before starting a measurement.
> [Status] > [Save]
1
2
3
4
5
6
2
-(1)
2
-(2)
1
Click the [Auto save settings] button to set it to [On].
2
Click the [Media] box, and then choose a destination to save from the list.
SSD/HDD
Built-in SSD
USB ash drive USB ash drive
Mail Sends measured data to a computer in the network or to a remote computer as an
email attachment.
FTP transfer: Sends waveform data to a computer connected to your network.
(1) When you choose a save destination, the state of the storage device such as its drive letter and capacity
appears on the right of the [Media] box. If no storage device is inserted, the string [None] appears.
(2) When you choose [USB Memory] as the save destination, choose a USB ash drive you would like to use
as a save destination from among all attached USB ash drives.
• The [HIOKI_MR8740T] folder is automatically created in the specied save destination, and sub-folders are
automatically created in the folder according to the [Type] setting.
Waveform (Binary), Waveform (Text), Waveform (Float): WAVE
Setting: CONFIG
Numerical calculation result: MEASURE
Screenshot: PICT
When you choose [FTP], congure the LAN and FTP client function settings.
Refer to “Conguring the LAN settings with the instrument” (p. 182) and “11.3 Sending Data to a Computer
With the FTP Client Function” (p. 192).
• Use Model Z4006 USB Drive (Hioki’s option) for protecting data.
3
Enter the le name in the [File name] box.
• Number of characters for a le name: Up to 100 characters
• The maximum length of a le name that includes its path: Up to 255 characters