MR8740T_user_manual_eng_20191016H.pdf - 第59页
54 Conguring Measuring-Module-Specic Settings Conguring Model 8971 Current Unit settings > [Channel] > [8971] 4 1, 2 3 1 Conrm the output rate displayed in the [Mode] area. The instrument automatically recogniz…

53
Conguring Measuring-Module-Specic Settings
9
Click the [Level] box, and then from the list, choose a side of the threshold level to be
detected for pulse width measurement and duty ratio measurement.
Only when [Mode] is set to [Pulse width] or [Duty ratio], this setting is available.
High
Measures waveforms on the upper side of the threshold level.
Low Measures waveforms on the lower side of the threshold level.
10
Click the [Smoothing] box, and then choose a scaling setting from the list.
Only when [Mode] is set to [Freq] or [Revolution], this setting is available.
Off
Records measured data without smoothing (resulting in a step-like waveform).
On Interpolates measured data to smooth a waveform and outputs it.
(Upper limit: 10 kHz; outputting data with this setting set to on lags behind that with this
setting set to off)
11
Click the [Hold] box, and then choose a measured-value retaining setting from the list.
Only when [Mode] is set to [Freq] or [Revolution], this setting is available.
Off (1 Hz),
Off (0.5 Hz),
Off (0.2 Hz),
Off (0.1 Hz)
When the instrument does not determine the measured value even after the frequency
reaches a value in the brackets, the measurement is dened to stop and regards the
measured value to be 0 Hz (0 rpm).
On
Retains the value conrmed the last time.
12
Click [Close].
The setting dialog box closes.
3
Advanced Functions
54
Conguring Measuring-Module-Specic Settings
Conguring Model 8971 Current Unit settings
> [Channel] > [8971]
4
1, 2
3
1
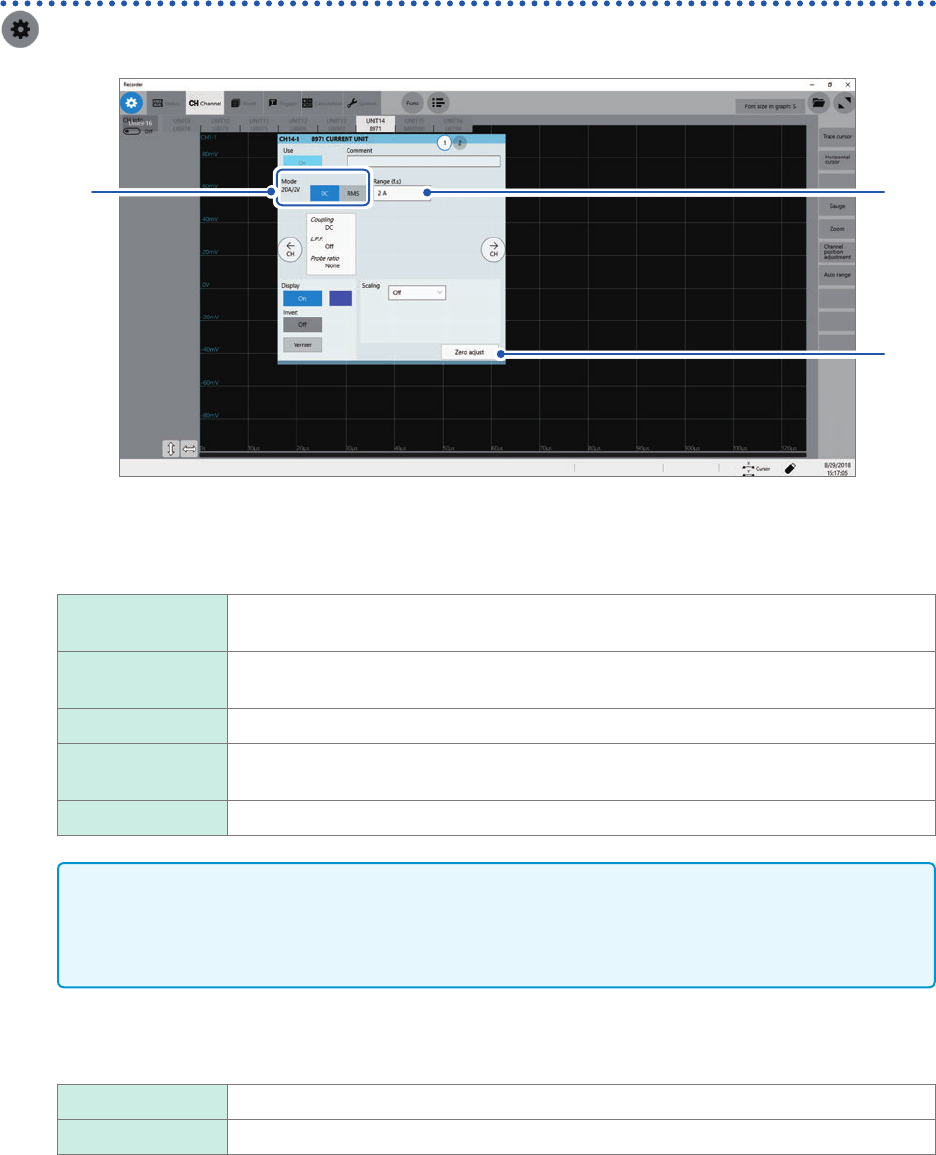
Conrm the output rate displayed in the [Mode] area.
The instrument automatically recognizes a current sensor connected to Model 8971 Current Unit and displays
it as follows:
20A/2V When one of the following current sensors is connected: Model 9272-10 (20 A range)
and Model CT6841.
200A/2V When one of the following current sensors is connected: Model 9272-10 (200 A range),
Model CT6843, and CT6863.
50A/2V When Model CT6862 AC/DC Current Sensor is connected
500A/2V When one of the following current sensors is connected: Models 9709, CT6844,
CT6845, CT6846*, and CT6865*.
None When no current sensor is connected.
IMPORTANT
*: When Model CT6846 or Model CT6865 connects to Model 8971 Current Unit via Model 9318
Conversion Cable, the instrument recognizes the sensor as a 500 A AC/DC sensor. Set the
conversion ratio at 2.00 in the scaling setting to obtain correct current values.
2
In the [Mode] area, click the [DC] or [RMS] to choose a measurement mode.
DC
For current measurement
RMS For RMS measurement
3
(When you have changed the measurement mode) Click [Zero adjust].
The instrument performs zero-adjustment. Execute zero-adjustment without any input.

55
Conguring Measuring-Module-Specic Settings
4
Click the [Range (f.s.)] box, and then choose a measurement range from the list.
IMPORTANT
The gure of each measurement range name represents the maximum current Model 8971 can
measure using the range. However, the instrument cannot measure currents that exceed the rated
current of a connected current sensor. Check the specications of the current sensor used.
3
Advanced Functions