MR8740T_user_manual_eng_20191016H.pdf - 第89页
84 Saving Data Automatically saving waveform data The instrument automatically saves data every time it has acquired the measured data with the recording length. Specify a save destination and items to be saved before st…
83
Saving Data
4.2 Saving Data
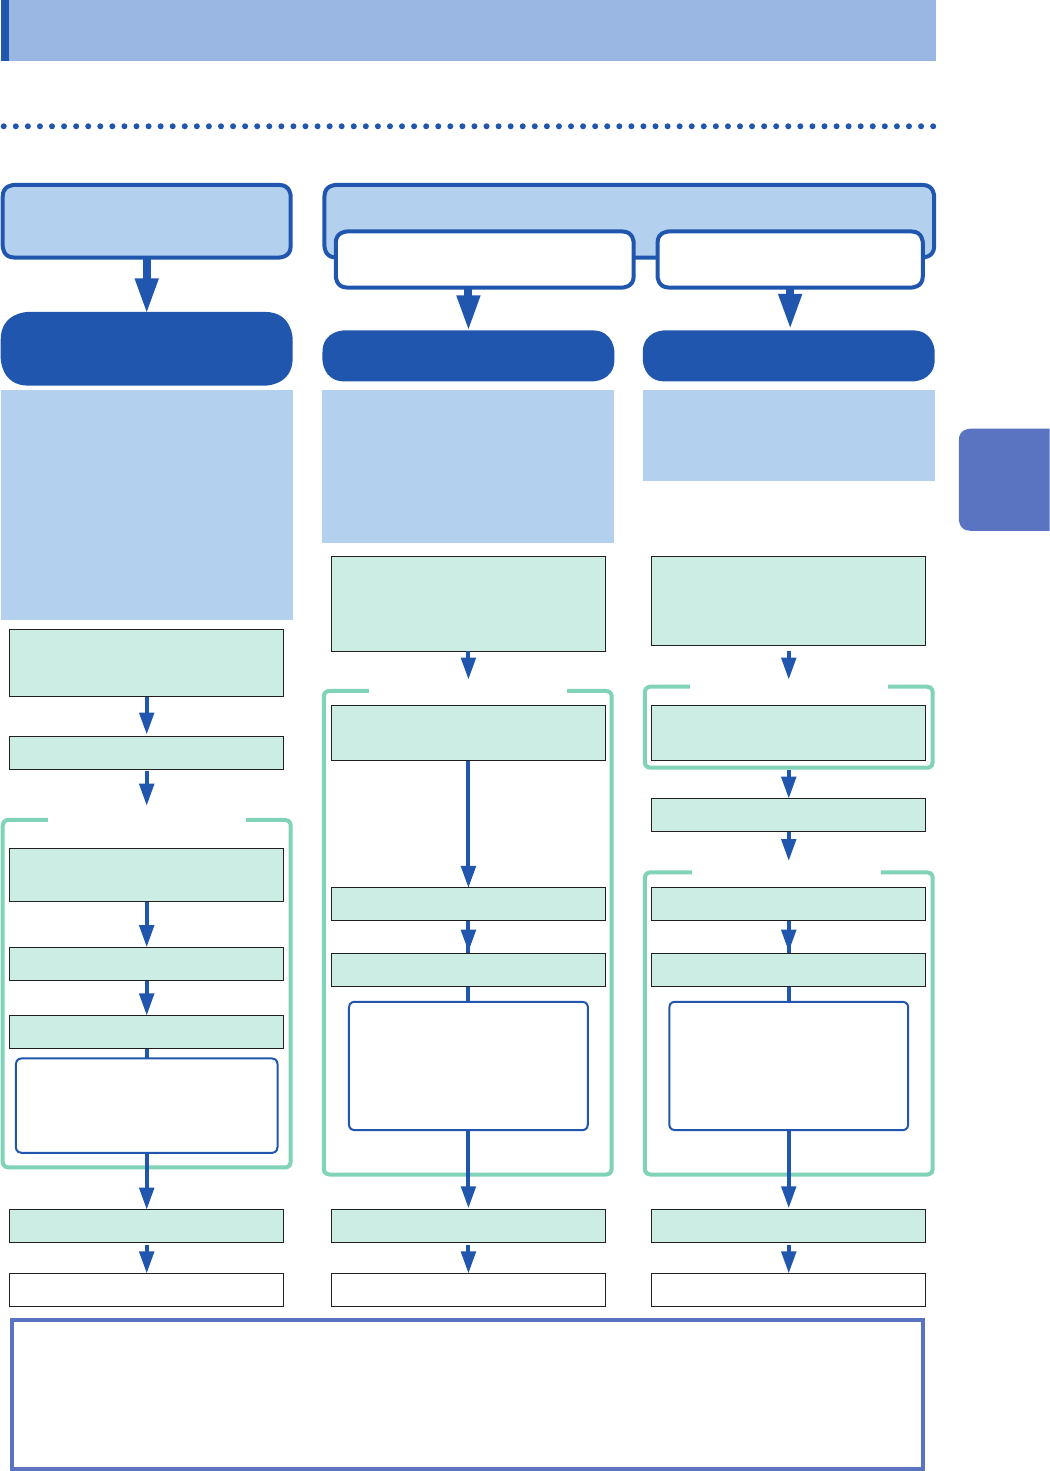
Saving types and setting procedure
Three ways are available to save data.
The [Save] screen The [Save] screen
Dialog box
To manually save data by clicking the save icon (p. 90)
To immediately save data
when you click the icon
To save data after
choosing items
Auto-save
Real-time save
Choose a destination to save
and a save type before starting a
measurement. (p. 84)
Auto-save:
The instrument automatically saves
data every time it has acquired the
measured data with the recording
length.
Real-time save:
Automatically saves data during
the measurement.
Set measurement conditions.
[Status] > [Save]
Measures waveforms.
Automatically saves data.
• Waveform data
• Numerical calculation result
(Auto-save only)
• Screenshot (Auto-save only)
Quick save
This function enables you to
repeatedly save waveforms and to
quickly save waveforms while you
are monitoring them. To save a le
immediately by clicking the save
icon, you need to specify the items
to be saved beforehand.
(p. 90)
After installation and
connection, turn on the
instrument.
Insert a storage device.
Choose a destination to save.
Click the save icon.
Saves data.
Data that can be saved:
• Waveform data
• Screenshot
• Numerical calculation result
• Setting
Selective save
(Default setting)
Clicking the save icon enables you
to specify data items, and then
saves the data.
After installation and
connection, turn on the
instrument.
Insert a storage device.
Assign [Select] to the save
icon.
Choose a destination to save.
Click the save icon.
Select [Execute].
Saves data.
Data that can be saved:
• Waveform data
• Screenshot
• Numerical calculation result
• Setting
Check the following before saving data:
• Have you already inserted and initialized a storage device?
Refer to “Formatting storage devices” in “2.5 Preparing Storage Devices (Recording Media)” in Quick Start
Manual.
• Is the save destination specied correctly?
• When the auto-save is used, is [Auto save settings] set to [On]?
Choose a save type.
Choose a save type. Choose a save type.
Assign [Select] to the save
icon.
Set the auto-save / real-time
save to [On].
After installation and
connection, turn on the
instrument.
To automatically save data
during measurement (p. 84)
Choose a destination to save.
4
Saving/Loading Data and Managing Files
84
Saving Data
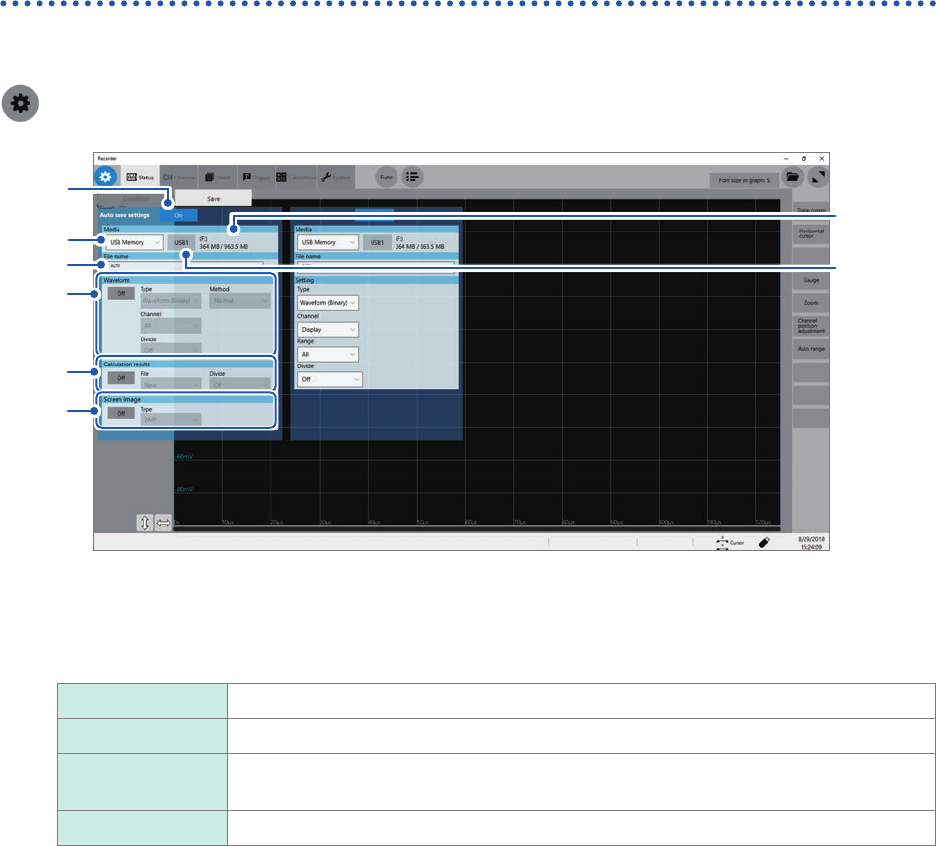
Automatically saving waveform data
The instrument automatically saves data every time it has acquired the measured data with the
recording length. Specify a save destination and items to be saved before starting a measurement.
> [Status] > [Save]
1
2
3
4
5
6
2
-(1)
2
-(2)
1
Click the [Auto save settings] button to set it to [On].
2
Click the [Media] box, and then choose a destination to save from the list.
SSD/HDD
Built-in SSD
USB ash drive USB ash drive
Mail Sends measured data to a computer in the network or to a remote computer as an
email attachment.
FTP transfer: Sends waveform data to a computer connected to your network.
(1) When you choose a save destination, the state of the storage device such as its drive letter and capacity
appears on the right of the [Media] box. If no storage device is inserted, the string [None] appears.
(2) When you choose [USB Memory] as the save destination, choose a USB ash drive you would like to use
as a save destination from among all attached USB ash drives.
• The [HIOKI_MR8740T] folder is automatically created in the specied save destination, and sub-folders are
automatically created in the folder according to the [Type] setting.
Waveform (Binary), Waveform (Text), Waveform (Float): WAVE
Setting: CONFIG
Numerical calculation result: MEASURE
Screenshot: PICT
When you choose [FTP], congure the LAN and FTP client function settings.
Refer to “Conguring the LAN settings with the instrument” (p. 182) and “11.3 Sending Data to a Computer
With the FTP Client Function” (p. 192).
• Use Model Z4006 USB Drive (Hioki’s option) for protecting data.
3
Enter the le name in the [File name] box.
• Number of characters for a le name: Up to 100 characters
• The maximum length of a le name that includes its path: Up to 255 characters

85
Saving Data
4
In the [Waveform] area, click [On] or [Off] to congure the waveform save setting.
Off
Does not save any waveforms.
On Saves waveforms.
Click the [Type] box, and then choose a save format of data from the list.
Waveform
(Binary)
Saves waveform data in binary format.
(Only data saved in binary format can be loaded onto the instrument)
Waveform (Text) Saves waveform data in text format.
(The instrument decimates the data and saves the remaining data as a le. The les
can be opened with editors and spreadsheet software installed in computers; however,
they cannot be loaded onto the instrument.)
Click the [Method] box, and then from the list, choose an action to be taken if the size of waveform
data to be saved exceeds the capacity of the storage device.
Normal
Stops the auto-save if the storage device is full.
Delete Deletes older les and continues the auto-save even when the storage device is full
(waveform les only).
The instrument deletes les only created after the measurement has started. It does
not delete previously existing les.
Click the [Channel] box, and then choose an option for channels to be saved.
All
Saves measured data of all channels.
The instrument also saves data acquired across channels with the waveform display
set to [Off].
Display Saves data acquired across channels with the waveform display set to [On] on all
sheets.
(When you choose [Waveform (Binary)] in the [Divide] box)
Click the [Divide] box, and then from the list, choose a size of each le.
Off
Saves a le without dividing it.
16 MB,
32 MB,
64 MB
Choose this option to divide a large le into several les and save them. A le is
divided into several les each of which has the specied size. The instrument creates
a folder with the specied name, divides a le into several les, and then saves them
in the folder.
The instrument automatically creates a folder, and then creates waveform les and an index le (extension:
.IDX) in the folder. Loading the IDX le allows the waveform les to be loaded in a batch.
(When you choose [Waveform (Text)] in the [Type] box)
Click the [Divide] box, and then from the list, choose an option for the number of lines of each le.
Off
Saves a le without dividing it.
60,000 data,
1,000,000 Data
Divides a le according to data points (row) you specify.
When using the memory division function, you cannot use the division save function.
4
Saving/Loading Data and Managing Files