CP43操作手册.pdf.pdf - 第104页
Chapter 4 Device Check Part 2 F2: MODE 1 In this mode the screen display will be like the one below wher e only the device positions that are used in the pr ogram actually appear on the screen. F3 MODE 2 In this mode the…
Chapter 4 Device CheckPart 2
4.3 Carrying Out Device Check
When device check is carried out the following operation screen displays.
The meaning of each item that displays is explained below.
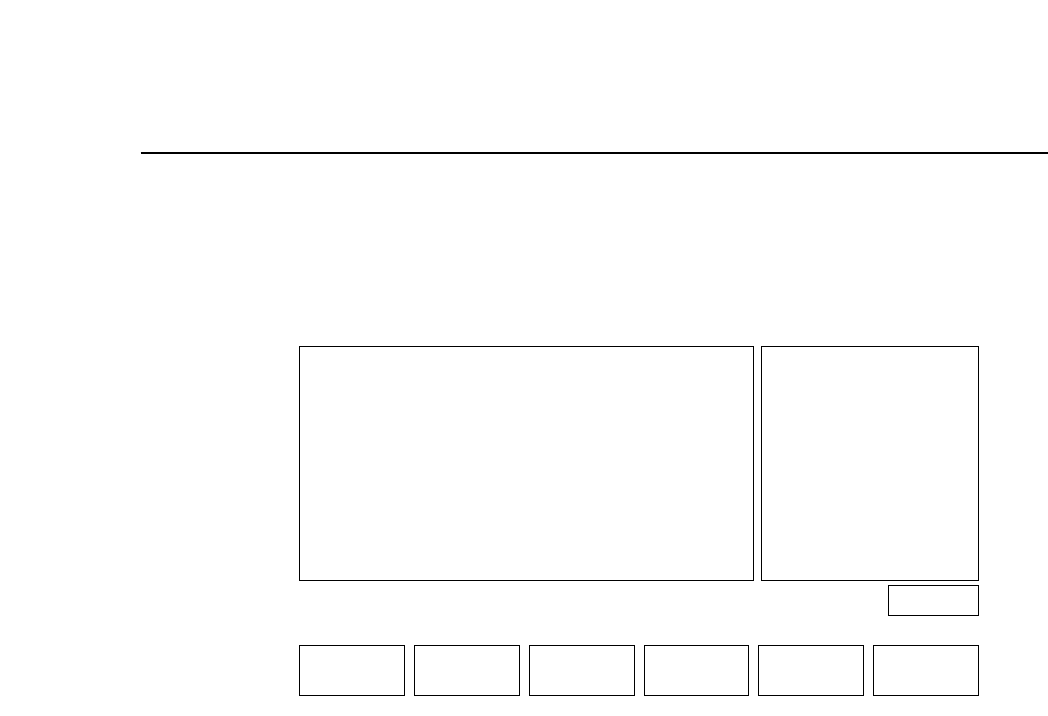
(a) Device number
(b) Status of parts
Un Set (yellow) : device has not yet been checked
OK (green) : device has been set
(blue) : device was used in previous program but is not
going to be used in the coming program.
Next D : next device is not yet set
Tape E (white) : end of tape detected
Parts E (red) : feeder is out of parts
Pickup (highlighted in yellow) : parts mispicked
Vision (purple) : vision processing error
(c) Number of parts used per board.
(d) Device comment
As shown in the above figure there are 3 types of display modes for
device check.
F1: MODE 0
In this mode the display screen will be the same as the one in the
figure above where 10 consecutive device positions display whether
the device position is used or not.
Page 451
MODE 1 MODE 2 MODE 3 RETURN
D001
D002
D003
D004
D005
D006
D007
D008
D009
D010
Un Set
Parts E
Vision
Tape E
Next_d
Pickup
[0013]
[0008]
[0002]
[0000]
[0001]
[0005]
[0007]
[0002]
[0003]
[0015]
Device_comment_No_1
Korewa_No_2Desu
PCPR1-2TL
MSD2HD256
Micro_Tr_No1
Super_Mini_Tr
Nihongonitute
N3456Sd23
Jaf
(a) (b) (c) (d)
2 – 35Version 5.0
FCP IV-3 Operation
Chapter 4 Device CheckPart 2
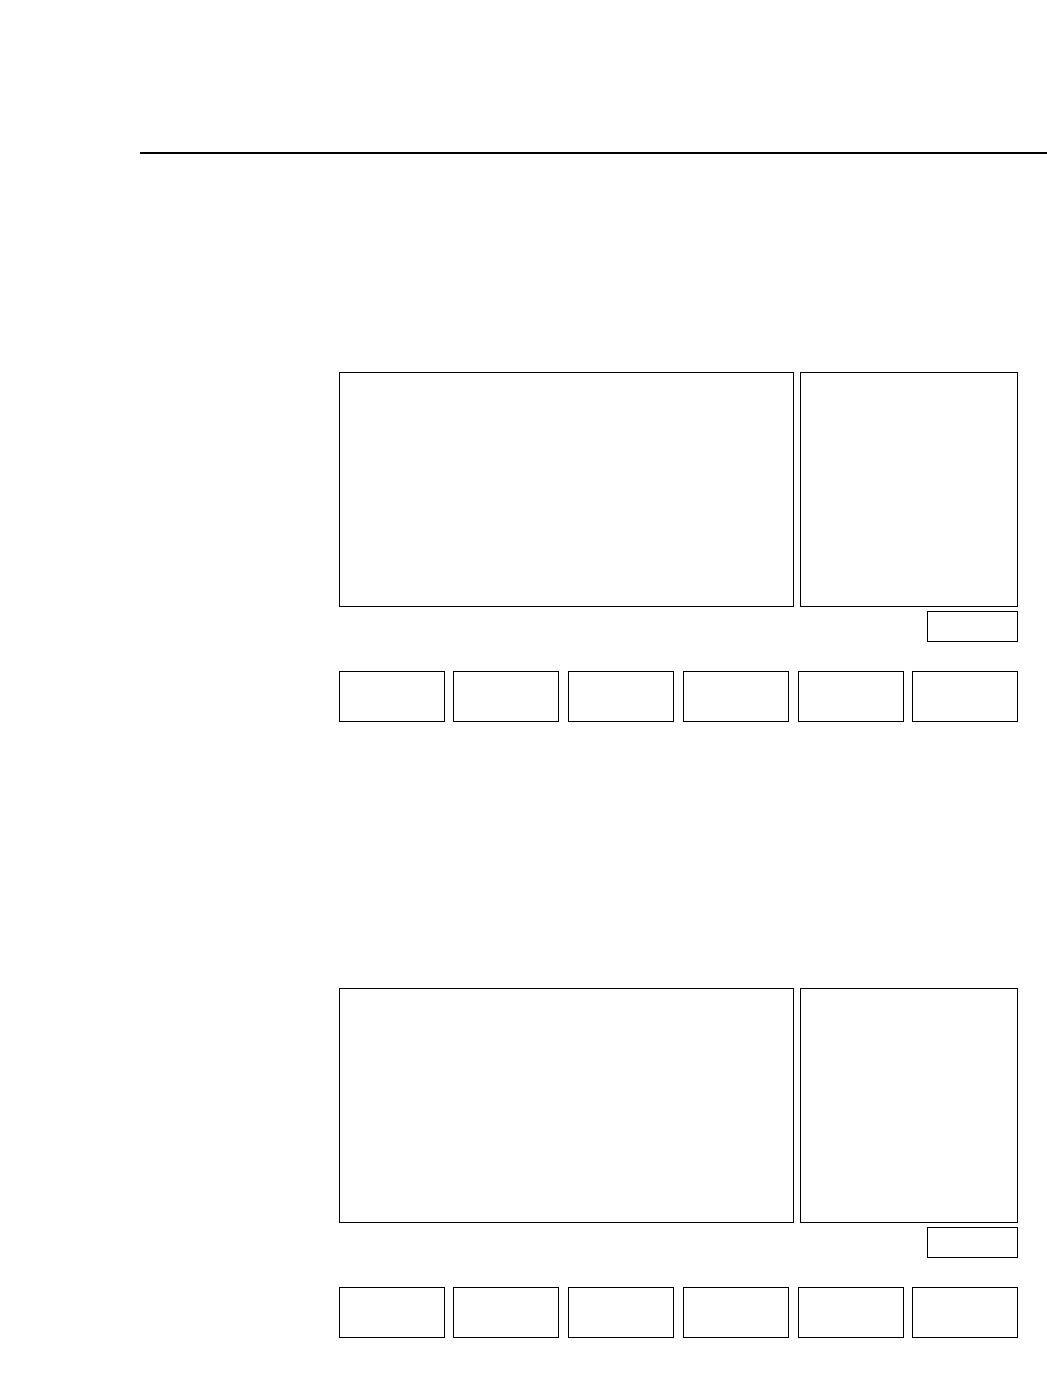
F2: MODE 1
In this mode the screen display will be like the one below where only
the device positions that are used in the program actually appear on
the screen.
F3 MODE 2
In this mode the display screen will be like the one shown below.
Among the device positions that are used in the program, only those
positions with a status condition such as Un Set, Parts E, Pickup,
Vision, etc. will actually display on the screen.
Page 451
+PAGE -PAGE ▲ RETURN
D001
D002
D005
D006
D007
D009
D015
Un Set
Parts E
Vision
Tape E
Next_d
Pickup
Un Set
[0013]
[0008]
[0005]
[0007]
[0002]
[0003]
[0023]
Device_comment_No_1
Korewa_No_2Desu
MSD2HD256
Micro_Tr_No1
Super_Mini_Tr
N3456Sd23
RECT3216060
▼ ESC
Page 451
+PAGE -PAGE ▲ RETURN
D001
D002
D003
D004
D005
D006
D007
D008
D009
D010
D015
Un Set
Parts E
Vision
Tape E
Next_d
Pickup
Un Set
[0013]
[0008]
[0002]
[0000]
[0001]
[0005]
[0007]
[0002]
[0003]
[0015]
[0023]
Device_comment_No_1
Korewa_No_2Desu
PCPR1-2TL
MSD2HD256
Micro_Tr_No1
Super_Mini_Tr
Nihongonitute
N3456Sd23
Jaf
RECT3216060
▼ ESC
2 – 36Version 5.0
FCP IV-3 Operation
Chapter 4 Device CheckPart 2
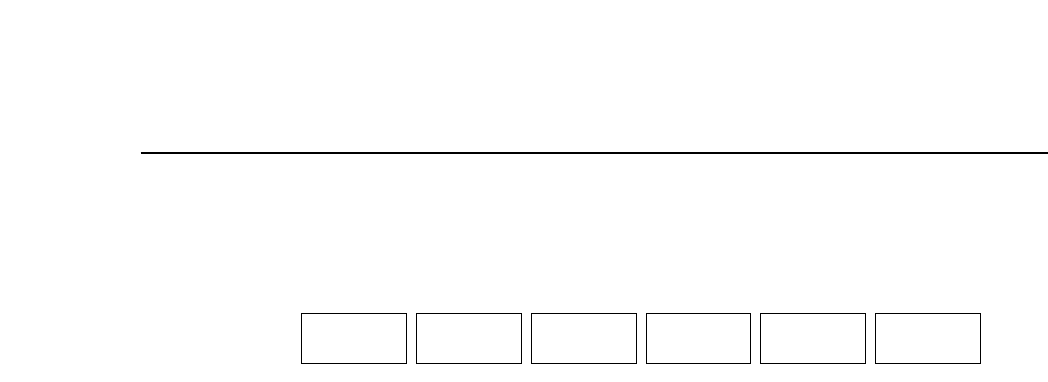
Function Key Menu
+PAGE : Press to display next screen
-PAGE : Press to display previous screen
▲ : Press to move cursor up one device
▼ : Press to move cursor down one device
ESC : Press to avoid checking all devices that have not been
checked yet. However, if Proper data item 74: ESC
Permission is not set to "Permit" this key cannot be
used.
Note: Even if ESC Permission is set to "Permit" this key cannot be used if
a "Parts out" device has been set.
The following methods can be used to register completion of device check.
(1) Move the cursor to the appropriate page using the function keys and
press the [CR] key.
(2) Input the device number.
example: device number 101
Input [1] [0] [1] and press the [CR] button to complete the check. The
color of the display will change to green. However, if the device
number being input is not displayed on the screen then only the
screen will change. Device check completion is not registered. The
device number must be input again and the [CR] key pressed to
register that the check has been completed.
(3) Press the [ESC] key.
This method allows the user to skip checking all devices that have not
been checked. However, if Proper data item 74: ESC Permission is
not set to "Permit" this key cannot be used.
+PAGE -PAGE ▲ RETURN▼ ESC
2 – 37Version 5.0
FCP IV-3 Operation