SIPLACE-SX4-DX4-用户手册.pdf - 第115页
Service Work 3.6.11 Replacing the Conv eyor Toothed Belt [03075565 -xx] Conveyor Service Manual SIPLACE SX4/DX4 115 ► Loosen the screw fastenin g the respective hexa gonal shaft and m ove this within the open ing in the …
Service Work
Conveyor 3.6.11 Replacing the Conveyor Toothed Belt [03075565-xx]
114 Service Manual SIPLACE SX4/DX4
3.6.11
3.6.11 Replacing the Conveyor Toothed Belt [03075565-xx]
Replacing the Conveyor Toothed Belt [03075565-xx]
Parts, equipment and tools
▪ Toothed belt Brecoflex 10 T5/2085 z=417 [03075565-xx]
Overview
Removal
► Use the software to move the conveyor sides into the position which allows you best access. As an
alternative, you can loosen the clamps for the relevant sides in dual conveyors.
► Switch off the machine, disconnect it from the power supply and secure it to prevent unauthorized
reactivation. Observe the instructions in section "1.2 Preparatory Work..." [ ➙ 12].
► Dismantle the clamping plate. Make sure that you do not lose the springs. (See "3.6.23 Replacing
the Clamping Plate [03081665-xx]" [ ➙ 132])
► Loosen the 3 screws fastening the belt guides and then remove the belt guide.
► Loosen the deflection pulley with slot.
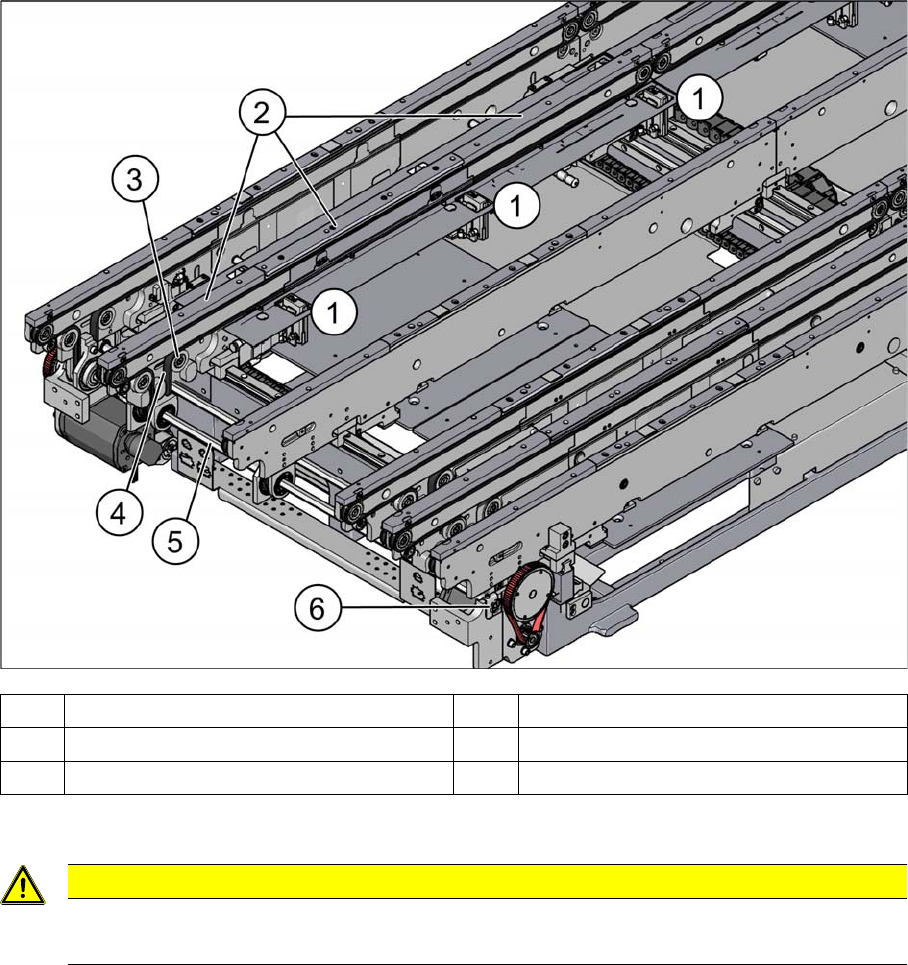
(1) Stopper (2) Belt guidance
(3) Deflection pulley with slot (4) Conveyor toothed belt (2x per side)
(5) Hexagonal shaft (6) Fixture for hexagonal shaft
CAUTION
Toothed belt
► Make sure that the toothed belt is not folded!

Service Work
3.6.11 Replacing the Conveyor Toothed Belt [03075565-xx] Conveyor
Service Manual SIPLACE SX4/DX4 115
► Loosen the screw fastening the respective hexagonal shaft and move this within the opening in the
machine frame.
► Unthread the toothed belt and take this out of the machine. You may need to move the sensor rail.
Installation
► Follow the removal instructions in reverse order for installation. Also observe the following instruc-
tions:
See also
3.6.1 Loosening the Conveyor Side Clamps [ ➙ 95]
3.6.20 Replacing the Stopper [03084034-xx] [ ➙ 125]
5.5.1.1 Setting the Conveyor Belt Tension [ ➙ 251]
CAUTION
Take care not to damage the cables.
There are cables run inside the machine frame.
► Make sure you do not damage these cables.
CAUTION
Installation instructions
► Make sure that the toothed belt is not folded or otherwise damaged!
► Pretension the toothed belt slightly, otherwise it might get caught when you fit the belt
guides and the clamping plate.
Service Work
Conveyor 3.6.12 Replacing the Width Adjustment Valve [03077072-xx]
116 Service Manual SIPLACE SX4/DX4
3.6.12
3.6.12 Replacing the Width Adjustment Valve [03077072-xx]
Replacing the Width Adjustment Valve [03077072-xx]
Parts, equipment and tools
▪ SMC valve assembly [03077072-xx]
Overview
Removal
► Use the software to move the conveyor sides into the position which allows you best access. As an
alternative, you can loosen the clamps for the relevant sides in dual conveyors.
► Switch off the machine, disconnect it from the power supply and secure it to prevent unauthorized
reactivation. Observe the instructions in section "1.2 Preparatory Work..." [ ➙ 12].
► Loosen the screws fastening the cover on the conveyor control at location 4 and remove this cover.
► Unplug the pneumatic and electrical connections for the relevant solenoid valve. You may want to
mark the positions, to make clear assignment easier later on.
► Remove the solenoid valve from the machine.
Installation
► Follow the removal instructions in reverse order for installation. Also observe the following instruc-
tions:
See also
3.6.1 Loosening the Conveyor Side Clamps [ ➙ 95]
3.6.1 Loosening the Conveyor Side Clamps [ ➙ 95]
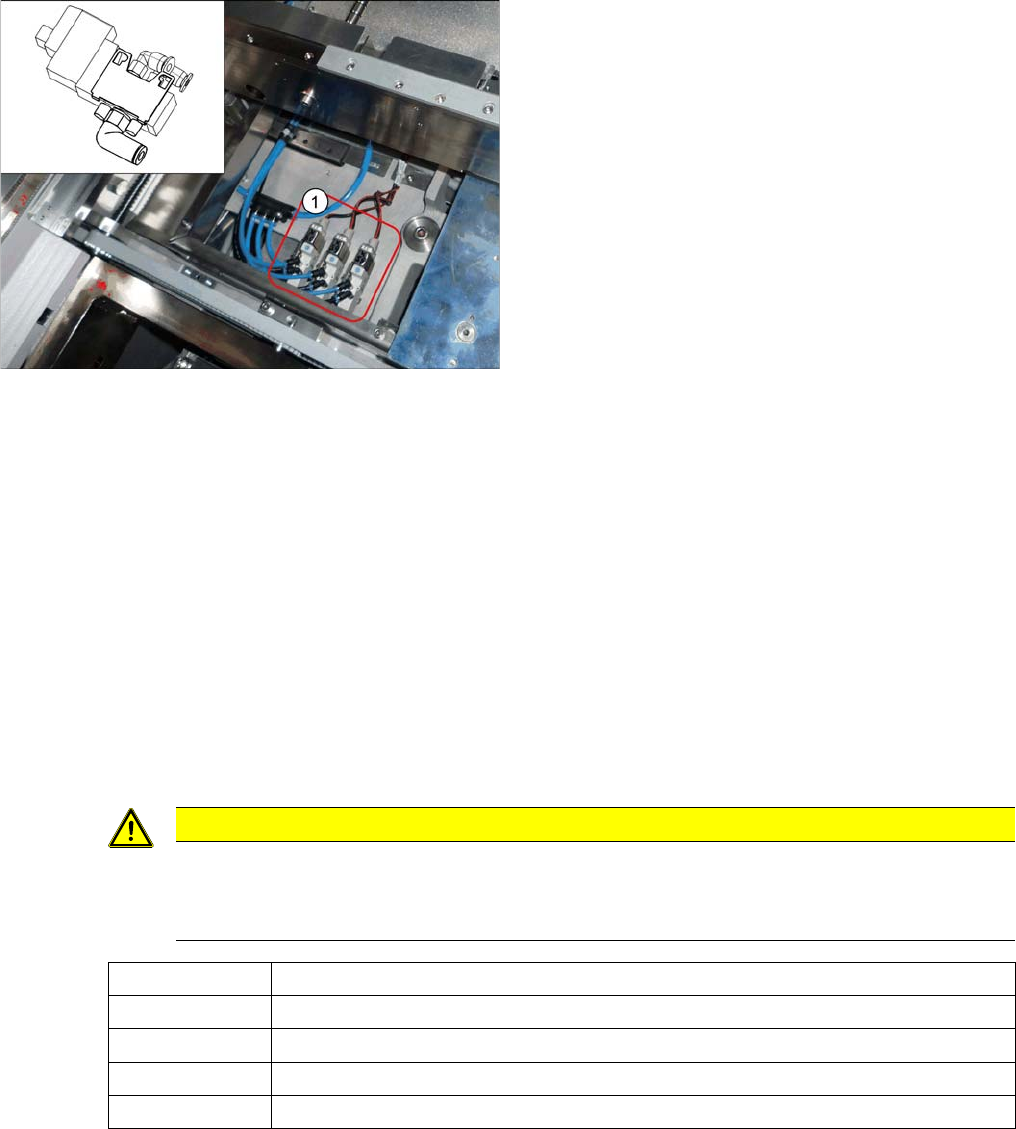
1. Solenoid valves.
The solenoid valves are located in placement area 1
(locations 4) next to the middle adjustment unit.
CAUTION
Installation instructions
► Replace any opened cable ties.
► Make sure that the connections are correct (see the following table).
Connection 1 Compressed air supply (L-quick release fastening QSML-M3-4)
Connection 2 "Move in cylinder" blue hose (L-quick release fastening QSML-M3-3)
Connection 3 Silencer U-M3
Connection 4 "Move out cylinder" black hose (L quick release fastening QSML-M3-3)
Connection 5 Silencer U-M3