SIPLACE-SX4-DX4-用户手册.pdf - 第45页
Service Work 3.2.9 Replacing the Main Switch 3LD2 [03040709- xx] Electrical System Service Manual SIPLACE SX4/DX4 45 3.2.9 3 . 2 . 9 R e p la c in g t h e M a in S w it c h 3 L D 2 [ 0 3 0 4 0 7 0 9 - x x ] Replacing the…
Service Work
Electrical System 3.2.8 Replacing the Line Filter (Z1) [03078386-xx]
44 Service Manual SIPLACE SX4/DX4
3.2.8
3.2.8 Replacing the Line Filter (Z1) [03078386-xx]
Replacing the Line Filter (Z1) [03078386-xx]
Parts, equipment and tools
▪ Line filter for 3-phase systems 36 A (Z1) [03078386-xx]
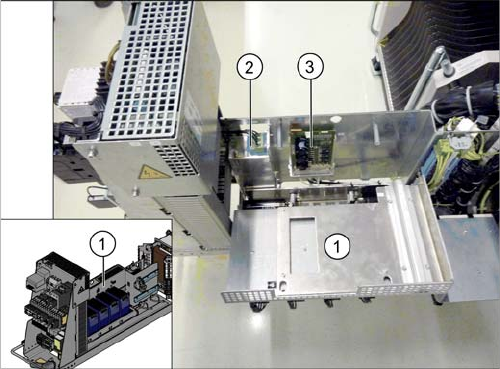
Overview
Removal
► Switch off the machine, disconnect it from the power supply and secure it to prevent unauthorized
reactivation. Observe the instructions in section "1.2 Preparatory Work..." [ ➙ 12].
► Loosen the screws fastening the cover and swing the cover towards the front. The pulsed power
packs are fitted to the cover. These are swung open together with the cover.
► Unplug all connections to the line filter. You may want to mark their positions, to make clear assign-
ment easier later on.
► Loosen the screws fastening the line filter and remove the line filter.
Installation
► Follow the removal instructions in reverse order for installation.
1. Cover
2. Line filter (Z1)
3. Load add circuit (A4)
Service Work
3.2.9 Replacing the Main Switch 3LD2 [03040709-xx] Electrical System
Service Manual SIPLACE SX4/DX4 45
3.2.9
3.2.9 Replacing the Main Switch 3LD2 [03040709-xx]
Replacing the Main Switch 3LD2 [03040709-xx]
Parts, equipment and tools
▪ Main switch 3LD2 with shaft length 85 mm [03040709-xx] (US version)
Overview
Removal
► Switch off the machine, disconnect it from the power supply and secure it to prevent unauthorized
reactivation. Observe the instructions in section "1.2 Preparatory Work..." [ ➙ 12].
Installation
► Follow the removal instructions in reverse order for installation. Also observe the following instruc-
tions:
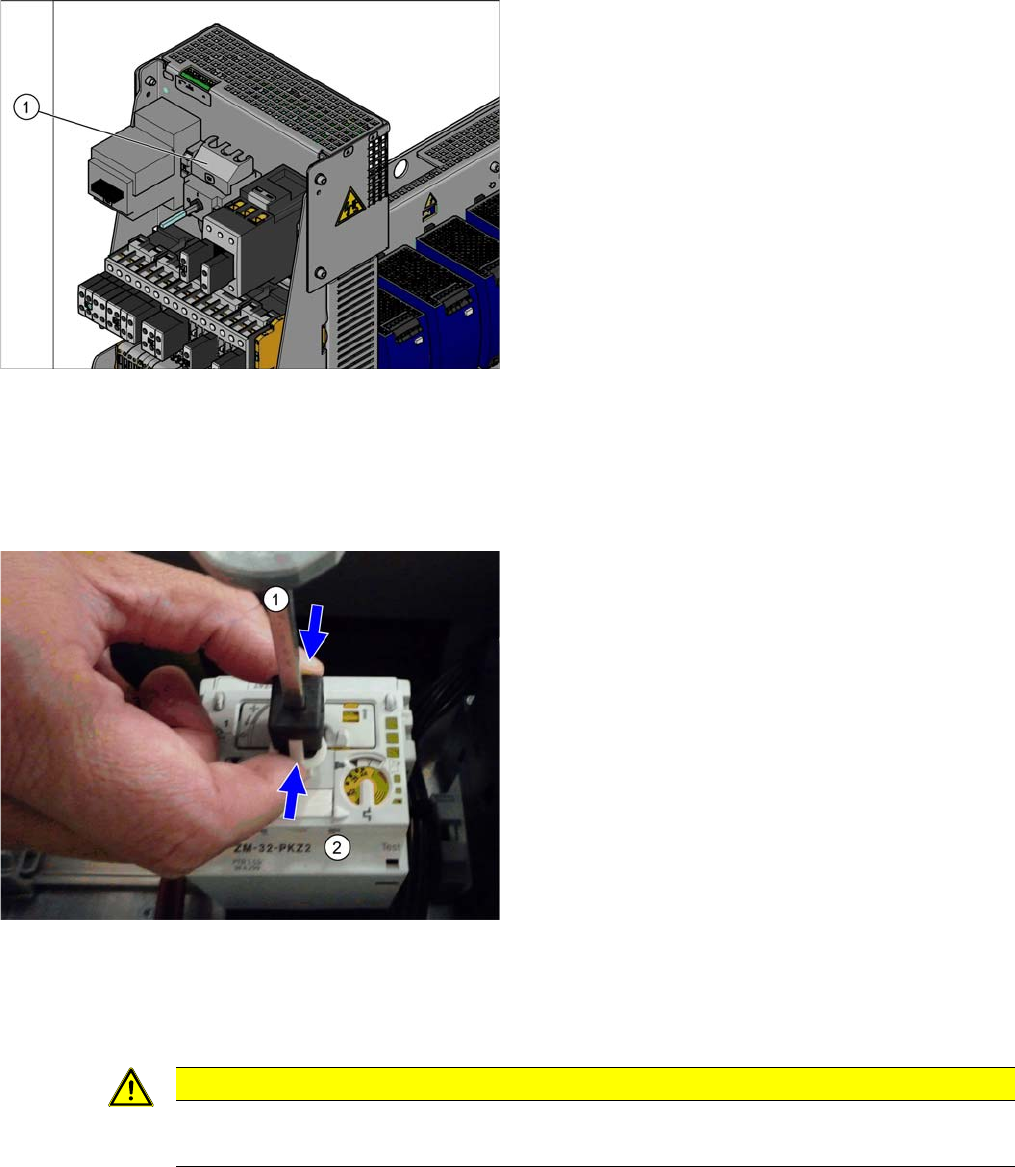
Main switch (using example of US version)
1. Main switch
► Unplug all connections to the main switch. You may
want to mark their positions, to make clear assign-
ment easier later on.
► Dismantle the shaft (1) on the main switch (2), by
pressing this together at the sides and pulling it off.
You will need to use this again on the new switch.
► Take the main switch off the rail.
CAUTION
Installation instructions
► Fit the shaft from the old switch onto the new switch.
Service Work
Electrical System 3.2.10 Replacing the Motor Circuit Breaker with Motor Protection Tripping Unit
46 Service Manual SIPLACE SX4/DX4
3.2.10
3.2.10 Replacing the Motor Circuit Breaker with Motor Protection Tripping Unit
Replacing the Motor Circuit Breaker with Motor Protection Tripping Unit
Overview
► Select the required chapter:
▪ "3.2.10.1 Replacing the Motor Circuit Breaker PKZ2 [00342494-xx]" [ ➙ 46]
▪ "3.2.10.2 Replacing the Motor Protection Tripping Unit (PKZ 2)" [ ➙ 48]
▪ "3.2.10.3 Replacing the Motor Circuit Breaker PKE32/XTU-32 [03098183-xx]" [ ➙ 50]
3.2.10.1
3.2.10.1 Replacing the Motor Circuit Breaker PKZ2 [00342494-xx]
Replacing the Motor Circuit Breaker PKZ2 [00342494-xx]
Parts, equipment and tools
▪ Motor circuit breaker PKZ2, basic device 3 pin. [00342494-xx]
A motor protection tripping unit belongs to this:
– Motor protection tripping unit ZM-32-PKZ2 (US version) [00342496-xx]
– Motor protection tripping unit ZM-16-PKZ2 (all except US) [00342495-xx]
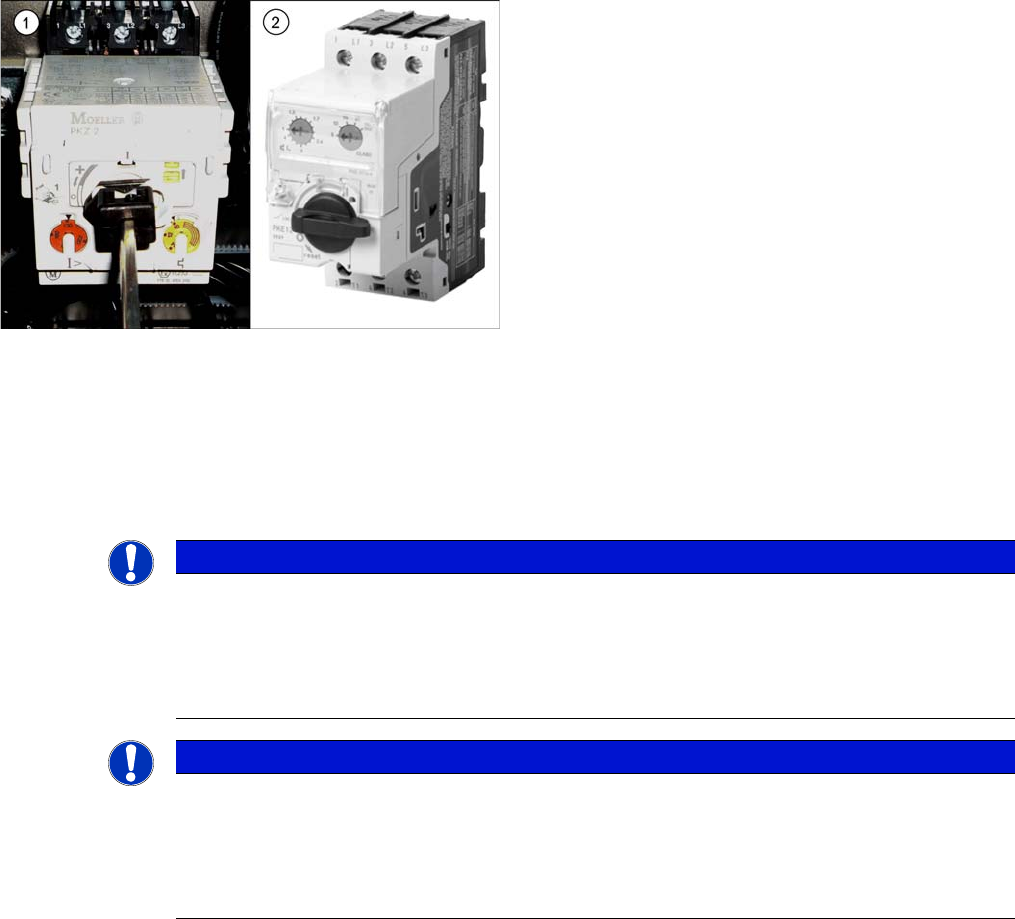
1. Motor circuit breaker – old version with motor protec-
tion tripping unit
2. Motor circuit breaker – new version without motor
protection tripping unit
NOTICE
Old version [00342494-xx]
This version of the motor circuit breaker is obsolete and may need to be replaced with the new
version "Motor circuit breaker PKE32/XTU-32 assembly 3-pin" [03098183-xx].
► Please also read section "3.2.10.3 Replacing the Motor Circuit Breaker PKE32/XTU-32
[03098183-xx]" [ ➙ 50].
NOTICE
Motor protection tripping unit
The corresponding motor protection tripping unit belongs to the motor circuit breaker.
► For details about replacing the motor protection tripping unit, refer to section "3.2.10.2 Re-
placing the Motor Protection Tripping Unit (PKZ 2)" [ ➙ 48]. Pay particular attention to the
correct settings.