EUKYX-199-2100_G5S2_Instruction_Vol2_E.pdf - 第278页
EUKYX 6-41 199-2100 7.3 "COMP RCG" T est Window 7 .3.2 "Sel. from CompDt" T ab Sheet When the [ Sel. from CompDt] tab is presse d in the "COMP R CG" test window , the fol lowin g tab shee t …
EUKYX
6-40199-2100
7.3 "COMP RCG" Test Window
[6] [Delete] Button
When this button is pressed, the component ID selected in [3] is deleted.
[7] [Add to Comp ID] Button
When this button is pressed, the test ID edited in [5] is registered in the component ID list.
[8] [Copy from Comp ID] Button
When this button is pressed, the component ID is copied and inserted in the Test ID list.
[9] [Fr.] Button
When this button is pressed, the component recognition test for the test ID selected in [3] is
performed.
Refer to “7.3.4 “Component Recognition Test Execution” Window” for the editing procedure.
Reference
EUKYX
6-41199-2100
7.3 "COMP RCG" Test Window
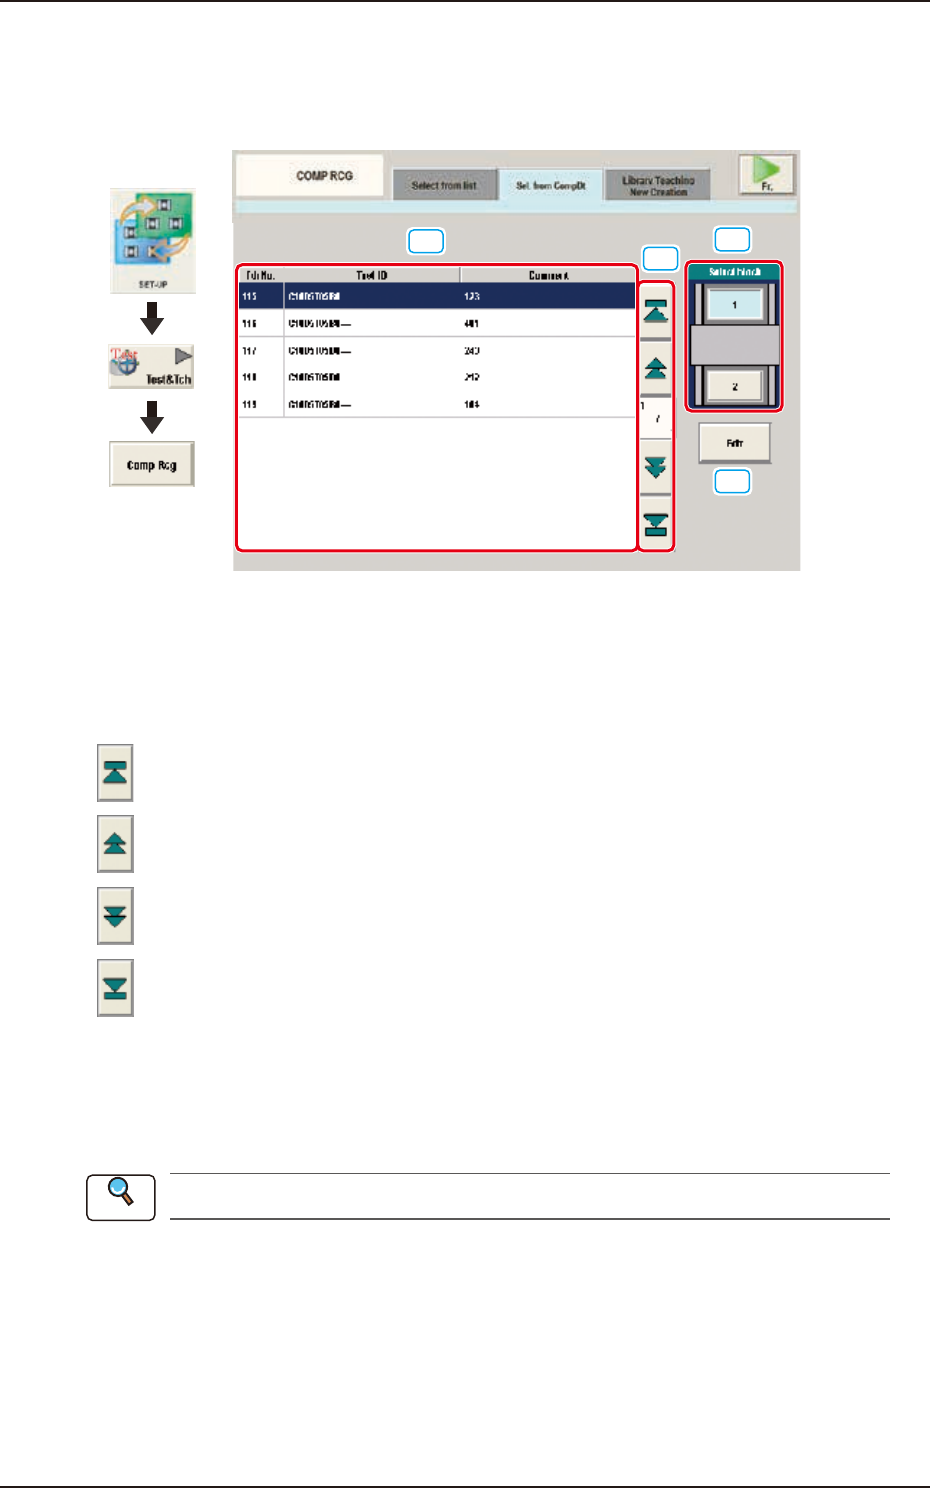
7.3.2 "Sel. from CompDt" Tab Sheet
When the [Sel. from CompDt] tab is pressed in the "COMP RCG" test window, the following tab
sheet appears.
[1]
[2]
[3]
[4]
Graphic
Development
F2F46
[1] Test ID Selection Tabs
The corresponding tab sheet enables the operator to display the test IDs registered for the block
selected in [3].
[2] Page Change Button
[
] Button : When pressed, the top page is displayed.
[
] Button : When pressed, the previous page is displayed.
[
] Button : When pressed, the next page is displayed.
[
] Button : When pressed, the last page is displayed.
[3] [Select block] Button
Using this button, the block is selected.
[4] [Edit] Button
When this button is pressed, the test ID selected in [1] is edited.
Refer to “Chapter 3 Component Library”, for the editing procedure.
Reference
EUKYX
6-42199-2100
7.3 "COMP RCG" Test Window
7.3.3 "Library Teaching New Creation" Tab Sheet
On this tab sheet, the initial data parameter entry is performed for the data to be created newly.
When the [Library Teaching New Creation] tab is pressed on the "COMP RCG" window, the
following tab sheet is displayed.
On this tab sheet, enter the parameters for "T" (Thickness), "t" (Thickness) and "Ut" (Thickness).
If this setting is not performed, the procedure does not go to the next step.
Refer to ”Volume 6 : Component Library” for the description of each item.
[1]
[2]
[4]
[5]
[6]
[3]
Graphic
Development
F2F47
[1] [Comp ID] Button
In this data box, enter the component ID to be created.
Enter the component ID. If this setting is not performed, the procedure does not go to the next
step.
[2] [Comment] Button
The comment for the component can be entered in this text box.
[3] Input Data Change Button
[Shape Data]:
The shape data entry window is displayed.
[Control Data]:
The control data entry window is displayed.
[Carrier Data]:
The carrier data entry window is displayed.
[4] [Fr.] Button
When this button is pressed, the component recognition test window for the Test & Teaching
operation is transferred.
Refer to “7.3.4 “Component Recognition Test Execution” Window” for the “COMP RCG”
window for the Test & Teaching operation.
[5] [Return] Button:
When this button is pressed, the “COMP RCG” test window is returned.
[6] Shape Data Entry Window:
In this window, enter the shape data.
Note
Reference
Note
Reference