EUKYX-199-2100_G5S2_Instruction_Vol2_E.pdf - 第283页
EUKYX 6-46 199-2100 7.3 "COMP RCG" T est Window [ 3] Recognition Displa y Se ction The recogniti on resul ts are disp la yed in thi s pane. [ 4] Ope ration But t ons (First P age) Pick -up mode F eeder : Thi s …
EUKYX
6-45199-2100
7.3 "COMP RCG" Test Window
[
] Button : Image Reduction Mode
After changing to the image reduction mode using the [
] button (the shape of the pointer is
changed to
) when the image to be reduced is touched, or the left button of the mouse is clicked
on the image, the image is reduced from the pointer position as the center.
When the image is to be reduced with its position fixed, place the pointer on the center of the
image before the reduction operation.
[
] Button : Image Movement Mode
After changing to the image movement mode using the [
] button (the shape of the pointer is
changed to
mark), drag the image to be moved (with the left button on the mouse pressed).
[
] Button : Image Real-Size Display Mode (Captured image is displayed in real-size.)
After changing to the image real-size display mode using the [
] button (the shape of the pointer
is changed to
), when the image to be displayed in real-size is touched, or the left button of the
mouse is clicked on the image, the image is displayed in real-size from the pointer position as the
center. When the image is to be displayed in real-size with its position fixed, place the pointer on
the center of the image before the image real-size display operation.
[
] Button : Image Fitting Mode (the image is displayed fully using the recognition image
display domain.)
After changing to the image fitting mode using the [
] button (the shape of the pointer is
changed to
), when the image to be fit is touched, or the left button of the mouse is clicked on
the image, the image is displayed fully using the recognition image display domain, from the pointer
position as the center. When the image is to be displayed in the image fitting mode with its position
fixed, place the pointer on the center of the image before the image fitting operation.
[
] button :
Using this button, the image displayed within the display domain on the Recognition Window can
be moved to the position where the image is to be displayed.
[
] button :
When selected, this button displays a crosshair indicates the center of the camera.
EUKYX
6-46199-2100
7.3 "COMP RCG" Test Window
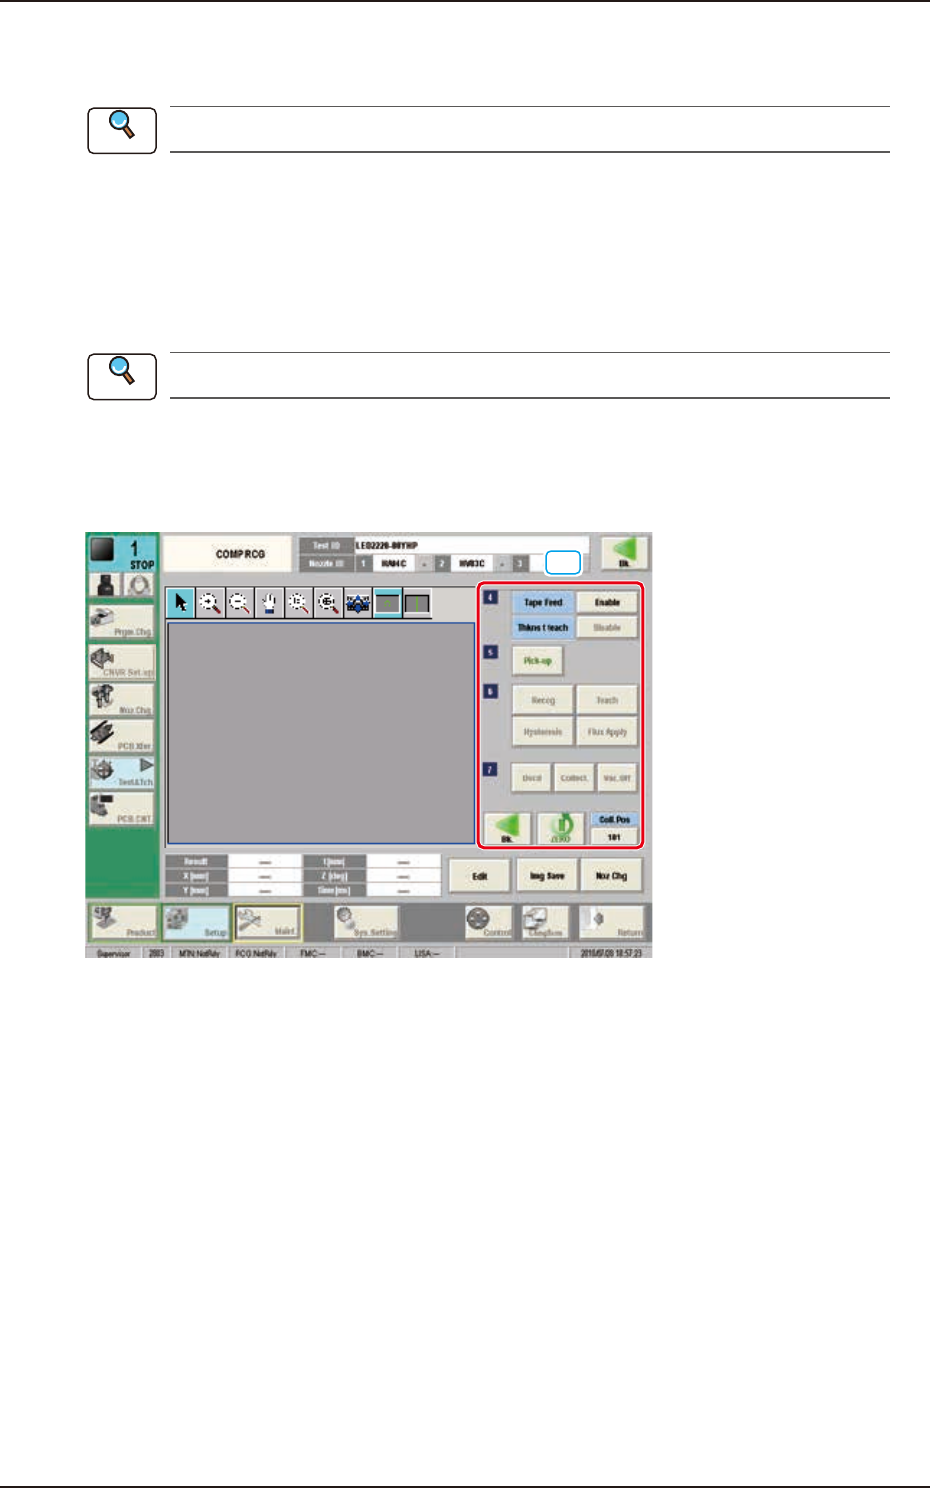
[3] Recognition Display Section
The recognition results are displayed in this pane.
[4] Operation Buttons (First Page)
Pick-up mode
Feeder :
This mode is selected when the component is picked up from each feeder automatically and
the test is performed.
Mnl. :
This mode is selected when the component is attached to the nozzle manually and the test is
performed. When the [Fr.] button is pressed, the head on the XY beam specified using the
"Head Sel" button, is moved to the center position (home position) and the nozzle of which
No. has been specified in "Noz select" button, is moved (turned) to this side.
Feeder No.
Using this button, the feeder to be used to pick-up the test component is selected. When this
button is pressed, the window to enter feeder No. appears.
Fdr P-u Tch
Press this button and then press the [START] button within 10 seconds. The pickup position
teaching is performed for specified feeder.
Refer to “7.1.1 Fdr Pick- up Tch”, for pickup position teaching.
Head Sel
Pressing this button selects the head that component recognition test is performed.
Select camera
Pressing this button selects the camera that component recognition test is performed.
Noz select
Using this button, the nozzle to be used for the recognition test is selected. When this button
is pressed, the "Nozzle No." selection window appears.
[Fr.] Button
When this button is pressed, the next page appears.
[5] Test Result
When this button is pressed, the component recognition test results are displayed.
Reference
EUKYX
6-47199-2100
7.3 "COMP RCG" Test Window
[6] [Edit] Button
When this button is pressed, the test ID selected in [1] is edited.
Refer to “Chapter 3 Component Library”, for the editing procedure.
[Img Save] Button
When this button is pressed, the "Img Save" window appears.
This window is used to save the test results.
[Noz Chg] Button
When this button is pressed, the "NOZ.CHG." window appears.
Refer to “5. “NOZ.CHG.” Window” for the details of the "NOZ.CHG." window.
[7] [Bk.] Button
When this button is pressed, the "COMP RCG" test window is returned.
[8] Operation Buttons (Second Page)
[10]
F2F54
■
Tape Feed
[Enable] Button : When this button is pressed, the tape is fed when the test component is
picked up from the feeder.
[Disable] Button
: When this button is pressed, the tape is not fed when the test component
is picked up from the feeder.
■
Thkns t teach
[Enable] Button : When this button is pressed, the component thickness teaching is
performed.
[Disable] Button
: When this button is pressed, the component thickness teaching is not
performed.
Reference
Reference