YesAX V3.1.2 - Software User Manual.pdf - 第49页
Inspection and De fect Revie w Step by S tep 5-3 La ser Height Profile This option is only available for X3 AXI system. If enabled, the laser height profile will run first before any 3D inspection and update the slice of…
5-2 Inspection and Defect Review Step by Step
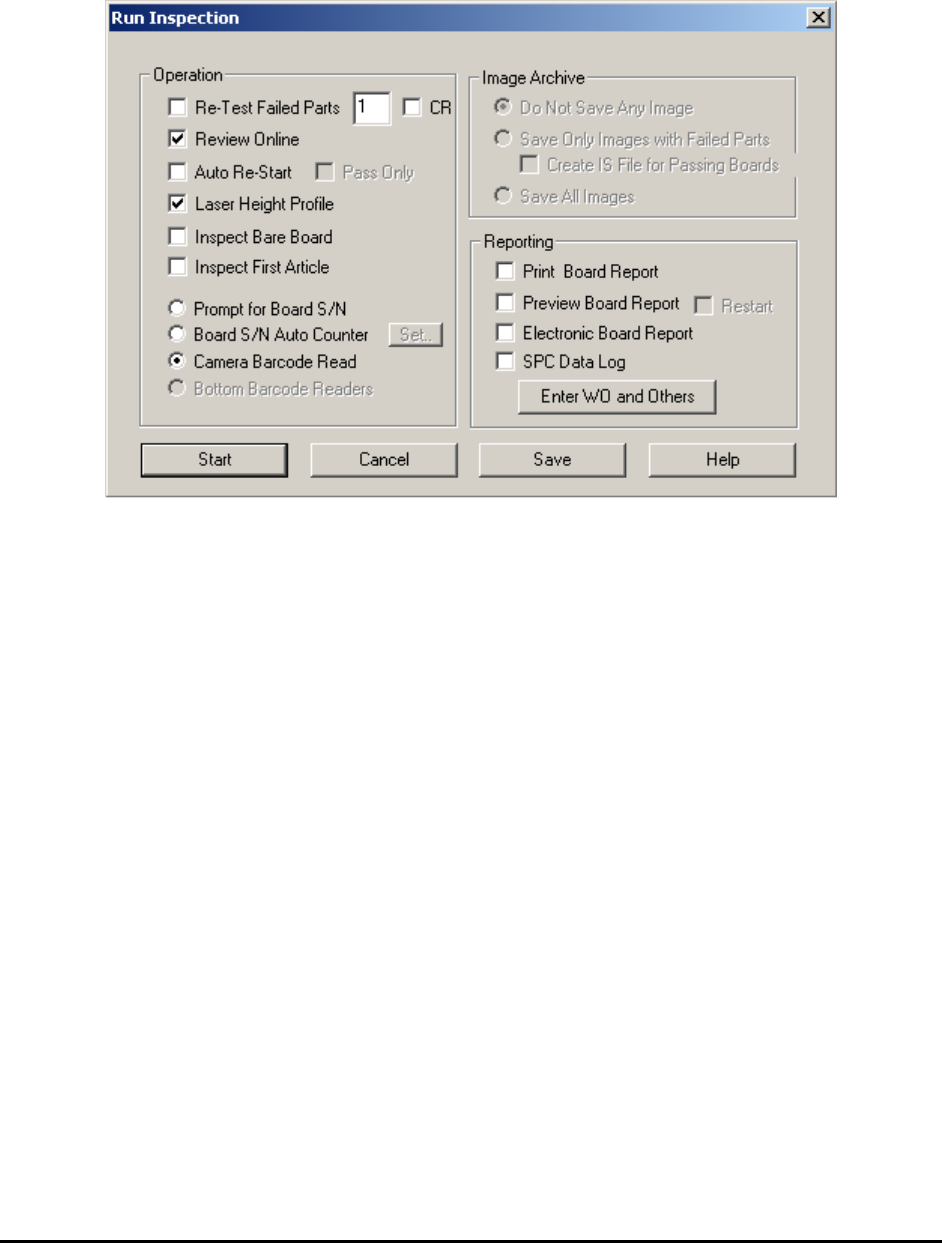
5.2 Step2: Run the Inspection
To run the inspection, click the Run Recipe button. The Run Inspection dialog opens. In this
dialog the user can set various options for the inspection process.
The options in this dialog are arranged in three groups; Operation, Image Archive and
Reporting.
In the Operation group there are nine checkboxes and five radio buttons.
Re-Test Failed Parts
Enable or Disable the Re-Test feature. The re-testing of failed parts reduces the false call rate.
The number defines the re-test criteria. For example if a 3 is entered the system will retest
any frame having 3 or more failures. The default number is 1; re-test every failure.
CR
Perform a Center Retest. Any failure found during the run will be moved under the crosshairs,
and retested.
Review Online
Select online or offline review. If online review is not selected user must select one of the
save image options in the Image Archive to allow offline review.
Auto Re-Start
If enabled, this feature will repeat the inspection step for the next board without the user
pressing the Next button in the Result dialog.
Pass Only
This option is only available when the Auto Re-Start option is selected. If enabled, Auto Re-
start is only active when the board being inspected has passed the inspection.
Inspection and Defect Review Step by Step 5-3
Laser Height Profile
This option is only available for X3 AXI system. If enabled, the laser height profile will run
first before any 3D inspection and update the slice offset of each 3D site. The Fast option is
available for early version YTX-X3 with non-PGR side cameras. If enabled, the laser height
inspection will be performed in a faster speed.
Inspect First Article
If enabled, the inspection will run under first article inspection mode. For details regarding
first article inspection, please refer to 0 For inspection programs use multiple layers, it will
be convenient to click layer buttons inside toolbar so that switching between different layers
is easy. To turn on the feature, close YesAX software first then edit the YesAX.ini file and
change:
[MainFrame]
..
ShowLayerButtons=1
..
Open YesAX software again the three layer buttons will show up in toolbar.
Reducing Inspection and Review Time for Non First Article Inspection.
Inspect Bare Board
If enabled, this feature indicates to the machine that a bare board is placed in the machine and
the machine will perform a bare board test for the inspection recipe. With the bare board test
all “marks” and “solder” inspection boxes are supposed to fail. In the review process for bare
boards, this system reviews “marks” and “solder” inspection boxes that passed.
The five radial buttons in the operation group are used to select how the boards are tracked.
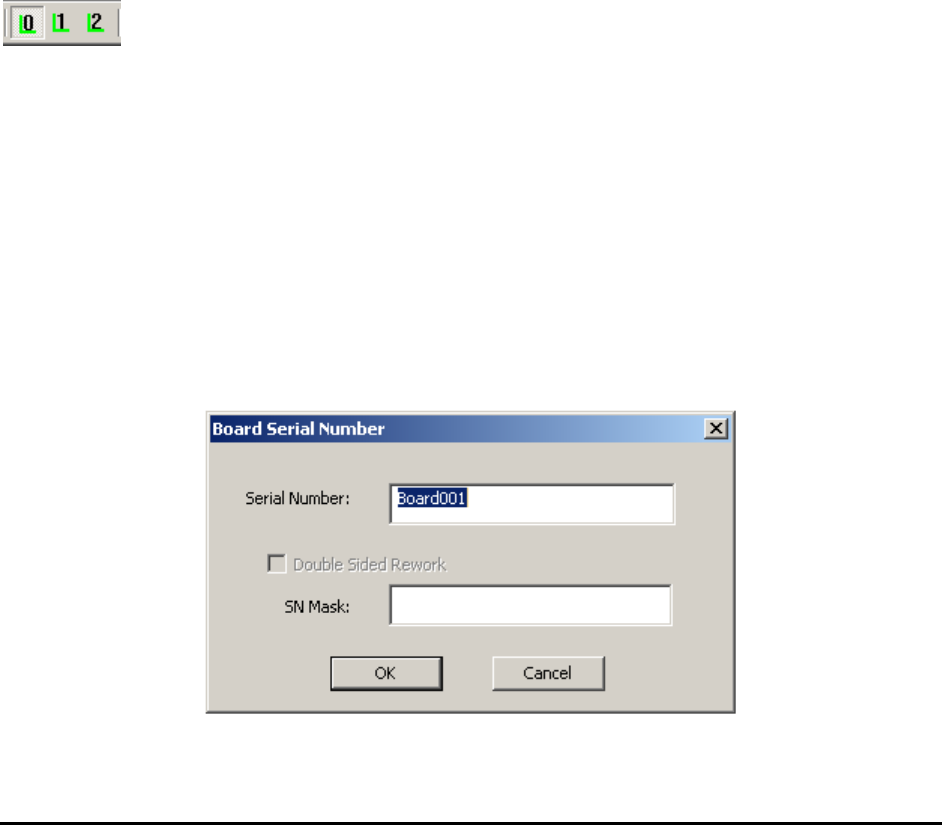
Prompt for S/N
Before inspection software will prompt the user for the board’s serial number with the Board
Serial Number dialog.
5-4 Inspection and Defect Review Step by Step
This is the appropriate selection when using a hand held barcode reader since it generates an
output via the keyboard interface. If the serial number of the board follows certain pattern
user can setup a SN Mask to verify that pattern. For example if the serial number must
always starts with AF and follows by 4 digits. Then a mask of “AF????” can be use to ensure
correct number is entered.
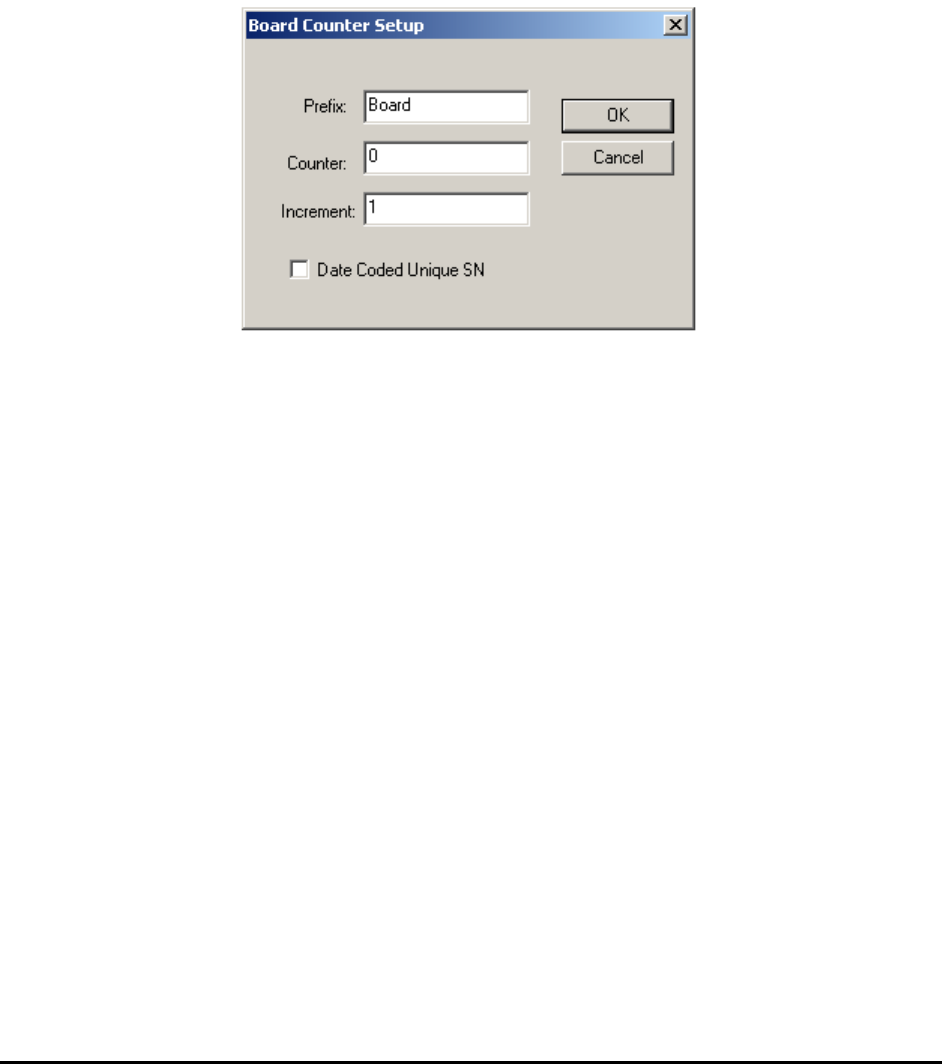
Board S/N Auto Counter
The software will automatically generate a serial number for the board. You can instruct the
software to compose the serial number by pressing the Set Button. The Set Button brings up
the Board Counter Setup dialog.
The software will generate the next serial number: Board001
The Data Coded Unique SN checkbox enables a feature for the software to generate serial
number base on the date. The number generated will be unique and non-repeating for all the
boards inspected on the AXI machine. If there are more than one AXI machine in the same
facility user should use the Prefix field to identify individual machine.
Camera Barcode Read
With this option selected the system will use one of the cameras to read the barcode from the
board. The recipe needs to have the part with Reference ID “BARCODE” in the part list.
Bottom Barcode Reader
This selection will enable if the optional bottom side barcode reader is installed. When this
item is selected the software will get the board’s SN using the bottom barcode reader. Refer
to section 18.3 for this optional accessory.
Upstream Barcode Reader
This option can be used when the upstream conveyor has a barcode scanner attached to it.
The board SN will be scanned before entering the machine. This option is disabled unless the
upstream barcode reader option is enabled and parameters are setup in the system option
dialog.
In the Image Archive group there are 3 radio buttons and 1 checkbox.
Do Not Save Any Images